# Authorize Airtable
Source: https://docs.klavis.ai/api-reference/airtable-oauth/authorize-airtable
get /oauth/airtable/authorize
Start Airtable OAuth flow
Parameters:
- instance_id: Identifier for the instance requesting authorization
- client_id: Optional client ID for white labeling
- scope: Optional scopes to request (space-separated)
- redirect_url: Optional URL to redirect to after authorization completes
# Authorize Asana
Source: https://docs.klavis.ai/api-reference/asana-oauth/authorize-asana
get /oauth/asana/authorize
Start Asana OAuth flow
Parameters:
- instance_id: Identifier for the instance requesting authorization
- client_id: Optional client ID for white labeling
- scope: Optional scopes to request (comma-separated)
- redirect_url: Optional URL to redirect to after authorization completes
# Authorize Attio
Source: https://docs.klavis.ai/api-reference/attio-oauth/authorize-attio
get /oauth/attio/authorize
Start Attio OAuth flow
Parameters:
- instance_id: Identifier for the instance requesting authorization
- client_id: Optional client ID for white labeling
- redirect_url: Optional URL to redirect to after authorization completes
# Authorize Close
Source: https://docs.klavis.ai/api-reference/close-oauth/authorize-close
get /oauth/close/authorize
Start Close OAuth flow
Parameters:
- instance_id: Identifier for the instance requesting authorization
- client_id: Optional client ID for white labeling
- scope: Optional scopes to request (comma-separated)
- redirect_url: Optional URL to redirect to after authorization completes
# Authorize Confluence
Source: https://docs.klavis.ai/api-reference/confluence-oauth/authorize-confluence
get /oauth/confluence/authorize
Start Confluence OAuth flow
Parameters:
- instance_id: Identifier for the instance requesting authorization
- client_id: Optional client ID for white labeling
- scope: Optional scopes to request (comma-separated)
- redirect_url: Optional URL to redirect to after authorization completes
# Authorize Github
Source: https://docs.klavis.ai/api-reference/github-oauth/authorize-github
get /oauth/github/authorize
Start GitHub OAuth flow
Parameters:
- instance_id: Identifier for the instance requesting authorization
- client_id: Optional client ID for white labeling
- scope: Optional scopes to request (comma-separated)
- redirect_url: Optional URL to redirect to after authorization completes
# Authorize Gmail
Source: https://docs.klavis.ai/api-reference/gmail-oauth/authorize-gmail
get /oauth/gmail/authorize
Start Gmail OAuth flow
Parameters:
- instance_id: Identifier for the instance requesting authorization
- client_id: Optional client ID for white labeling
- scope: Optional scopes to request (comma-separated)
- redirect_url: Optional URL to redirect to after authorization completes
# Authorize Gcalendar
Source: https://docs.klavis.ai/api-reference/google-calendar-oauth/authorize-google-calendar
get /oauth/gcalendar/authorize
Start Google Calendar OAuth flow
Parameters:
- instance_id: Identifier for the instance requesting authorization
- client_id: Optional client ID for white labeling
- scope: Optional scopes to request (comma-separated)
- redirect_url: Optional URL to redirect to after authorization completes
# Authorize Gdocs
Source: https://docs.klavis.ai/api-reference/google-docs-oauth/authorize-google-docs
get /oauth/gdocs/authorize
Start Google Docs OAuth flow
Parameters:
- instance_id: Identifier for the instance requesting authorization
- client_id: Optional client ID for white labeling
- scope: Optional scopes to request (comma-separated)
- redirect_url: Optional URL to redirect to after authorization completes
# Authorize Gdrive
Source: https://docs.klavis.ai/api-reference/google-drive-oauth/authorize-google-drive
get /oauth/gdrive/authorize
Start Google Drive OAuth flow
Parameters:
- instance_id: Identifier for the instance requesting authorization
- client_id: Optional client ID for white labeling
- scope: Optional scopes to request (comma-separated)
- redirect_url: Optional URL to redirect to after authorization completes
# Authorize Gsheets
Source: https://docs.klavis.ai/api-reference/google-sheets-oauth/authorize-google-sheets
get /oauth/gsheets/authorize
Start Google Sheets OAuth flow
Parameters:
- instance_id: Identifier for the instance requesting authorization
- client_id: Optional client ID for white labeling
- scope: Optional scopes to request (comma-separated)
- redirect_url: Optional URL to redirect to after authorization completes
# Introduction
Source: https://docs.klavis.ai/api-reference/introduction
Klavis provides API for developers to integrate MCP to your AI application.
## Base URL
The Klavis API is built on REST principles. We enforce HTTPS in every request to improve data security, integrity, and privacy. The API does not support HTTP.
All requests contain the following base URL:
```bash
https://api.klavis.ai
```
## Authentication
To authenticate you need to add an Authorization header with the contents of the header being Bearer key\_123456789 where key\_123456789 is your API Key.
```bash
Authorization: Bearer key_123456789
```
## Response codes
Klavis uses standard HTTP codes to indicate the success or failure of your requests.
In general, 2xx HTTP codes correspond to success, 4xx codes are for user-related failures, and 5xx codes are for infrastructure issues.
| Status | Description |
| ------ | --------------------------------------- |
| 200 | Successful request. |
| 400 | Check that the parameters were correct. |
| 401 | The API key used was missing. |
| 403 | The API key used was invalid. |
| 404 | The resource was not found. |
| 429 | The rate limit was exceeded. |
| 5xx | Indicates an error with Klavis servers. |
Check Error Codes for a comprehensive breakdown of all possible API errors.
## Rate limit
The default maximum rate limit is 2 requests per second. This number can be increased for trusted senders by request. After that, you'll hit the rate limit and receive a 429 response error code.
# Authorize Jira
Source: https://docs.klavis.ai/api-reference/jira-oauth/authorize-jira
get /oauth/jira/authorize
Start Jira OAuth flow
Parameters:
- instance_id: Identifier for the instance requesting authorization
- client_id: Optional client ID for white labeling
- scope: Optional scopes to request (comma-separated)
- redirect_url: Optional URL to redirect to after authorization completes
# Authorize Linear
Source: https://docs.klavis.ai/api-reference/linear-oauth/authorize-linear
get /oauth/linear/authorize
Start Linear OAuth flow
Parameters:
- instance_id: Identifier for the instance requesting authorization
- client_id: Optional client ID for white labeling
- scope: Optional scopes to request (comma-separated)
- redirect_url: Optional URL to redirect to after authorization completes
# Authorize Linkedin
Source: https://docs.klavis.ai/api-reference/linkedin-oauth/authorize-linkedin
get /oauth/linkedin/authorize
Start LinkedIn OAuth flow
Parameters:
- instance_id: Identifier for the instance requesting authorization
- client_id: Optional client ID for white labeling
- scope: Optional scopes to request (comma-separated)
- redirect_url: Optional URL to redirect to after authorization completes
# Call Tool
Source: https://docs.klavis.ai/api-reference/mcp-server/call-tool
post /mcp-server/call-tool
Calls a tool on a specific remote MCP server, used for function calling. Eliminates the need for manual MCP code implementation.
Under the hood, Klavis will instantiates an MCP client and establishes a connection with the remote MCP server to call the tool.
# Create a Server Instance
Source: https://docs.klavis.ai/api-reference/mcp-server/create-a-server-instance
post /mcp-server/instance/create
Creates a URL for a specified MCP server,
validating the request with an API key and user details.
Returns the existing server URL if it already exists for the user.
If OAuth is configured for the server, also returns the base OAuth authorization URL.
# Delete a Server Instance
Source: https://docs.klavis.ai/api-reference/mcp-server/delete-a-server-instance
delete /mcp-server/instance/delete/{instance_id}
Completely removes a server connection instance using its unique ID,
deleting all associated data from the system.
# Delete Auth data for a Server Instance
Source: https://docs.klavis.ai/api-reference/mcp-server/delete-auth-data-for-a-server-instance
delete /mcp-server/instance/delete-auth/{instance_id}
Deletes authentication metadata for a specific server connection instance.
# Get All Servers
Source: https://docs.klavis.ai/api-reference/mcp-server/get-all-servers
get /mcp-server/servers
Get all MCP servers with their basic information including id, name, description, and tools.
# Get Authentication Metadata
Source: https://docs.klavis.ai/api-reference/mcp-server/get-auth-metadata
get /mcp-server/instance/get-auth/{instance_id}
Retrieves the auth metadata for a specific instance that the API key owner controls.
Includes access token, refresh token, and other authentication metadata.
This endpoint includes proper ownership verification to ensure users can only access
authentication data for instances they own. It also handles token refresh if needed.
# Get OAuth URL
Source: https://docs.klavis.ai/api-reference/mcp-server/get-oauth-url
post /mcp-server/oauth-url
Gets the OAuth authorization URL for a specific MCP server and instance.
Returns the complete OAuth URL with the instance ID as a query parameter.
# Get Server Instance
Source: https://docs.klavis.ai/api-reference/mcp-server/get-server-instance
get /mcp-server/instance/get/{instance_id}
Checks the details of a specific server connection instance using its unique ID and API key,
returning server details like authentication status and associated server/platform info.
# Get Tools
Source: https://docs.klavis.ai/api-reference/mcp-server/get-tools
get /mcp-server/tools/{server_name}
Get list of tool names for a specific MCP server.
Mainly used for querying metadata about the MCP server.
# List Tools
Source: https://docs.klavis.ai/api-reference/mcp-server/list-tools
post /mcp-server/list-tools
Lists all tools available for a specific remote MCP server in various AI model formats.
This eliminates the need for manual MCP code implementation and format conversion.
Under the hood, Klavis instantiates an MCP client and establishes a connection
with the remote MCP server to retrieve available tools.
# Set Auth Token
Source: https://docs.klavis.ai/api-reference/mcp-server/set-auth-token
post /mcp-server/instance/set-auth-token
Sets an authentication token for a specific instance.
This updates the auth_metadata for the specified instance.
# Authorize Notion
Source: https://docs.klavis.ai/api-reference/notion-oauth/authorize-notion
get /oauth/notion/authorize
Start Notion OAuth flow
Parameters:
- instance_id: Identifier for the instance requesting authorization
- client_id: Optional client ID for white labeling
- scope: Optional scopes to request (comma-separated)
- redirect_url: Optional URL to redirect to after authorization completes
# Authorize Salesforce
Source: https://docs.klavis.ai/api-reference/salesforce-oauth/authorize-salesforce
get /oauth/salesforce/authorize
Start Salesforce OAuth flow
Parameters:
- instance_id: Identifier for the instance requesting authorization
- client_id: Optional client ID for white labeling
- scope: Optional scopes to request (space-separated)
- redirect_url: Optional URL to redirect to after authorization completes
- instance_url: Optional Salesforce instance URL for sandbox or custom domains
# Authorize Slack
Source: https://docs.klavis.ai/api-reference/slack-oauth/authorize-slack
get /oauth/slack/authorize
Start Slack OAuth flow
Parameters:
- instance_id: Identifier for the instance requesting authorization
- client_id: Optional client ID for white labeling
- scope: Optional scopes to request (comma-separated)
- user_scope: Optional user-specific scopes to request (comma-separated)
- redirect_url: Optional URL to redirect to after authorization completes
# Authorize Supabase
Source: https://docs.klavis.ai/api-reference/supabase-oauth/authorize-supabase
get /oauth/supabase/authorize
Start Supabase OAuth flow
Parameters:
- instance_id: Identifier for the instance requesting authorization
- client_id: Optional client ID for white labeling
- redirect_url: Optional URL to redirect to after authorization completes
# Get user instances
Source: https://docs.klavis.ai/api-reference/user/get-server-instances
get /user/instances
Get all MCP server instances information by user ID and platform name.
# Create
Source: https://docs.klavis.ai/api-reference/white-labeling/create
post /white-labeling/create
Saves OAuth white labeling information, or updates existing information if the `client_id` matches.
# Get
Source: https://docs.klavis.ai/api-reference/white-labeling/get
get /white-labeling/get/{client_id}
Retrieves white labeling information for a specific OAuth client ID.
# Authorize Wordpress
Source: https://docs.klavis.ai/api-reference/wordpress-oauth/authorize-wordpress
get /oauth/wordpress/authorize
Start WordPress OAuth flow
Parameters:
- instance_id: Identifier for the instance requesting authorization
- client_id: Optional client ID for white labeling
- scope: Optional scopes to request (comma-separated)
- redirect_url: Optional URL to redirect to after authorization completes
# Develop with AI
Source: https://docs.klavis.ai/develop-with-ai
Make your coding assistant access Klavis documentation.
Klavis provides LLM-accessible tools (powered by Mintlify) that you can plug locally in your coding assistant (Cursor, Windsurf, Claude Desktop, etc.) to speed up your local development. There are two options:
* **An MCP server** that can directly query this documentation, ensuring your coding assistant receives real-time information about available commands and features.
* **An llms-full.txt** text file with the entire documentation compiled and formatted for LLMs
Alternatively you can also use the native AI assistant built into this documentation portal.
## Option 1: Install the MCP server
Open a terminal and run the following command to install the MCP server locally:
```bash
npx mint-mcp add klavisai
```
Everything will be set up automatically.
## Option 2: Copy-paste llms-full.txt
You'll find a `llms-full.txt` file at the root level of this documentation. It is a compiled text document designed to provide context for LLMs.
Copy the following content and paste it in the prompt for your coding assistant: [https://docs.klavis.ai/llms-full.txt](https://docs.klavis.ai/llms-full.txt)
## Option 3: Use the documentation's built-in assistant
This documentation portal has a built-in AI assistant. Simply click "✨**Ask AI**" at the top of any page to use it.
# Claude
Source: https://docs.klavis.ai/documentation/ai-platform-integration/claude
Learn how to build AI agents that integrate Anthropic's Claude with Klavis MCP Servers for enhanced functionality
[](https://colab.research.google.com/github/klavis-ai/klavis/blob/main/examples/claude/Use_Klavis_with_Claude.ipynb)
# Claude + Klavis AI Integration
This tutorial demonstrates how to use Anthropic's Claude with tool use (function calling) with Klavis MCP (Model Context Protocol) servers.
## Prerequisites
Before we begin, you'll need:
Get your API key from Anthropic Console
Get your API key from Klavis AI
## Installation
First, install the required packages:
```bash Python
pip install anthropic klavis
```
```bash TypeScript
npm install @anthropic-ai/sdk klavis
```
## Setup Environment Variables
```python Python
import os
import json
from anthropic import Anthropic
from klavis import Klavis
from klavis.types import McpServerName, ToolFormat
# Set environment variables
os.environ["ANTHROPIC_API_KEY"] = "YOUR_ANTHROPIC_API_KEY" # Replace with your actual Anthropic API key
os.environ["KLAVIS_API_KEY"] = "YOUR_KLAVIS_API_KEY" # Replace with your actual Klavis API key
```
```typescript TypeScript
import Anthropic from '@anthropic-ai/sdk';
import { KlavisClient, Klavis } from 'klavis';
// Set environment variables
process.env.ANTHROPIC_API_KEY = "YOUR_ANTHROPIC_API_KEY"; // Replace with your actual Anthropic API key
process.env.KLAVIS_API_KEY = "YOUR_KLAVIS_API_KEY"; // Replace with your actual Klavis API key
```
## Case Study 1: Claude + YouTube MCP Server
### Step 1 - Create YouTube MCP Server using Klavis
```python Python
klavis_client = Klavis(api_key=os.getenv("KLAVIS_API_KEY"))
youtube_mcp_instance = klavis_client.mcp_server.create_server_instance(
server_name=McpServerName.YOUTUBE,
user_id="1234",
platform_name="Klavis",
)
# print(f"🔗 YouTube MCP server created at: {youtube_mcp_instance.server_url}, and the instance id is {youtube_mcp_instance.instance_id}")
```
```typescript TypeScript
const klavisClient = new KlavisClient({ apiKey: process.env.KLAVIS_API_KEY });
const youtubeMcpInstance = await klavisClient.mcpServer.createServerInstance({
serverName: Klavis.McpServerName.Youtube,
userId: "1234",
platformName: "Klavis"
});
// console.log(`🔗 YouTube MCP server created at: ${youtubeMcpInstance.serverUrl}, and the instance id is ${youtubeMcpInstance.instanceId}`);
```
### Step 2 - Create general method to use MCP Server with Claude
```python Python
def claude_with_mcp_server(mcp_server_url: str, user_query: str):
claude_client = Anthropic(api_key=os.getenv("ANTHROPIC_API_KEY"))
messages = [
{"role": "user", "content": f"{user_query}"}
]
mcp_server_tools = klavis_client.mcp_server.list_tools(
server_url=mcp_server_url,
format=ToolFormat.ANTHROPIC,
)
response = claude_client.messages.create(
model="claude-3-5-sonnet-20241022",
max_tokens=4000,
system="You are a helpful assistant. Use the available tools to answer the user's question.",
messages=messages,
tools=mcp_server_tools.tools
)
messages.append({"role": "assistant", "content": response.content})
if response.stop_reason == "tool_use":
tool_results = []
for content_block in response.content:
if content_block.type == "tool_use":
function_name = content_block.name
function_args = content_block.input
print(f"🔧 Calling: {function_name}, with args: {function_args}")
result = klavis_client.mcp_server.call_tools(
server_url=mcp_server_url,
tool_name=function_name,
tool_args=function_args,
)
tool_results.append({
"type": "tool_result",
"tool_use_id": content_block.id,
"content": str(result)
})
messages.append({"role": "user", "content": tool_results})
final_response = claude_client.messages.create(
model="claude-3-5-sonnet-20241022",
max_tokens=4000,
system="You are a helpful assistant. Use the available tools to answer the user's question.",
messages=messages,
tools=mcp_server_tools.tools
)
return final_response.content[0].text
else:
return response.content[0].text
```
```typescript TypeScript
async function claudeWithMcpServer(mcpServerUrl: string, userQuery: string) {
const claudeClient = new Anthropic({ apiKey: process.env.ANTHROPIC_API_KEY });
const messages = [
{ role: "user", content: userQuery }
];
const mcpServerTools = await klavisClient.mcpServer.listTools({
serverUrl: mcpServerUrl,
format: Klavis.ToolFormat.Anthropic,
});
const response = await claudeClient.messages.create({
model: "claude-3-5-sonnet-20241022",
max_tokens: 4000,
system: "You are a helpful assistant. Use the available tools to answer the user's question.",
messages: messages,
tools: mcpServerTools.tools
});
messages.push({ role: "assistant", content: response.content });
if (response.stop_reason === "tool_use") {
const toolResults = [];
for (const contentBlock of response.content) {
if (contentBlock.type === "tool_use") {
const functionName = contentBlock.name;
const functionArgs = contentBlock.input;
console.log(`🔧 Calling: ${functionName}, with args:`, functionArgs);
const result = await klavisClient.mcpServer.callTools({
serverUrl: mcpServerUrl,
toolName: functionName,
toolArgs: functionArgs
});
toolResults.push({
type: "tool_result",
tool_use_id: contentBlock.id,
content: JSON.stringify(result)
});
}
}
messages.push({ role: "user", content: toolResults });
const finalResponse = await claudeClient.messages.create({
model: "claude-3-5-sonnet-20241022",
max_tokens: 4000,
system: "You are a helpful assistant. Use the available tools to answer the user's question.",
messages: messages,
tools: mcpServerTools.tools
});
return finalResponse.content[0].text;
} else {
return response.content[0].text;
}
}
```
### Step 3 - Summarize your favorite video!
```python Python
YOUTUBE_VIDEO_URL = "https://www.youtube.com/watch?v=LCEmiRjPEtQ" # pick a video you like!
result = claude_with_mcp_server(
mcp_server_url=youtube_mcp_instance.server_url,
user_query=f"Summarize this YouTube video with timestamps: {YOUTUBE_VIDEO_URL}"
)
print(result)
```
```typescript TypeScript
const YOUTUBE_VIDEO_URL = "https://www.youtube.com/watch?v=LCEmiRjPEtQ"; // pick a video you like!
const result = await claudeWithMcpServer(
youtubeMcpInstance.serverUrl,
`Summarize this YouTube video with timestamps: ${YOUTUBE_VIDEO_URL}`
);
console.log(result);
```
✅ Great! You've successfully created an AI agent that uses Claude's tool use with Klavis MCP servers to summarize YouTube videos!
## Case Study 2: Claude + Gmail MCP Server (OAuth needed)
```python Python
import webbrowser
gmail_mcp_server = klavis_client.mcp_server.create_server_instance(
server_name=McpServerName.GMAIL,
user_id="1234",
platform_name="Klavis",
)
webbrowser.open(gmail_mcp_server.oauth_url)
print(f"🔐 Opening OAuth authorization for Gmail, if you are not redirected, please open the following URL in your browser: {gmail_mcp_server.oauth_url}")
```
```typescript TypeScript
const gmailMcpServer = await klavisClient.mcpServer.createServerInstance({
serverName: Klavis.McpServerName.Gmail,
userId: "1234",
platformName: "Klavis"
});
// In a web environment, you might redirect the user
window.open(gmailMcpServer.oauthUrl);
console.log(`🔐 Opening OAuth authorization for Gmail, if you are not redirected, please open the following URL in your browser: ${gmailMcpServer.oauthUrl}`);
```
After completing the OAuth authorization, you can send emails using the agent.
```python Python
EMAIL_RECIPIENT = "zihaolin@klavis.ai" # Replace with your email
EMAIL_SUBJECT = "Test Claude + Gmail MCP Server"
EMAIL_BODY = "Hello World from Claude!"
result = claude_with_mcp_server(
mcp_server_url=gmail_mcp_server.server_url,
user_query=f"Please send an email to {EMAIL_RECIPIENT} with subject {EMAIL_SUBJECT} and body {EMAIL_BODY}"
)
print(result)
```
```typescript TypeScript
const EMAIL_RECIPIENT = "zihaolin@klavis.ai"; // Replace with your email
const EMAIL_SUBJECT = "Test Claude + Gmail MCP Server";
const EMAIL_BODY = "Hello World from Claude!";
const result = await claudeWithMcpServer(
gmailMcpServer.serverUrl,
`Please send an email to ${EMAIL_RECIPIENT} with subject ${EMAIL_SUBJECT} and body ${EMAIL_BODY}`
);
console.log(result);
```
## Summary
This tutorial demonstrated how to integrate Anthropic's Claude with tool use capabilities with Klavis MCP servers to create powerful AI applications. We covered two practical examples:
**🎥 YouTube Integration**: Built an AI assistant that can automatically summarize YouTube videos by extracting transcripts and providing detailed, timestamped summaries.
**📧 Gmail Integration**: Created an AI-powered email assistant that can send emails through Gmail with OAuth authentication.
### Key Takeaways:
* **Easy Setup**: Klavis MCP servers can be created with just a few lines of code
* **Claude Compatible**: All tools are formatted for seamless Claude tool use
* **Versatile**: Support for both simple APIs (YouTube) and OAuth-authenticated services (Gmail)
* **Scalable**: The same pattern can be applied to any of the MCP servers available in Klavis
* **Advanced Reasoning**: Claude's superior reasoning capabilities make it excellent for complex analysis tasks
## Next Steps
Try other available servers like Slack, Notion, GitHub, etc.
Build multi-step workflows combining multiple MCP servers
Scale these patterns for production applications
Build custom MCP servers for your specific needs
## Useful Resources
* [Anthropic Documentation](https://docs.anthropic.com/)
* [Claude API Reference](https://docs.anthropic.com/claude/reference/)
* [Klavis AI Documentation](https://docs.klavis.ai/)
* [MCP Protocol Specification](https://modelcontextprotocol.io/)
* [Klavis MCP Servers](/documentation/mcp-server)
**Happy building!** 🚀
# CrewAI
Source: https://docs.klavis.ai/documentation/ai-platform-integration/crewai
Build powerful AI agent crews that integrate CrewAI with Klavis MCP Servers for multi-agent workflows
## Partnership
CrewAI has officially showcased their integration with Klavis AI in [this LinkedIn post](https://www.linkedin.com/feed/update/urn:li:activity:7346573584267395072/), demonstrating how to build powerful AI agent crews that can automate complex workflows across multiple platforms.
## Prerequisites
Before we begin, you'll need:
Get your API key from OpenAI Platform (CrewAI uses OpenAI as the default model)
Get your API key from Klavis AI
## Installation
First, install the required packages:
```bash Python
pip install crewai 'crewai-tools[mcp]' klavis openai
```
```bash TypeScript
npm install crewai crewai-tools klavis openai
```
## Setup Environment Variables
```python Python
import os
# Set environment variables
os.environ["OPENAI_API_KEY"] = "your-openai-api-key-here" # Replace with your actual OpenAI API key
os.environ["KLAVIS_API_KEY"] = "your-klavis-api-key-here" # Replace with your actual Klavis API key
```
```typescript TypeScript
// Set environment variables in your .env file
process.env.OPENAI_API_KEY = "your-openai-api-key-here"; // Replace with your actual OpenAI API key
process.env.KLAVIS_API_KEY = "your-klavis-api-key-here"; // Replace with your actual Klavis API key
```
## CrewAI with MCP Integration
CrewAI allows you to create specialized AI agent crews where each agent can have access to different MCP tools. This enables sophisticated multi-agent workflows that can:
1. **Create MCP Instances**: Set up connections to external services
2. **Specialized Agents**: Each agent focuses on specific tasks with relevant tools
3. **Collaborative Workflows**: Agents work together in sequential or parallel processes
4. **Tool Discovery**: Automatically discover available tools from MCP servers
5. **Smart Coordination**: CrewAI manages task dependencies and agent collaboration
## Use Case Examples
### Example 1: YouTube Research Crew
Create a specialized agent that can research and analyze YouTube videos.
Set up CrewAI + Klavis integration
Create a YouTube MCP server instance
Create an agent specialized in video content analysis
Run the crew to analyze a YouTube video
```python Python
from crewai import Agent, Task, Crew, Process
from crewai_tools import MCPServerAdapter
from klavis import Klavis
from klavis.types import McpServerName
# Initialize clients
klavis_client = Klavis(api_key=os.getenv("KLAVIS_API_KEY"))
# Create YouTube MCP server
youtube_mcp_instance = klavis_client.mcp_server.create_server_instance(
server_name=McpServerName.YOUTUBE,
user_id="1234",
platform_name="Klavis",
)
print(f"🔗 YouTube MCP server created at: {youtube_mcp_instance.server_url}")
# Configure MCP server parameters for CrewAI
server_params = {
"url": youtube_mcp_instance.server_url,
"transport": "streamable-http"
}
YOUTUBE_VIDEO_URL = "https://www.youtube.com/watch?v=LCEmiRjPEtQ"
try:
with MCPServerAdapter(server_params) as mcp_tools:
print(f"✅ Available tools: {[tool.name for tool in mcp_tools]}")
# Create a YouTube Analysis Agent
youtube_agent = Agent(
role="YouTube Content Analyst",
goal="Research and analyze YouTube videos to extract comprehensive insights",
backstory="You are an expert at analyzing video content and creating professional summaries.",
tools=mcp_tools,
reasoning=True,
verbose=False
)
# Define Task
analysis_task = Task(
description=f"Research the YouTube video at {YOUTUBE_VIDEO_URL}. Extract the video transcript, analyze the content, and create a comprehensive summary with key points, timestamps, and main takeaways.",
expected_output="Complete video analysis with transcript, structured summary, key insights, timestamps, and main takeaways",
agent=youtube_agent,
markdown=True
)
# Create and execute the crew
youtube_crew = Crew(
agents=[youtube_agent],
tasks=[analysis_task],
verbose=False,
process=Process.sequential
)
result = youtube_crew.kickoff()
print(result)
except Exception as e:
print(f"❌ Error connecting to YouTube MCP server: {e}")
```
```typescript TypeScript
import { CrewAI, Agent, Task, Crew } from 'crewai';
import { MCPServerAdapter } from 'crewai-tools';
import { KlavisClient, Klavis } from 'klavis';
// Initialize clients
const klavisClient = new KlavisClient({ apiKey: process.env.KLAVIS_API_KEY });
// Create YouTube MCP server
const youtubeMcpInstance = await klavisClient.mcpServer.createServerInstance({
serverName: Klavis.McpServerName.Youtube,
userId: "1234",
platformName: "Klavis",
});
console.log(`🔗 YouTube MCP server created at: ${youtubeMcpInstance.serverUrl}`);
// Configure MCP server parameters for CrewAI
const serverParams = {
url: youtubeMcpInstance.serverUrl,
transport: "streamable-http"
};
const YOUTUBE_VIDEO_URL = "https://www.youtube.com/watch?v=LCEmiRjPEtQ";
try {
const mcpTools = new MCPServerAdapter(serverParams);
console.log(`✅ Available tools connected`);
// Create a YouTube Analysis Agent
const youtubeAgent = new Agent({
role: "YouTube Content Analyst",
goal: "Research and analyze YouTube videos to extract comprehensive insights",
backstory: "You are an expert at analyzing video content and creating professional summaries.",
tools: mcpTools,
reasoning: true,
verbose: false
});
// Define Task
const analysisTask = new Task({
description: `Research the YouTube video at ${YOUTUBE_VIDEO_URL}. Extract the video transcript, analyze the content, and create a comprehensive summary with key points, timestamps, and main takeaways.`,
expectedOutput: "Complete video analysis with transcript, structured summary, key insights, timestamps, and main takeaways",
agent: youtubeAgent,
markdown: true
});
// Create and execute the crew
const youtubeCrew = new Crew({
agents: [youtubeAgent],
tasks: [analysisTask],
verbose: false,
process: CrewAI.Process.Sequential
});
const result = await youtubeCrew.kickoff();
console.log(result);
} catch (error) {
console.error(`❌ Error connecting to YouTube MCP server: ${error}`);
}
```
### Example 2: Multi-Service Research & Communication Crew
Create a two-agent crew that researches content and communicates findings via email.
Gmail integration requires OAuth authentication, so you'll need to authorize the application in your browser.
Set up both YouTube and Gmail MCP servers
Complete OAuth flow for Gmail access
Set up research agent and communication agent
Run the sequential workflow
```python Python
import webbrowser
# Create YouTube and Gmail MCP servers
youtube_mcp_instance = klavis_client.mcp_server.create_server_instance(
server_name=McpServerName.YOUTUBE,
user_id="1234",
platform_name="Klavis",
)
gmail_mcp_instance = klavis_client.mcp_server.create_server_instance(
server_name=McpServerName.GMAIL,
user_id="1234",
platform_name="Klavis",
)
# Handle OAuth for Gmail
webbrowser.open(gmail_mcp_instance.oauth_url)
print(f"🔐 Opening OAuth authorization for Gmail...")
print(f"📱 If not redirected automatically, open: {gmail_mcp_instance.oauth_url}")
VIDEO_URL = "https://www.youtube.com/watch?v=LCEmiRjPEtQ"
RECIPIENT_EMAIL = "your-email@example.com"
# Configure multiple MCP servers
multiple_server_params = [
{
"url": youtube_mcp_instance.server_url,
"transport": "streamable-http"
},
{
"url": gmail_mcp_instance.server_url,
"transport": "streamable-http"
}
]
try:
with MCPServerAdapter(multiple_server_params) as all_mcp_tools:
print(f"✅ Available tools from all MCP servers: {[tool.name for tool in all_mcp_tools]}")
# Create YouTube Research Agent
youtube_research_agent = Agent(
role="YouTube Content Analyst",
goal="Research and analyze YouTube videos to extract comprehensive insights",
backstory="You are an expert at analyzing video content and extracting key insights.",
tools=all_mcp_tools,
reasoning=False,
verbose=False,
)
# Create Email Communication Agent
email_agent = Agent(
role="Email Communications Specialist",
goal="Draft and send professional email communications based on research findings",
backstory="You are skilled at crafting professional emails with clear, impactful messaging.",
tools=all_mcp_tools,
reasoning=True,
verbose=False,
)
# Define workflow tasks
youtube_research_task = Task(
description=f"Research the YouTube video at {VIDEO_URL}. Extract transcript, analyze the content for key insights about AI and software development, and create a comprehensive analysis report with key takeaways and recommendations.",
expected_output="Complete video analysis report with transcript, key insights, recommendations, and strategic takeaways",
agent=youtube_research_agent
)
send_email_task = Task(
description=f"Based on the youtube analysis, draft and send a professional email to {RECIPIENT_EMAIL} with the subject 'YouTube Video AI Analysis'. Include content of the youtube video in the email.",
expected_output="Confirmation that a professional email has been sent with the research insights",
agent=email_agent,
context=[youtube_research_task]
)
# Create and execute the crew
multi_service_crew = Crew(
agents=[youtube_research_agent, email_agent],
tasks=[youtube_research_task, send_email_task],
verbose=False,
process=Process.sequential
)
result = multi_service_crew.kickoff()
print(result)
except Exception as e:
print(f"❌ Error with multi-service MCP integration: {e}")
```
```typescript TypeScript
// Create YouTube and Gmail MCP servers
const youtubeMcpInstance = await klavisClient.mcpServer.createServerInstance({
serverName: Klavis.McpServerName.Youtube,
userId: "1234",
platformName: "Klavis",
});
const gmailMcpInstance = await klavisClient.mcpServer.createServerInstance({
serverName: Klavis.McpServerName.Gmail,
userId: "1234",
platformName: "Klavis",
});
// Handle OAuth for Gmail
console.log(f"🔐 Opening OAuth authorization for Gmail...");
console.log(f"📱 Please open: {gmailMcpInstance.oauthUrl}");
const VIDEO_URL = "https://www.youtube.com/watch?v=LCEmiRjPEtQ";
const RECIPIENT_EMAIL = "your-email@example.com";
// Configure multiple MCP servers
const multipleServerParams = [
{
url: youtubeMcpInstance.serverUrl,
transport: "streamable-http"
},
{
url: gmailMcpInstance.serverUrl,
transport: "streamable-http"
}
];
try {
const allMcpTools = new MCPServerAdapter(multipleServerParams);
console.log(`✅ Available tools from all MCP servers connected`);
// Create YouTube Research Agent
const youtubeResearchAgent = new Agent({
role: "YouTube Content Analyst",
goal: "Research and analyze YouTube videos to extract comprehensive insights",
backstory: "You are an expert at analyzing video content and extracting key insights.",
tools: allMcpTools,
reasoning: false,
verbose: false,
});
// Create Email Communication Agent
const emailAgent = new Agent({
role: "Email Communications Specialist",
goal: "Draft and send professional email communications based on research findings",
backstory: "You are skilled at crafting professional emails with clear, impactful messaging.",
tools: allMcpTools,
reasoning: true,
verbose: false,
});
// Define workflow tasks
const youtubeResearchTask = new Task({
description: `Research the YouTube video at ${VIDEO_URL}. Extract transcript, analyze the content for key insights about AI and software development, and create a comprehensive analysis report with key takeaways and recommendations.`,
expectedOutput: "Complete video analysis report with transcript, key insights, recommendations, and strategic takeaways",
agent: youtubeResearchAgent
});
const sendEmailTask = new Task({
description: `Based on the youtube analysis, draft and send a professional email to ${RECIPIENT_EMAIL} with the subject 'YouTube Video AI Analysis'. Include content of the youtube video in the email.`,
expectedOutput: "Confirmation that a professional email has been sent with the research insights",
agent: emailAgent,
context: [youtubeResearchTask]
});
// Create and execute the crew
const multiServiceCrew = new Crew({
agents: [youtubeResearchAgent, emailAgent],
tasks: [youtubeResearchTask, sendEmailTask],
verbose: false,
process: CrewAI.Process.Sequential
});
const result = await multiServiceCrew.kickoff();
console.log(result);
} catch (error) {
console.error(`❌ Error with multi-service MCP integration: ${error}`);
}
```
## Security Best Practices
When using CrewAI with Klavis MCP servers, follow these security guidelines:
```python Python
def create_secure_crew():
"""Demonstrates secure MCP server integration with CrewAI"""
# 1. Use environment variables for sensitive data
api_key = os.getenv("KLAVIS_API_KEY")
if not api_key:
raise ValueError("KLAVIS_API_KEY environment variable is required")
# 2. Validate server URLs (use HTTPS in production)
server_params = [{
"url": server_instance.server_url,
"transport": "streamable-http"
}]
# 3. Always use context managers for proper resource cleanup
try:
with MCPServerAdapter(server_params) as mcp_tools:
# 4. Validate available tools before use
if not mcp_tools:
raise ValueError("No tools available from MCP server")
print(f"✅ Securely connected with {len(mcp_tools)} tools")
# 5. Create agents with limited scope
agent = Agent(
role="Data Analyst",
goal="Analyze data within defined parameters",
backstory="You operate within strict security guidelines.",
tools=mcp_tools,
reasoning=False, # Disable for production
verbose=False # Disable verbose logging in production
)
return agent
except Exception as e:
print(f"🔒 Security check failed: {e}")
return None
# Example usage
secure_agent = create_secure_crew()
if secure_agent:
print("✅ Secure crew created successfully")
```
```typescript TypeScript
function createSecureCrew() {
// 1. Use environment variables for sensitive data
const apiKey = process.env.KLAVIS_API_KEY;
if (!apiKey) {
throw new Error("KLAVIS_API_KEY environment variable is required");
}
// 2. Validate server URLs (use HTTPS in production)
const serverParams = [{
url: serverInstance.serverUrl,
transport: "streamable-http"
}];
// 3. Always handle errors properly
try {
// 4. Validate available tools before use
const mcpTools = new MCPServerAdapter(serverParams);
if (!mcpTools) {
throw new Error("No tools available from MCP server");
}
console.log(`✅ Securely connected with tools`);
// 5. Create agents with limited scope
const agent = new Agent({
role: "Data Analyst",
goal: "Analyze data within defined parameters",
backstory: "You operate within strict security guidelines.",
tools: mcpTools,
reasoning: false, // Disable for production
verbose: false // Disable verbose logging in production
});
return agent;
} catch (error) {
console.error(`🔒 Security check failed: ${error}`);
return null;
}
}
// Example usage
const secureAgent = createSecureCrew();
if (secureAgent) {
console.log("✅ Secure crew created successfully");
}
```
## Available MCP Servers
CrewAI works with all Klavis MCP servers. Here are some popular options:
Gmail, Slack, Discord, Outlook
YouTube, Notion, Google Docs, WordPress
GitHub, Jira, Linear, Confluence
Google Sheets, Supabase, PostgreSQL
Salesforce, HubSpot, Asana, ClickUp
Google Drive, Dropbox, OneDrive
## Summary
CrewAI + Klavis integration enables you to build sophisticated multi-agent AI systems with real-world capabilities. Key benefits include:
### 🚀 **CrewAI + Klavis Benefits:**
* **Seamless Integration**: MCPServerAdapter makes MCP connection effortless
* **Agent Specialization**: Each agent can focus on specific domains
* **Scalable Architecture**: Easy to add more agents and MCP servers
* **Professional AI Teams**: Create sophisticated multi-agent systems
* **Real-World Impact**: Connect AI to actual business tools and services
**Ready to build your first AI crew?** Start with a simple YouTube research agent and expand from there! 🚀👥
# Fireworks AI
Source: https://docs.klavis.ai/documentation/ai-platform-integration/fireworks-ai
Learn how to build AI agents that integrate Fireworks AI's LLMs with Klavis MCP Servers
## Prerequisites
Before we begin, you'll need:
Get your API key from Fireworks AI
Get your API key from Klavis AI
## Installation
First, install the required packages:
```bash Python
pip install fireworks-ai klavis
```
```bash TypeScript
npm install fireworks-ai klavis
```
## Setup Environment Variables
```python Python
import os
# Set environment variables
os.environ["FIREWORKS_API_KEY"] = "your-fireworks-api-key-here" # Replace with your actual Fireworks API key
os.environ["KLAVIS_API_KEY"] = "your-klavis-api-key-here" # Replace with your actual Klavis API key
```
```typescript TypeScript
// Set environment variables in your .env file
process.env.FIREWORKS_API_KEY = "your-fireworks-api-key-here"; // Replace with your actual Fireworks API key
process.env.KLAVIS_API_KEY = "your-klavis-api-key-here"; // Replace with your actual Klavis API key
```
## Basic Setup
```python Python
import os
import json
from fireworks.client import Fireworks
from klavis import Klavis
from klavis.types import McpServerName, ToolFormat
# Initialize clients
fireworks_client = Fireworks(api_key=os.getenv("FIREWORKS_API_KEY"))
klavis_client = Klavis(api_key=os.getenv("KLAVIS_API_KEY"))
```
```typescript TypeScript
import Fireworks from 'fireworks-ai';
import { KlavisClient, Klavis } from 'klavis';
// Initialize clients
const fireworksClient = new Fireworks({ apiKey: process.env.FIREWORKS_API_KEY });
const klavisClient = new KlavisClient({ apiKey: process.env.KLAVIS_API_KEY });
```
## AI Agent with MCP Integration
Now we'll create an intelligent agent that can use MCP servers through Klavis API. This agent will:
1. **Discover Tools**: Automatically find available tools from MCP servers
2. **Function Calling**: Use Fireworks AI's function calling capabilities
3. **Tool Execution**: Execute tools through Klavis API
4. **Smart Responses**: Generate intelligent responses based on tool results
```python Python
class Agent:
def __init__(self, fireworks_client, klavis_client, mcp_server_url):
self.fireworks = fireworks_client
self.klavis = klavis_client
self.mcp_server_url = mcp_server_url
self.model = "accounts/fireworks/models/qwen2p5-72b-instruct"
print(f"🤖 Agent initialized with model: {self.model}")
def process_request(self, user_message):
# 1. Get available tools
mcp_tools = self.klavis.mcp_server.list_tools(
server_url=self.mcp_server_url,
format=ToolFormat.OPENAI,
)
# 2. Call LLM with tools
messages = [
{"role": "system", "content": "You are a helpful assistant."},
{"role": "user", "content": user_message}
]
response = self.fireworks.chat.completions.create(
model=self.model,
messages=messages,
tools=mcp_tools.tools
)
assistant_message = response.choices[0].message
messages.append(assistant_message)
# 3. If LLM wants to use tools
if assistant_message.tool_calls:
# Execute each tool call
for tool_call in assistant_message.tool_calls:
tool_name = tool_call.function.name
tool_args = json.loads(tool_call.function.arguments)
print(f"🛠️ Calling tool: {tool_name} with args: {tool_args}")
# Call tool via Klavis SDK
tool_result = self.klavis.mcp_server.call_tools(
server_url=self.mcp_server_url,
tool_name=tool_name,
tool_args=tool_args,
)
messages.append({
"role": "tool",
"tool_call_id": tool_call.id,
"content": str(tool_result)
})
# 4. Get final response from LLM
final_response = self.fireworks.chat.completions.create(
model=self.model,
messages=messages
)
return final_response.choices[0].message.content
# If no tools needed, return the assistant message directly
return assistant_message.content
```
```typescript TypeScript
class Agent {
private fireworks: Fireworks;
private klavis: KlavisClient;
private mcpServerUrl: string;
private model: string;
constructor(fireworksClient: Fireworks, klavisClient: KlavisClient, mcpServerUrl: string) {
this.fireworks = fireworksClient;
this.klavis = klavisClient;
this.mcpServerUrl = mcpServerUrl;
this.model = "accounts/fireworks/models/qwen2p5-72b-instruct";
console.log(`🤖 Agent initialized with model: ${this.model}`);
}
async processRequest(userMessage: string) {
// 1. Get available tools
const mcpTools = await this.klavis.mcpServer.listTools({
serverUrl: this.mcpServerUrl,
format: Klavis.ToolFormat.Openai,
});
// 2. Call LLM with tools
const messages = [
{ role: "system", content: "You are a helpful assistant." },
{ role: "user", content: userMessage }
];
const response = await this.fireworks.chat.completions.create({
model: this.model,
messages: messages,
tools: mcpTools.tools
});
const assistantMessage = response.choices[0].message;
messages.push(assistantMessage);
// 3. If LLM wants to use tools
if (assistantMessage.tool_calls) {
// Execute each tool call
for (const toolCall of assistantMessage.tool_calls) {
const toolName = toolCall.function.name;
const toolArgs = JSON.parse(toolCall.function.arguments);
console.log(`🛠️ Calling tool: ${toolName} with args:`, toolArgs);
// Call tool via Klavis SDK
const toolResult = await this.klavis.mcpServer.callTools({
serverUrl: this.mcpServerUrl,
toolName: toolName,
toolArgs: toolArgs,
});
messages.push({
role: "tool",
tool_call_id: toolCall.id,
content: JSON.stringify(toolResult)
});
}
// 4. Get final response from LLM
const finalResponse = await this.fireworks.chat.completions.create({
model: this.model,
messages: messages
});
return finalResponse.choices[0].message.content;
}
// If no tools needed, return the assistant message directly
return assistantMessage.content;
}
}
```
## Use Case Examples
### Example 1: Summarize YouTube Video
Set up Fireworks AI and Klavis API clients
Create a YouTube MCP server instance
Use the agent to analyze and summarize a YouTube video
```python Python
YOUTUBE_VIDEO_URL = "https://www.youtube.com/watch?v=kPXvf2-C_Hs" # Pick a video you like!
# 1. Create YouTube MCP server instance
youtube_mcp_instance = klavis_client.mcp_server.create_server_instance(
server_name=McpServerName.YOUTUBE,
user_id="1234",
platform_name="Klavis",
)
# 2. Create an agent with YouTube MCP server
agent = Agent(fireworks_client, klavis_client, youtube_mcp_instance.server_url)
# 3. Process the request
response = agent.process_request(
f"Summarize this YouTube video with timestamps: {YOUTUBE_VIDEO_URL}"
)
print(response)
```
```typescript TypeScript
const YOUTUBE_VIDEO_URL = "https://www.youtube.com/watch?v=kPXvf2-C_Hs"; // Pick a video you like!
// 1. Create YouTube MCP server instance
const youtubeMcpInstance = await klavisClient.mcpServer.createServerInstance({
serverName: Klavis.McpServerName.Youtube,
userId: "1234",
platformName: "Klavis",
});
// 2. Create an agent with YouTube MCP server
const agent = new Agent(fireworksClient, klavisClient, youtubeMcpInstance.serverUrl);
// 3. Process the request
const response = await agent.processRequest(
`Summarize this YouTube video with timestamps: ${YOUTUBE_VIDEO_URL}`
);
console.log(response);
```
### Example 2: Send Email via Gmail
Gmail integration requires OAuth authentication, so you'll need to authorize the application in your browser.
Create a Gmail MCP server instance
Complete OAuth flow for Gmail access
Use the agent to send an email
```python Python
import webbrowser
# Create Gmail MCP server instance
gmail_mcp_instance = klavis_client.mcp_server.create_server_instance(
server_name=McpServerName.GMAIL,
user_id="1234",
platform_name="Klavis",
)
# Redirect to Gmail OAuth page
webbrowser.open(gmail_mcp_instance.oauth_url)
print(f"🔐 Opening OAuth authorization for Gmail, if you are not redirected, please open the following URL in your browser: {gmail_mcp_instance.oauth_url}")
EMAIL_SUBJECT = "Hello, World!"
EMAIL_BODY = "This is a test email sent using Fireworks AI and Klavis integration."
EMAIL_RECIPIENT = "recipient@example.com" # Replace with your email
# After OAuth authorization, create an agent with Gmail MCP server
agent = Agent(fireworks_client, klavis_client, gmail_mcp_instance.server_url)
# Send the email
response = agent.process_request(
f"Send an email to {EMAIL_RECIPIENT} with subject {EMAIL_SUBJECT} and body {EMAIL_BODY}"
)
print(response)
```
```typescript TypeScript
// Create Gmail MCP server instance
const gmailMcpInstance = await klavisClient.mcpServer.createServerInstance({
serverName: Klavis.McpServerName.Gmail,
userId: "1234",
platformName: "Klavis",
});
// Redirect to Gmail OAuth page
console.log("🔐 Opening OAuth authorization for Gmail");
console.log(`If you are not redirected, please open the following URL in your browser: ${gmailMcpInstance.oauthUrl}`);
// In a web environment, you might redirect the user
window.open(gmailMcpInstance.oauthUrl);
const EMAIL_SUBJECT = "Hello, World!";
const EMAIL_BODY = "This is a test email sent using Fireworks AI and Klavis integration.";
const EMAIL_RECIPIENT = "recipient@example.com"; // Replace with your email
// After OAuth authorization, create an agent with Gmail MCP server
const agent = new Agent(fireworksClient, klavisClient, gmailMcpInstance.serverUrl);
// Send the email
const response = await agent.processRequest(
`Send an email to ${EMAIL_RECIPIENT} with subject ${EMAIL_SUBJECT} and body ${EMAIL_BODY}`
);
console.log(response);
```
## Next Steps
Try other available servers like Slack, Notion, CRM, etc.
Experiment with various models like Llama, Mixtral, or Deepseek for different use cases
Create sophisticated agents that combine Gmail + Slack + Notion for complete business automation
Scale these patterns for production applications
## Useful Resources
* [Fireworks AI Documentation](https://docs.fireworks.ai/)
* [Klavis AI Documentation](https://docs.klavis.ai/)
* [MCP Protocol Specification](https://modelcontextprotocol.io/)
* [Klavis MCP Servers](/documentation/mcp-server)
**Happy building with Fireworks AI and Klavis!** 🚀
# Gemini
Source: https://docs.klavis.ai/documentation/ai-platform-integration/gemini
Learn how to build AI agents that integrate Google's Gemini with Klavis MCP Servers for multimodal AI capabilities
[](https://colab.research.google.com/github/klavis-ai/klavis/blob/main/examples/google-genai/Use_Klavis_with_Gemini.ipynb)
# Gemini + Klavis AI Integration
This tutorial demonstrates how to use Google's Gemini with function calling with Klavis MCP (Model Context Protocol) servers.
## Prerequisites
Before we begin, you'll need:
Get your API key from Google AI Studio
Get your API key from Klavis AI
## Installation
First, install the required packages:
```bash Python
pip install google-genai klavis
```
```bash TypeScript
npm install @google/genai klavis
```
## Full Code Examples
For complete working examples, check out the source code:
## Setup Environment Variables
```python Python
import os
import webbrowser
from google import genai
from google.genai import types
from klavis import Klavis
from klavis.types import McpServerName, ToolFormat
# Set environment variables (you can also use .env file)
os.environ["GEMINI_API_KEY"] = "YOUR_GEMINI_API_KEY" # Replace with your actual Gemini API key
os.environ["KLAVIS_API_KEY"] = "YOUR_KLAVIS_API_KEY" # Replace with your actual Klavis API key
# Initialize clients
gemini_client = genai.Client(api_key=os.getenv("GEMINI_API_KEY"))
klavis_client = Klavis(api_key=os.getenv("KLAVIS_API_KEY"))
```
```typescript TypeScript
import { GoogleGenAI, ToolListUnion } from '@google/genai';
import { KlavisClient, Klavis } from 'klavis';
import open from 'open';
// Set your API keys here
const geminiApiKey = "YOUR_GEMINI_API_KEY"; // Replace with your actual Gemini API key
const klavisApiKey = "YOUR_KLAVIS_API_KEY"; // Replace with your actual Klavis API key
const geminiClient = new GoogleGenAI({ apiKey: geminiApiKey });
const klavisClient = new KlavisClient({ apiKey: klavisApiKey });
```
## Case Study 1: Gemini + YouTube MCP Server
### Step 1 - Create YouTube MCP Server using Klavis
```python Python
youtube_mcp_instance = klavis_client.mcp_server.create_server_instance(
server_name=McpServerName.YOUTUBE,
user_id="1234",
platform_name="Klavis",
)
print(f"🔗 YouTube MCP server created at: {youtube_mcp_instance.server_url}, and the instance id is {youtube_mcp_instance.instance_id}")
```
```typescript TypeScript
const youtubeMcpInstance = await klavisClient.mcpServer.createServerInstance({
serverName: Klavis.McpServerName.Youtube,
userId: "1234",
platformName: "Klavis",
});
console.log(`🔗 YouTube MCP server created at: ${youtubeMcpInstance.serverUrl}, and the instance id is ${youtubeMcpInstance.instanceId}`);
```
### Step 2 - Create general method to use MCP Server with Gemini
```python Python
def gemini_with_mcp_server(mcp_server_url: str, user_query: str):
# Get tools from MCP server
mcp_server_tools = klavis_client.mcp_server.list_tools(
server_url=mcp_server_url,
format=ToolFormat.GEMINI,
)
# Prepare conversation contents
contents = [types.Content(role="user", parts=[types.Part(text=user_query)])]
# Generate response with function calling
response = gemini_client.models.generate_content(
model='gemini-1.5-pro',
contents=contents,
config=types.GenerateContentConfig(tools=mcp_server_tools.tools)
)
if response.candidates and response.candidates[0].content.parts:
contents.append(response.candidates[0].content)
# Check if there are function calls to execute
has_function_calls = False
for part in response.candidates[0].content.parts:
if hasattr(part, 'function_call') and part.function_call:
has_function_calls = True
print(f"🔧 Calling function: {part.function_call.name}")
try:
# Execute tool call via Klavis
function_result = klavis_client.mcp_server.call_tools(
server_url=mcp_server_url,
tool_name=part.function_call.name,
tool_args=dict(part.function_call.args),
)
# Create function response in the proper format
function_response = {'result': function_result.result}
except Exception as e:
print(f"Function call error: {e}")
function_response = {'error': str(e)}
# Add function response to conversation
function_response_part = types.Part.from_function_response(
name=part.function_call.name,
response=function_response,
)
function_response_content = types.Content(
role='tool',
parts=[function_response_part]
)
contents.append(function_response_content)
if has_function_calls:
# Generate final response after function calls
final_response = gemini_client.models.generate_content(
model='gemini-1.5-pro',
contents=contents,
config=types.GenerateContentConfig(tools=mcp_server_tools.tools)
)
return final_response.text
else:
# No function calls, return original response
return response.text
else:
return "No response generated."
```
```typescript TypeScript
async function geminiWithMcpServer(mcpServerUrl: string, userQuery: string) {
// Get tools from MCP server
const mcpTools = await klavisClient.mcpServer.listTools({
serverUrl: mcpServerUrl,
format: Klavis.ToolFormat.Gemini
});
const contents: any[] = [];
// Extract function declarations from the Klavis response
const gemini_tools = mcpTools.tools as ToolListUnion;
const functionDeclarations = (gemini_tools[0] as any)?.function_declarations || [];
contents.push({
role: "user",
parts: [{ text: userQuery }]
});
const response = await geminiClient.models.generateContent({
model: 'gemini-2.5-flash',
contents: contents,
config: {
tools: [{
functionDeclarations: functionDeclarations
}],
}
});
if (!response.candidates || !response.candidates[0]?.content?.parts) {
return "No response generated.";
}
contents.push(response.candidates[0].content);
// Check for function calls in the response
let hasFunctionCalls = false;
const functionCallResults: any[] = [];
// Check if response has functionCalls property
if (response.functionCalls && response.functionCalls.length > 0) {
hasFunctionCalls = true;
for (const functionCall of response.functionCalls) {
console.log(`🔧 Calling function: ${functionCall.name}`);
try {
// Execute tool call via Klavis
const functionResult = await klavisClient.mcpServer.callTools({
serverUrl: mcpServerUrl,
toolName: functionCall.name || '',
toolArgs: functionCall.args || {},
});
functionCallResults.push({
functionResponse: {
name: functionCall.name,
response: functionResult.result
}
});
} catch (error) {
console.error(`❌ Function call error: ${error}`);
functionCallResults.push({
functionResponse: {
name: functionCall.name,
response: { error: String(error) }
}
});
}
}
}
// If there were function calls, add the results and get final response
if (hasFunctionCalls && functionCallResults.length > 0) {
// Add function responses to conversation history
contents.push({
role: 'tool',
parts: functionCallResults
});
// Get final response after function execution
const finalResponse = await geminiClient.models.generateContent({
model: 'gemini-2.5-flash',
contents: contents,
config: {
tools: [{
functionDeclarations: functionDeclarations
}],
temperature: 0,
}
});
return finalResponse.text || 'No response text';
} else {
// No function calls, just display the response
return response.text || 'No response text';
}
}
```
### Step 3 - Summarize your favorite video!
```python Python
YOUTUBE_VIDEO_URL = "https://www.youtube.com/watch?v=LCEmiRjPEtQ" # pick a video you like!
result = gemini_with_mcp_server(
mcp_server_url=youtube_mcp_instance.server_url,
user_query=f"Please provide a complete summary of this YouTube video with timestamp: {YOUTUBE_VIDEO_URL}"
)
print(result)
```
```typescript TypeScript
const YOUTUBE_VIDEO_URL = "https://www.youtube.com/watch?v=LCEmiRjPEtQ"; // pick a video you like!
const result = await geminiWithMcpServer(
youtubeMcpInstance.serverUrl,
`Please provide a complete summary of this YouTube video with timestamp: ${YOUTUBE_VIDEO_URL}`
);
console.log(result);
```
✅ Great! You've successfully created an AI agent that uses Gemini's function calling with Klavis MCP servers to summarize YouTube videos!
## Case Study 2: Gemini + Gmail MCP Server (OAuth needed)
```python Python
# Create Gmail MCP server instance
gmail_mcp_server = klavis_client.mcp_server.create_server_instance(
server_name=McpServerName.GMAIL,
user_id="1234",
platform_name="Klavis",
)
# Redirect to Gmail OAuth page for authorization
webbrowser.open(gmail_mcp_server.oauth_url)
print(f"🔐 Opening OAuth authorization for Gmail, if you are not redirected, please open the following URL in your browser: {gmail_mcp_server.oauth_url}")
```
```typescript TypeScript
// Create Gmail MCP server instance
const gmailMcpServer = await klavisClient.mcpServer.createServerInstance({
serverName: Klavis.McpServerName.Gmail,
userId: "1234",
platformName: "Klavis",
});
// Handle OAuth if needed
if (gmailMcpServer.oauthUrl) {
console.log(`🔐 Opening OAuth authorization: ${gmailMcpServer.oauthUrl}`);
await open(gmailMcpServer.oauthUrl);
console.log("Please complete the OAuth authorization in your browser...");
}
```
```python Python
EMAIL_RECIPIENT = "zihaolin@klavis.ai" # Replace with your email
EMAIL_SUBJECT = "Test Gemini + Gmail MCP Server"
EMAIL_BODY = "Hello World from Gemini!"
result = gemini_with_mcp_server(
mcp_server_url=gmail_mcp_server.server_url,
user_query=f"Please send an email to {EMAIL_RECIPIENT} with subject {EMAIL_SUBJECT} and body {EMAIL_BODY}"
)
print(result)
```
```typescript TypeScript
const EMAIL_RECIPIENT = "zihaolin@klavis.ai"; // Replace with your email
const EMAIL_SUBJECT = "Test Gemini + Gmail MCP Server";
const EMAIL_BODY = "Hello World from Gemini!";
const result = await geminiWithMcpServer(
gmailMcpServer.serverUrl,
`Please send an email to ${EMAIL_RECIPIENT} with subject ${EMAIL_SUBJECT} and body ${EMAIL_BODY}`
);
console.log(result);
```
## Summary
This tutorial demonstrated how to integrate Google's Gemini with function calling capabilities with Klavis MCP servers to create powerful AI applications. We covered two practical examples:
**🎥 YouTube Integration**: Built an AI assistant that can automatically summarize YouTube videos by extracting transcripts and providing detailed, timestamped summaries.
**📧 Gmail Integration**: Created an AI-powered email assistant that can send emails through Gmail with OAuth authentication.
## Next Steps
Try other available servers like Slack, Notion, GitHub, etc.
Build workflows that combine text, images, and other media
Scale these patterns for production applications
Build custom MCP servers for your specific needs
## Useful Resources
* [Google AI Documentation](https://ai.google.dev/)
* [Gemini API Reference](https://ai.google.dev/api)
* [Klavis AI Documentation](https://docs.klavis.ai/)
* [MCP Protocol Specification](https://modelcontextprotocol.io/)
* [Klavis MCP Servers](/documentation/mcp-server)
**Happy building!** 🚀
# LangChain
Source: https://docs.klavis.ai/documentation/ai-platform-integration/langchain
Learn how to build multi-agent workflows using LangChain's agent framework with Klavis MCP Servers
## Prerequisites
Before we begin, you'll need:
Get your API key from OpenAI Platform (LangChain uses OpenAI as the default LLM)
Get your API key from Klavis AI
## Installation
First, install the required packages:
```bash Python
pip install langchain-mcp-adapters langgraph langchain-openai klavis
```
```bash TypeScript
npm install @langchain/mcp-adapters @langchain/langgraph @langchain/openai klavis
```
## Setup Environment Variables
```python Python
import os
# Set environment variables
os.environ["OPENAI_API_KEY"] = "your-openai-api-key-here" # Replace with your actual OpenAI API key
os.environ["KLAVIS_API_KEY"] = "your-klavis-api-key-here" # Replace with your actual Klavis API key
```
```typescript TypeScript
// Set environment variables in your .env file
process.env.OPENAI_API_KEY = "your-openai-api-key-here"; // Replace with your actual OpenAI API key
process.env.KLAVIS_API_KEY = "your-klavis-api-key-here"; // Replace with your actual Klavis API key
```
## Basic Setup
```python Python
import os
import asyncio
from klavis import Klavis
from klavis.types import McpServerName
from langchain_mcp_adapters.client import MultiServerMCPClient
from langgraph.prebuilt import create_react_agent
from langchain_openai import ChatOpenAI
# Initialize clients
klavis_client = Klavis(api_key=os.getenv("KLAVIS_API_KEY"))
llm = ChatOpenAI(model="gpt-4o-mini", api_key=os.getenv("OPENAI_API_KEY"))
```
```typescript TypeScript
import { KlavisClient, Klavis } from 'klavis';
import { MultiServerMCPClient } from "@langchain/mcp-adapters";
import { ChatOpenAI } from "@langchain/openai";
import { createReactAgent } from "@langchain/langgraph/prebuilt";
// Initialize clients
const klavisClient = new KlavisClient({ apiKey: process.env.KLAVIS_API_KEY });
const llm = new ChatOpenAI({
modelName: "gpt-4o-mini",
apiKey: process.env.OPENAI_API_KEY
});
```
## Single MCP Server Integration
Let's start with creating a simple AI agent that can summarize YouTube videos using LangChain and a single Klavis MCP Server.
### Step 1: Create MCP Server Instance
```python Python
# Create a YouTube MCP server and get the server URL
youtube_mcp_instance = klavis_client.mcp_server.create_server_instance(
server_name=McpServerName.YOUTUBE,
user_id="1234",
platform_name="klavis",
)
youtube_mcp_server_url = youtube_mcp_instance.server_url
print(f"🔗 YouTube MCP server created at: {youtube_mcp_server_url}")
```
```typescript TypeScript
// Create a YouTube MCP server and get the server URL
const youtubeMcpInstance = await klavisClient.mcpServer.createServerInstance({
serverName: Klavis.McpServerName.Youtube,
userId: "1234",
platformName: "Klavis",
});
const youtubeMcpServerUrl = youtubeMcpInstance.serverUrl;
console.log(`🔗 YouTube MCP server created at: ${youtubeMcpServerUrl}`);
```
### Step 2: Create LangChain Agent with MCP Tools
```python Python
# Create MCP client with YouTube server
mcp_client = MultiServerMCPClient({
"youtube": {
"transport": "streamable_http",
"url": youtube_mcp_server_url
}
})
# Get tools from MCP server
tools = asyncio.run(mcp_client.get_tools())
# Create agent with MCP-based tools
youtube_agent = create_react_agent(
model=llm,
tools=tools,
prompt="You are an AI assistant that uses MCP tools to analyze YouTube videos."
)
print("🤖 YouTube AI agent created successfully!")
```
```typescript TypeScript
// Create MCP client with YouTube server
const mcpClient = new MultiServerMCPClient({
throwOnLoadError: true,
useStandardContentBlocks: true,
mcpServers: {
youtube: {
url: youtubeMcpServerUrl,
transport: "streamable_http"
}
}
});
// Get tools from MCP server
const tools = await mcpClient.getTools();
// Create agent with MCP-based tools
const youtubeAgent = createReactAgent({
llm: llm,
tools: tools,
systemMessage: "You are an AI assistant that uses MCP tools to analyze YouTube videos."
});
console.log("🤖 YouTube AI agent created successfully!");
```
### Step 3: Use the Agent
```python Python
YOUTUBE_VIDEO_URL = "https://www.youtube.com/watch?v=LCEmiRjPEtQ" # pick a video you like!
response = asyncio.run(youtube_agent.ainvoke({
"messages": [{"role": "user", "content": f"Summarize this video: {YOUTUBE_VIDEO_URL}"}]
}))
print("✅ Video Summary:", response["messages"][-1].content)
```
```typescript TypeScript
const YOUTUBE_VIDEO_URL = "https://www.youtube.com/watch?v=MmiveeGxfX0"; // pick a video you like!
try {
const response = await youtubeAgent.invoke({
messages: [{ role: "user", content: `Summarize this video: ${YOUTUBE_VIDEO_URL}` }]
});
console.log("✅ Video Summary:", response);
} catch (error) {
console.error("Error during agent execution:", error);
if (error.name === "ToolException") {
console.error("Tool execution failed:", error.message);
}
} finally {
await mcpClient.close();
}
```
## Multiple MCP Servers Integration
Now let's build a more sophisticated multi-agent workflow that summarizes YouTube videos and sends the summary via email using multiple MCP servers.
### Step 1: Create Multiple MCP Server Instances
```python Python
import webbrowser
# Create YouTube MCP server
youtube_mcp_instance = klavis_client.mcp_server.create_server_instance(
server_name=McpServerName.YOUTUBE,
user_id="1234",
platform_name="klavis",
)
# Create Gmail MCP server with OAuth authorization
gmail_mcp_instance = klavis_client.mcp_server.create_server_instance(
server_name=McpServerName.GMAIL,
user_id="1234",
platform_name="klavis",
)
print("✅ Created YouTube and Gmail MCP instances")
# Open Gmail OAuth authorization
webbrowser.open(gmail_mcp_instance.oauth_url)
print(f"🔐 Opening OAuth authorization for Gmail, if you are not redirected, please open the following URL in your browser: {gmail_mcp_instance.oauth_url}")
```
```typescript TypeScript
// Create YouTube MCP server
const youtubeMcpInstance = await klavisClient.mcpServer.createServerInstance({
serverName: Klavis.McpServerName.Youtube,
userId: "1234",
platformName: "Klavis",
});
// Create Gmail MCP server with OAuth authorization
const gmailMcpInstance = await klavisClient.mcpServer.createServerInstance({
serverName: Klavis.McpServerName.Gmail,
userId: "1234",
platformName: "Klavis",
});
console.log("✅ Created YouTube and Gmail MCP instances");
// Open Gmail OAuth authorization
console.log("🔐 Opening OAuth authorization for Gmail");
console.log(`If you are not redirected, please open the following URL in your browser: ${gmailMcpInstance.oauthUrl}`);
// In a web environment, you might redirect the user
if (typeof window !== 'undefined') {
window.open(gmailMcpInstance.oauthUrl);
}
```
### Step 2: Create Multi-Agent Workflow
```python Python
from langgraph.graph import StateGraph, MessagesState
from typing import Annotated, Literal
from langchain_core.messages import BaseMessage
# Get MCP server URLs
youtube_mcp_server_url = youtube_mcp_instance.server_url
gmail_mcp_server_url = gmail_mcp_instance.server_url
# Create a single MCP client with both servers
mcp_client = MultiServerMCPClient({
"youtube": {
"transport": "streamable_http",
"url": youtube_mcp_server_url
},
"gmail": {
"transport": "streamable_http",
"url": gmail_mcp_server_url
}
})
# Get tools from all MCP servers
all_tools = asyncio.run(mcp_client.get_tools())
# Create agents with access to all tools
youtube_agent = create_react_agent(
model=llm,
tools=all_tools,
prompt="You are a YouTube video summarization expert. Use MCP tools to analyze and summarize videos. After summarizing, pass the summary to the gmail agent."
)
gmail_agent = create_react_agent(
model=llm,
tools=all_tools,
prompt="You are an email assistant. Use MCP tools to send emails via Gmail."
)
print("🤖 Multi-agent workflow created with YouTube and Gmail agents!")
```
```typescript TypeScript
import { StateGraph, MessagesAnnotation } from "@langchain/langgraph";
// Get MCP server URLs
const youtubeMcpServerUrl = youtubeMcpInstance.serverUrl;
const gmailMcpServerUrl = gmailMcpInstance.serverUrl;
// Create a single MCP client with both servers
const mcpClient = new MultiServerMCPClient({
throwOnLoadError: true,
useStandardContentBlocks: true,
mcpServers: {
youtube: {
url: youtubeMcpServerUrl,
transport: "streamable_http"
},
gmail: {
url: gmailMcpServerUrl,
transport: "streamable_http"
}
}
});
// Get tools from all MCP servers
const allTools = await mcpClient.getTools();
// Create agents with access to all tools
const youtubeAgent = createReactAgent({
llm: llm,
tools: allTools,
systemMessage: "You are a YouTube video summarization expert. Use MCP tools to analyze and summarize videos. After summarizing, pass the summary to the gmail agent."
});
const gmailAgent = createReactAgent({
llm: llm,
tools: allTools,
systemMessage: "You are an email assistant. Use MCP tools to send emails via Gmail."
});
console.log("🤖 Multi-agent workflow created with YouTube and Gmail agents!");
```
### Step 3: Create Workflow Graph
```python Python
# Define workflow state
class WorkflowState(MessagesState):
summary: str = ""
email_sent: bool = False
# Define workflow functions
def youtube_summarizer(state: WorkflowState):
"""Summarize YouTube video"""
response = asyncio.run(youtube_agent.ainvoke(state))
return {
"messages": response["messages"],
"summary": response["messages"][-1].content
}
def email_sender(state: WorkflowState):
"""Send email with summary"""
email_prompt = f"Send the following summary via email: {state['summary']}"
response = asyncio.run(gmail_agent.ainvoke({
"messages": [{"role": "user", "content": email_prompt}]
}))
return {
"messages": response["messages"],
"email_sent": True
}
# Create the workflow graph
workflow = StateGraph(WorkflowState)
workflow.add_node("youtube_summarizer", youtube_summarizer)
workflow.add_node("email_sender", email_sender)
# Define the flow
workflow.set_entry_point("youtube_summarizer")
workflow.add_edge("youtube_summarizer", "email_sender")
workflow.set_finish_point("email_sender")
# Compile the workflow
app = workflow.compile()
print("📊 Multi-agent workflow graph created!")
```
```typescript TypeScript
// Define workflow functions
const youtubeSummarizer = async (state: typeof MessagesAnnotation.State) => {
const response = await youtubeAgent.invoke(state);
return {
messages: response.messages,
summary: response.messages[response.messages.length - 1].content
};
};
const emailSender = async (state: typeof MessagesAnnotation.State & { summary: string }) => {
const emailPrompt = `Send the following summary via email: ${state.summary}`;
const response = await gmailAgent.invoke({
messages: [{ role: "user", content: emailPrompt }]
});
return {
messages: response.messages,
emailSent: true
};
};
// Create the workflow graph
const workflow = new StateGraph(MessagesAnnotation)
.addNode("youtubeSummarizer", youtubeSummarizer)
.addNode("emailSender", emailSender)
.setEntryPoint("youtubeSummarizer")
.addEdge("youtubeSummarizer", "emailSender")
.setFinishPoint("emailSender");
// Compile the workflow
const app = workflow.compile();
console.log("📊 Multi-agent workflow graph created!");
```
### Step 4: Run the Multi-Agent Workflow
```python Python
YOUTUBE_VIDEO_URL = "https://www.youtube.com/watch?v=LCEmiRjPEtQ" # pick a video you like!
EMAIL_RECIPIENT = "example@email.com" # Replace with your email
initial_state = {
"messages": [{
"role": "user",
"content": f"Summarize this video {YOUTUBE_VIDEO_URL} and send it to {EMAIL_RECIPIENT}"
}]
}
# Run the workflow
result = asyncio.run(app.ainvoke(initial_state))
print("\n✅ Workflow Result:", result)
```
```typescript TypeScript
const YOUTUBE_VIDEO_URL = "https://www.youtube.com/watch?v=MmiveeGxfX0"; // pick a video you like!
const EMAIL_RECIPIENT = "example@email.com"; // Replace with your email
const initialState = {
messages: [{
role: "user" as const,
content: `Summarize this video ${YOUTUBE_VIDEO_URL} and send it to ${EMAIL_RECIPIENT}`
}]
};
try {
// Run the workflow
const result = await app.invoke(initialState);
console.log("\n✅ Workflow Result:", result);
} catch (error) {
console.error("Error during workflow execution:", error);
} finally {
// Close MCP client
await mcpClient.close();
}
```
## Next Steps
Try other available servers like Slack, Notion, GitHub, etc.
Build more complex multi-agent systems with conditional routing
Create custom tools and integrate them with your workflows
Scale these patterns for production applications with proper error handling
## Useful Resources
* [LangChain Documentation](https://python.langchain.com/docs/)
* [LangGraph Documentation](https://langchain-ai.github.io/langgraph/)
* [LangChain MCP Adapters](https://pypi.org/project/langchain-mcp-adapters/)
* [Klavis AI Documentation](https://docs.klavis.ai/)
* [MCP Protocol Specification](https://modelcontextprotocol.io/)
* [Klavis MCP Servers](/documentation/mcp-server)
**Happy building with LangChain and Klavis!** 🚀
# LlamaIndex
Source: https://docs.klavis.ai/documentation/ai-platform-integration/llamaindex
Learn how to build multi-agent workflows using LlamaIndex's agent framework with Klavis MCP Servers
## Partnership
LlamaIndex has officially showcased their integration with Klavis AI in [this LinkedIn post](https://www.linkedin.com/posts/llamaindex_build-ai-agents-that-connect-to-youtube-activity-7344107221221355521-UrOl?utm_source=share\&utm_medium=member_desktop\&rcm=ACoAACh0ewEBh9MR1nb_U_x3e5bqgDYgETJ8d5Y), demonstrating how to build AI agents that connect to MCP Servers in just a few lines of code.
## Prerequisites
Before we begin, you'll need:
Get your API key from OpenAI Platform (LlamaIndex uses OpenAI as the default LLM)
Get your API key from Klavis AI
## Installation
First, install the required packages:
```bash Python
pip install llama-index llama-index-tools-mcp klavis
```
```bash TypeScript
npm install @llamaindex/tools @llamaindex/workflow @llamaindex/openai klavis
```
## Setup Environment Variables
```python Python
import os
# Set environment variables
os.environ["OPENAI_API_KEY"] = "your-openai-api-key-here" # Replace with your actual OpenAI API key
os.environ["KLAVIS_API_KEY"] = "your-klavis-api-key-here" # Replace with your actual Klavis API key
```
```typescript TypeScript
// Set environment variables in your .env file
process.env.OPENAI_API_KEY = "your-openai-api-key-here"; // Replace with your actual OpenAI API key
process.env.KLAVIS_API_KEY = "your-klavis-api-key-here"; // Replace with your actual Klavis API key
```
## Basic Setup
```python Python
import os
from klavis import Klavis
from klavis.types import McpServerName
from llama_index.llms.openai import OpenAI
from llama_index.tools.mcp import (
BasicMCPClient,
get_tools_from_mcp_url,
aget_tools_from_mcp_url,
)
# Initialize clients
klavis_client = Klavis(api_key=os.getenv("KLAVIS_API_KEY"))
llm = OpenAI(model="gpt-4o-mini", api_key=os.getenv("OPENAI_API_KEY"))
```
```typescript TypeScript
import { KlavisClient, Klavis } from 'klavis';
import { mcp } from "@llamaindex/tools";
import { agent, multiAgent } from "@llamaindex/workflow";
import { openai } from "@llamaindex/openai";
// Initialize clients
const klavisClient = new KlavisClient({ apiKey: process.env.KLAVIS_API_KEY });
```
## Single Agent Integration
Let's start with creating a simple AI agent that can summarize YouTube videos using LlamaIndex and Klavis MCP Server.
### Step 1: Create MCP Server Instance
```python Python
# Create a YouTube MCP server and get the server URL
youtube_mcp_instance = klavis_client.mcp_server.create_server_instance(
server_name=McpServerName.YOUTUBE,
user_id="1234",
platform_name="Klavis",
)
youtube_mcp_server_url = youtube_mcp_instance.server_url
print(f"🔗 YouTube MCP server created at: {youtube_mcp_server_url}")
```
```typescript TypeScript
// Create a YouTube MCP server and get the server URL
const youtubeMcpInstance = await klavisClient.mcpServer.createServerInstance({
serverName: Klavis.McpServerName.Youtube,
userId: "1234",
platformName: "Klavis",
});
const youtubeMcpServerUrl = youtubeMcpInstance.serverUrl;
console.log(`🔗 YouTube MCP server created at: ${youtubeMcpServerUrl}`);
```
### Step 2: Create LlamaIndex Agent with MCP Tools
```python Python
from llama_index.core.agent.workflow import FunctionAgent
# Get tools from MCP server
youtube_tools = await aget_tools_from_mcp_url(
youtube_mcp_server_url,
client=BasicMCPClient(youtube_mcp_server_url)
)
# Create agent with MCP-based tools
youtube_agent = FunctionAgent(
name="youtube_agent",
description="Agent using MCP-based tools",
tools=youtube_tools,
llm=llm,
system_prompt="You are an AI assistant that uses MCP tools to analyze YouTube videos."
)
print("🤖 YouTube AI agent created successfully!")
```
```typescript TypeScript
// Create MCP server connection
const youtubeServer = mcp({
url: youtubeMcpServerUrl,
verbose: true,
});
// Get tools from MCP server
const youtubeTools = await youtubeServer.tools();
// Create agent with MCP-based tools
const youtubeAgent = agent({
name: "youtube_agent",
llm: openai({ model: "gpt-4o" }),
tools: youtubeTools,
systemPrompt: "You are an AI assistant that uses MCP tools to analyze YouTube videos."
});
console.log("🤖 YouTube AI agent created successfully!");
```
### Step 3: Use the Agent
```python Python
YOUTUBE_VIDEO_URL = "https://www.youtube.com/watch?v=MmiveeGxfX0" # pick a video you like!
response = await youtube_agent.run(f"Summarize this video: {YOUTUBE_VIDEO_URL}")
print("✅ Video Summary:", response)
```
```typescript TypeScript
const YOUTUBE_VIDEO_URL = "https://www.youtube.com/watch?v=MmiveeGxfX0"; // pick a video you like!
const response = await youtubeAgent.run(`Summarize this video: ${YOUTUBE_VIDEO_URL}`);
console.log("✅ Video Summary:", response);
```
## Multi-Agent Workflow
Now let's build a more sophisticated multi-agent workflow that summarizes YouTube videos and sends the summary via email.
### Step 1: Create Multiple MCP Server Instances
```python Python
import webbrowser
# Create YouTube MCP server
youtube_mcp_instance = klavis_client.mcp_server.create_server_instance(
server_name=McpServerName.YOUTUBE,
user_id="1234",
platform_name="Klavis",
)
# Create Gmail MCP server with OAuth authorization
gmail_mcp_instance = klavis_client.mcp_server.create_server_instance(
server_name=McpServerName.GMAIL,
user_id="1234",
platform_name="Klavis",
)
print("✅ Created YouTube and Gmail MCP instances")
# Open Gmail OAuth authorization
webbrowser.open(gmail_mcp_instance.oauth_url)
print(f"🔐 Opening OAuth authorization for Gmail, if you are not redirected, please open the following URL in your browser: {gmail_mcp_instance.oauth_url}")
```
```typescript TypeScript
// Create YouTube MCP server
const youtubeMcpInstance = await klavisClient.mcpServer.createServerInstance({
serverName: Klavis.McpServerName.Youtube,
userId: "1234",
platformName: "Klavis",
});
// Create Gmail MCP server with OAuth authorization
const gmailMcpInstance = await klavisClient.mcpServer.createServerInstance({
serverName: Klavis.McpServerName.Gmail,
userId: "1234",
platformName: "Klavis",
});
console.log("✅ Created YouTube and Gmail MCP instances");
// Open Gmail OAuth authorization
console.log("🔐 Opening OAuth authorization for Gmail");
console.log(`If you are not redirected, please open the following URL in your browser: ${gmailMcpInstance.oauthUrl}`);
// In a web environment, you might redirect the user
window.open(gmailMcpInstance.oauthUrl);
```
### Step 2: Create Multi-Agent Workflow
```python Python
from llama_index.core.agent.workflow import FunctionAgent, AgentWorkflow
# Get MCP server URLs
youtube_mcp_server_url = youtube_mcp_instance.server_url
gmail_mcp_server_url = gmail_mcp_instance.server_url
# Get tools from both MCP servers
youtube_tools = await aget_tools_from_mcp_url(
youtube_mcp_server_url,
client=BasicMCPClient(youtube_mcp_server_url)
)
gmail_tools = await aget_tools_from_mcp_url(
gmail_mcp_server_url,
client=BasicMCPClient(gmail_mcp_server_url)
)
# Create specialized agents
youtube_agent = FunctionAgent(
name="youtube_agent",
description="Agent that can summarize YouTube videos",
tools=youtube_tools,
llm=llm,
system_prompt="You are a YouTube video summarization expert. Use MCP tools to analyze and summarize videos.",
can_handoff_to=["gmail_agent"],
)
gmail_agent = FunctionAgent(
name="gmail_agent",
description="Agent that can send emails via Gmail",
tools=gmail_tools,
llm=llm,
system_prompt="You are an email assistant. Use MCP tools to send emails via Gmail."
)
# Create multi-agent workflow
workflow = AgentWorkflow(
agents=[youtube_agent, gmail_agent],
root_agent="youtube_agent",
)
print("🤖 Multi-agent workflow created with YouTube and Gmail agents!")
```
```typescript TypeScript
// Get MCP server URLs
const youtubeMcpServerUrl = youtubeMcpInstance.serverUrl;
const gmailMcpServerUrl = gmailMcpInstance.serverUrl;
// Create MCP server connections
const youtubeServer = mcp({
url: youtubeMcpServerUrl,
verbose: true,
});
const gmailServer = mcp({
url: gmailMcpServerUrl,
verbose: true,
});
// Get tools from both MCP servers
const youtubeTools = await youtubeServer.tools();
const gmailTools = await gmailServer.tools();
// Create specialized agents
const youtubeAgent = agent({
name: "youtube_agent",
llm: openai({ model: "gpt-4o" }),
tools: youtubeTools,
systemPrompt: "You are a YouTube video summarization expert. Use MCP tools to analyze and summarize videos.",
});
const gmailAgent = agent({
name: "gmail_agent",
llm: openai({ model: "gpt-4o" }),
tools: gmailTools,
systemPrompt: "You are an email assistant. Use MCP tools to send emails via Gmail."
});
// Create multi-agent workflow
const agents = multiAgent({
agents: [youtubeAgent, gmailAgent],
rootAgent: youtubeAgent,
});
console.log("🤖 Multi-agent workflow created with YouTube and Gmail agents!");
```
### Step 3: Run the Multi-Agent Workflow
```python Python
YOUTUBE_VIDEO_URL = "https://www.youtube.com/watch?v=MmiveeGxfX0" # pick a video you like!
EMAIL_RECIPIENT = "example@email.com" # Replace with your email
resp = await workflow.run(
user_msg=f"Summarize this video {YOUTUBE_VIDEO_URL} and send it to {EMAIL_RECIPIENT}"
)
print("\n✅ Workflow Result:", resp.response.content)
```
```typescript TypeScript
const YOUTUBE_VIDEO_URL = "https://www.youtube.com/watch?v=MmiveeGxfX0"; // pick a video you like!
const EMAIL_RECIPIENT = "example@email.com"; // Replace with your email
const resp = await agents.run(
`Summarize this video ${YOUTUBE_VIDEO_URL} and send it to ${EMAIL_RECIPIENT}`
);
console.log("\n✅ Workflow Result:", resp);
```
## Next Steps
Try other available servers like Slack, Notion, GitHub, etc.
Build more complex multi-agent systems with branching logic
Create custom tools and integrate them with your workflows
Scale these patterns for production applications
## Useful Resources
* [LlamaIndex Documentation](https://docs.llamaindex.ai/)
* [LlamaIndex Agent Workflows](https://docs.llamaindex.ai/en/stable/understanding/agent/multi_agents/)
* [Klavis AI Documentation](https://docs.klavis.ai/)
* [MCP Protocol Specification](https://modelcontextprotocol.io/)
* [Klavis MCP Servers](/documentation/mcp-server)
**Happy building with LlamaIndex and Klavis!** 🚀
# Mastra
Source: https://docs.klavis.ai/documentation/ai-platform-integration/mastra
Learn how to build AI agents that integrate Mastra framework with Klavis MCP Servers for enhanced functionality
## Partnership
Mastra has officially featured Klavis AI in [their MCP registry documentation](https://mastra.ai/en/docs/tools-mcp/mcp-overview#connecting-to-an-mcp-registry), showcasing how to connect to MCP servers for building powerful AI agents.
# Mastra + Klavis AI Integration
This tutorial demonstrates how to use Mastra, an open-source TypeScript framework for building AI agents, with Klavis MCP (Model Context Protocol) servers.
## Prerequisites
Before we begin, you'll need:
Get your API key from OpenAI Platform
Get your API key from Klavis AI
## Getting Started
You can find the complete example code in Klavis GitHub repository:
**[📁 Checkout the code here](https://github.com/Klavis-AI/klavis/tree/main/examples/mastra)**
## Setup Environment Variables
Create a `.env` file in your project root:
```env
OPENAI_API_KEY=your_openai_api_key_here
KLAVIS_API_KEY=your_klavis_api_key_here
```
## Project Structure
```
mastra-klavis-example/
├── src/
│ └── mastra/
│ └── index.ts
├── package.json
└── tsconfig.json
```
## Code Example
```typescript
import { Mastra } from '@mastra/core/mastra';
import { Agent } from '@mastra/core/agent';
import { openai } from '@ai-sdk/openai';
import { MCPClient } from '@mastra/mcp';
import { KlavisClient, Klavis } from 'klavis';
import open from 'open';
/**
* Creates a Gmail MCP Agent with tools from a Klavis-hosted server
*/
export const createGmailMcpAgent = async (userId: string = 'test-user', platformName: string = 'test-platform'): Promise => {
const klavis = new KlavisClient({ apiKey: process.env.KLAVIS_API_KEY! });
// Create a new Gmail MCP server instance
const instance = await klavis.mcpServer.createServerInstance({
serverName: Klavis.McpServerName.Gmail,
userId,
platformName,
});
// Redirect user to authorize
const response = await klavis.mcpServer.getOAuthUrl({
serverName: Klavis.McpServerName.Gmail,
instanceId: instance.instanceId,
});
open(response.oauthUrl);
// Initialize the MCP client
const mcpClient = new MCPClient({
servers: {
gmail: {
url: new URL(instance.serverUrl),
},
},
});
// Get tools from the server
const tools = await mcpClient.getTools();
// Create agent
return new Agent({
name: 'Gmail MCP Agent',
instructions: `You are a Gmail agent with access to Gmail tools: read, send, search emails, and manage labels.`,
model: openai('gpt-4o-mini'),
tools,
});
};
const agent = await createGmailMcpAgent();
export const mastra = new Mastra({
agents: { agent },
});
```
## Running the Agent
```bash
npm install
npm run dev
```
## Video Tutorial
## Summary
This implementation demonstrates a clean and focused approach to integrating Mastra with Klavis MCP servers for Gmail functionality. The agent can handle Gmail operations like reading, sending, searching emails, and managing labels through the MCP protocol.
## Useful Resources
* [Mastra Doc](https://mastra.ai/docs)
* [Mastra GitHub Repo](https://github.com/mastra-ai/mastra)
* [MCP Spec](https://modelcontextprotocol.io/)
**Happy building with Mastra and Klavis!** 🚀
# OpenAI
Source: https://docs.klavis.ai/documentation/ai-platform-integration/openai
Learn how to build AI agents that integrate OpenAI's models with Klavis MCP Servers for enhanced functionality
[](https://colab.research.google.com/github/klavis-ai/klavis/blob/main/examples/openai/Use_Klavis_with_OpenAI.ipynb)
# OpenAI + Klavis AI Integration
This tutorial demonstrates how to use OpenAI function calling with Klavis MCP (Model Context Protocol) servers.
## Prerequisites
Before we begin, you'll need:
Get your API key from OpenAI Platform
Get your API key from Klavis AI
## Installation
First, install the required packages:
```bash Python
pip install openai klavis requests
```
```bash TypeScript
npm install openai klavis
```
## Setup Environment Variables
```python Python
import os
import json
from openai import OpenAI
from klavis import Klavis
from klavis.types import McpServerName, ToolFormat
# Set environment variables
os.environ["OPENAI_API_KEY"] = "YOUR_OPENAI_API_KEY" # Replace with your actual OpenAI API key
os.environ["KLAVIS_API_KEY"] = "YOUR_KLAVIS_API_KEY" # Replace with your actual Klavis API key
```
```typescript TypeScript
import OpenAI from 'openai';
import { KlavisClient, Klavis } from 'klavis';
// Set environment variables
process.env.OPENAI_API_KEY = "YOUR_OPENAI_API_KEY"; // Replace with your actual OpenAI API key
process.env.KLAVIS_API_KEY = "YOUR_KLAVIS_API_KEY"; // Replace with your actual Klavis API key
```
## Case Study 1: OpenAI + YouTube MCP Server
### Step 1 - Create YouTube MCP Server using Klavis
```python Python
klavis_client = Klavis(api_key=os.getenv("KLAVIS_API_KEY"))
youtube_mcp_instance = klavis_client.mcp_server.create_server_instance(
server_name=McpServerName.YOUTUBE,
user_id="1234",
platform_name="Klavis",
)
# print(f"🔗 YouTube MCP server created at: {youtube_mcp_instance.server_url}, and the instance id is {youtube_mcp_instance.instance_id}")
```
```typescript TypeScript
const klavisClient = new KlavisClient({ apiKey: process.env.KLAVIS_API_KEY });
const youtubeMcpInstance = await klavisClient.mcpServer.createServerInstance({
serverName: Klavis.McpServerName.Youtube,
userId: "1234",
platformName: "Klavis",
});
// console.log(`🔗 YouTube MCP server created at: ${youtubeMcpInstance.serverUrl}, and the instance id is ${youtubeMcpInstance.instanceId}`);
```
### Step 2 - Create general method to use MCP Server with OpenAI
```python Python
def openai_with_mcp_server(mcp_server_url: str, user_query: str):
openai_client = OpenAI(api_key=os.getenv("OPENAI_API_KEY"))
messages = [
{"role": "system", "content": "You are a helpful assistant. Use the available tools to answer the user's question."},
{"role": "user", "content": f"{user_query}"}
]
mcp_server_tools = klavis_client.mcp_server.list_tools(
server_url=mcp_server_url,
format=ToolFormat.OPENAI,
)
response = openai_client.chat.completions.create(
model="gpt-4o-mini",
messages=messages,
tools=mcp_server_tools.tools
)
messages.append(response.choices[0].message)
if response.choices[0].message.tool_calls:
for tool_call in response.choices[0].message.tool_calls:
function_name = tool_call.function.name
function_args = json.loads(tool_call.function.arguments)
print(f"🔧 Calling: {function_name}, with args: {function_args}")
result = klavis_client.mcp_server.call_tools(
server_url=mcp_server_url,
tool_name=function_name,
tool_args=function_args,
)
messages.append({
"role": "tool",
"tool_call_id": tool_call.id,
"content": str(result)
})
final_response = openai_client.chat.completions.create(
model="gpt-4o-mini",
messages=messages
)
return final_response.choices[0].message.content
```
```typescript TypeScript
async function openaiWithMcpServer(mcpServerUrl: string, userQuery: string) {
const openaiClient = new OpenAI({ apiKey: process.env.OPENAI_API_KEY });
const messages = [
{ role: "system", content: "You are a helpful assistant. Use the available tools to answer the user's question." },
{ role: "user", content: userQuery }
];
const mcpServerTools = await klavisClient.mcpServer.listTools({
serverUrl: mcpServerUrl,
format: Klavis.ToolFormat.Openai,
});
const response = await openaiClient.chat.completions.create({
model: "gpt-4o-mini",
messages: messages,
tools: mcpServerTools.tools
});
messages.push(response.choices[0].message);
if (response.choices[0].message.tool_calls) {
for (const toolCall of response.choices[0].message.tool_calls) {
const functionName = toolCall.function.name;
const functionArgs = JSON.parse(toolCall.function.arguments);
console.log(`🔧 Calling: ${functionName}, with args:`, functionArgs);
const result = await klavisClient.mcpServer.callTools({
serverUrl: mcpServerUrl,
toolName: functionName,
toolArgs: functionArgs,
});
messages.push({
role: "tool",
tool_call_id: toolCall.id,
content: JSON.stringify(result)
});
}
}
const finalResponse = await openaiClient.chat.completions.create({
model: "gpt-4o-mini",
messages: messages
});
return finalResponse.choices[0].message.content;
}
```
### Step 3 - Summarize your favorite video!
```python Python
YOUTUBE_VIDEO_URL = "https://www.youtube.com/watch?v=LCEmiRjPEtQ" # pick a video you like!
result = openai_with_mcp_server(
mcp_server_url=youtube_mcp_instance.server_url,
user_query=f"Summarize this YouTube video with timestamps: {YOUTUBE_VIDEO_URL}"
)
print(result)
```
```typescript TypeScript
const YOUTUBE_VIDEO_URL = "https://www.youtube.com/watch?v=LCEmiRjPEtQ"; // pick a video you like!
const result = await openaiWithMcpServer(
youtubeMcpInstance.serverUrl,
`Summarize this YouTube video with timestamps: ${YOUTUBE_VIDEO_URL}`
);
console.log(result);
```
✅ Great! You've successfully created an AI agent that uses OpenAI function calling with Klavis MCP servers to summarize YouTube videos!
## Case Study 2: OpenAI + Gmail MCP Server (OAuth needed)
```python Python
import webbrowser
gmail_mcp_server = klavis_client.mcp_server.create_server_instance(
server_name=McpServerName.GMAIL,
user_id="1234",
platform_name="Klavis",
)
webbrowser.open(gmail_mcp_server.oauth_url)
print(f"🔐 Opening OAuth authorization for Gmail, if you are not redirected, please open the following URL in your browser: {gmail_mcp_server.oauth_url}")
```
```typescript TypeScript
const gmailMcpServer = await klavisClient.mcpServer.createServerInstance({
serverName: Klavis.McpServerName.Gmail,
userId: "1234",
platformName: "Klavis",
});
// In a web environment, you might redirect the user
window.open(gmailMcpServer.oauthUrl);
console.log(`🔐 Opening OAuth authorization for Gmail, if you are not redirected, please open the following URL in your browser: ${gmailMcpServer.oauthUrl}`);
```
After completing the OAuth authorization, you can send emails using the agent.
```python Python
EMAIL_RECIPIENT = "zihaolin@klavis.ai" # Replace with your email
EMAIL_SUBJECT = "Test OpenAI + Gmail MCP Server"
EMAIL_BODY = "Hello World"
result = openai_with_mcp_server(
mcp_server_url=gmail_mcp_server.server_url,
user_query=f"Please send an email to {EMAIL_RECIPIENT} with subject {EMAIL_SUBJECT} and body {EMAIL_BODY}"
)
print(result)
```
```typescript TypeScript
const EMAIL_RECIPIENT = "zihaolin@klavis.ai"; // Replace with your email
const EMAIL_SUBJECT = "Test OpenAI + Gmail MCP Server";
const EMAIL_BODY = "Hello World";
const result = await openaiWithMcpServer(
gmailMcpServer.serverUrl,
`Please send an email to ${EMAIL_RECIPIENT} with subject ${EMAIL_SUBJECT} and body ${EMAIL_BODY}`
);
console.log(result);
```
## Summary
This tutorial demonstrated how to integrate OpenAI's function calling capabilities with Klavis MCP servers to create powerful AI applications. We covered two practical examples:
**🎥 YouTube Integration**: Built an AI assistant that can automatically summarize YouTube videos by extracting transcripts and providing detailed, timestamped summaries.
**📧 Gmail Integration**: Created an AI-powered email assistant that can send emails through Gmail with OAuth authentication.
### Key Takeaways:
* **Easy Setup**: Klavis MCP servers can be created with just a few lines of code
* **OpenAI Compatible**: All tools are formatted for seamless OpenAI function calling
* **Versatile**: Support for both simple APIs (YouTube) and OAuth-authenticated services (Gmail)
* **Scalable**: The same pattern can be applied to any of the MCP servers available in Klavis
## Next Steps
Try other available servers like Notion, Salesforce, Google Drive, etc.
Create sophisticated agents that combine multiple services
Scale these patterns for production applications
Build your own MCP servers for custom integrations
## Useful Resources
* [OpenAI API Documentation](https://platform.openai.com/docs)
* [Klavis AI Documentation](https://docs.klavis.ai/)
* [MCP Protocol Specification](https://modelcontextprotocol.io/)
* [OpenAI Function Calling Guide](https://platform.openai.com/docs/guides/function-calling)
**Happy building!** 🚀
# Overview
Source: https://docs.klavis.ai/documentation/ai-platform-integration/overview
Integrate Klavis MCP Servers with leading AI platforms to build powerful AI agents
# AI Platform Integrations
Klavis AI seamlessly integrates with leading AI platforms, enabling you to build sophisticated AI agents that can interact with external services and APIs via MCP.
## Available Integrations
}
href="/documentation/ai-platform-integration/claude"
/>
{"CrewAI"}
}
href="/documentation/ai-platform-integration/crewai"
/>
{"Fireworks"}
}
href="/documentation/ai-platform-integration/fireworks-ai"
/>
{"Gemini"}
}
href="/documentation/ai-platform-integration/gemini"
/>
{"LangChain"}
}
href="/documentation/ai-platform-integration/langchain"
/>
{"LlamaIndex"}
}
href="/documentation/ai-platform-integration/llamaindex"
/>
}
href="/documentation/ai-platform-integration/mastra"
/>
{"OpenAI icon"}
}
href="/documentation/ai-platform-integration/openai"
/>
{"together.ai"}
}
href="/documentation/ai-platform-integration/together-ai"
/>
## How It Works
The integration pattern is consistent across all AI platforms:
1. **Setup**: Configure your AI platform API key and Klavis API key
2. **MCP Instance**: Create MCP server instances for the services you need (YouTube, Gmail, Slack, etc.)
3. **Agent Creation**: Build an AI agent that discovers available tools from MCP servers
4. **Function Calling**: The AI platform's LLM decides which tools to use based on user requests
5. **Tool Execution**: Tools are executed through Klavis API to remote MCP Servers and results are returned to the LLM
6. **Smart Response**: The LLM generates intelligent responses based on tool results
## Common Use Cases
Summarize YouTube videos, analyze documents, extract insights from web content
Send emails, post to Slack, create calendar events, manage contacts
Query databases, update spreadsheets, sync information across platforms
Create tickets in Jira, update Notion pages, manage Asana tasks
Web search, document analysis, code generation, API integrations
CRM updates, sales workflows, customer support, reporting
## Getting Started
Select the AI platform that best fits your needs from our available integrations
Obtain API keys from both your chosen AI platform and Klavis AI
Use our step-by-step integration guides to build your first AI agent
Add more MCP servers to give your agent access to additional tools and services
Ready to build intelligent AI agents? Choose your preferred AI platform and start building!
# Together AI
Source: https://docs.klavis.ai/documentation/ai-platform-integration/together-ai
Learn how to build AI agents that integrate Together AI's powerful LLMs with Klavis MCP Servers
## Prerequisites
Before we begin, you'll need:
Get your API key from Together AI
Get your API key from Klavis AI
## Installation
First, install the required packages:
```bash Python
pip install together klavis
```
```bash TypeScript
npm install together-ai klavis
```
## Setup Environment Variables
```python Python
import os
# Set environment variables
os.environ["TOGETHER_API_KEY"] = "your-together-api-key-here" # Replace with your actual Together API key
os.environ["KLAVIS_API_KEY"] = "your-klavis-api-key-here" # Replace with your actual Klavis API key
```
```typescript TypeScript
// Set environment variables in your .env file
process.env.TOGETHER_API_KEY = "your-together-api-key-here"; // Replace with your actual Together API key
process.env.KLAVIS_API_KEY = "your-klavis-api-key-here"; // Replace with your actual Klavis API key
```
## Basic Setup
```python Python
import os
import json
from together import Together
from klavis import Klavis
from klavis.types import McpServerName, ToolFormat
# Initialize clients
together_client = Together(api_key=os.getenv("TOGETHER_API_KEY"))
klavis_client = Klavis(api_key=os.getenv("KLAVIS_API_KEY"))
```
```typescript TypeScript
import Together from 'together-ai';
import { KlavisClient, Klavis } from 'klavis';
// Initialize clients
const togetherClient = new Together({ apiKey: process.env.TOGETHER_API_KEY });
const klavisClient = new KlavisClient({ apiKey: process.env.KLAVIS_API_KEY });
```
## AI Agent with MCP Integration
Now we'll create an intelligent agent that uses Together AI's powerful LLMs with Klavis MCP servers. This agent will:
1. **Discover Tools**: Automatically find available tools from MCP servers
2. **Function Calling**: Use Together AI's function calling capabilities
3. **Tool Execution**: Execute tools through Klavis API
4. **Smart Responses**: Generate intelligent responses based on tool results
```python Python
class Agent:
def __init__(self, together_client, klavis_client, mcp_server_url, model="meta-llama/Llama-3.3-70B-Instruct-Turbo"):
self.together = together_client
self.klavis = klavis_client
self.mcp_server_url = mcp_server_url
self.model = model
print(f"🤖 Agent initialized with Together AI model: {self.model}")
def process_request(self, user_message):
# 1. Get available tools
mcp_tools = self.klavis.mcp_server.list_tools(
server_url=self.mcp_server_url,
format=ToolFormat.OPENAI,
)
# 2. Call LLM with tools
messages = [
{"role": "system", "content": "You are a helpful AI assistant with access to various tools."},
{"role": "user", "content": user_message}
]
response = self.together.chat.completions.create(
model=self.model,
messages=messages,
tools=mcp_tools.tools
)
assistant_message = response.choices[0].message
messages.append(assistant_message)
# 3. If LLM wants to use tools
if assistant_message.tool_calls:
# Execute each tool call
for tool_call in assistant_message.tool_calls:
tool_name = tool_call.function.name
tool_args = json.loads(tool_call.function.arguments)
print(f"🛠️ Calling tool: {tool_name} with args: {tool_args}")
# Call tool via Klavis SDK
tool_result = self.klavis.mcp_server.call_tools(
server_url=self.mcp_server_url,
tool_name=tool_name,
tool_args=tool_args,
)
messages.append({
"role": "tool",
"tool_call_id": tool_call.id,
"content": str(tool_result)
})
# 4. Get final response from LLM
final_response = self.together.chat.completions.create(
model=self.model,
messages=messages
)
return final_response.choices[0].message.content
# If no tools needed, return the assistant message directly
return assistant_message.content
```
```typescript TypeScript
class Agent {
private together: Together;
private klavis: KlavisClient;
private mcpServerUrl: string;
private model: string;
constructor(togetherClient: Together, klavisClient: KlavisClient, mcpServerUrl: string, model: string = "meta-llama/Llama-3.3-70B-Instruct-Turbo") {
this.together = togetherClient;
this.klavis = klavisClient;
this.mcpServerUrl = mcpServerUrl;
this.model = model;
console.log(`🤖 Agent initialized with Together AI model: ${this.model}`);
}
async processRequest(userMessage: string) {
// 1. Get available tools
const mcpTools = await this.klavis.mcpServer.listTools({
serverUrl: this.mcpServerUrl,
format: Klavis.ToolFormat.Openai,
});
// 2. Call LLM with tools
const messages = [
{ role: "system", content: "You are a helpful AI assistant with access to various tools." },
{ role: "user", content: userMessage }
];
const response = await this.together.chat.completions.create({
model: this.model,
messages: messages,
tools: mcpTools.tools
});
const assistantMessage = response.choices[0].message;
messages.push(assistantMessage);
// 3. If LLM wants to use tools
if (assistantMessage.tool_calls) {
// Execute each tool call
for (const toolCall of assistantMessage.tool_calls) {
const toolName = toolCall.function.name;
const toolArgs = JSON.parse(toolCall.function.arguments);
console.log(`🛠️ Calling tool: ${toolName} with args:`, toolArgs);
// Call tool via Klavis SDK
const toolResult = await this.klavis.mcpServer.callTools({
serverUrl: this.mcpServerUrl,
toolName: toolName,
toolArgs: toolArgs,
});
messages.push({
role: "tool",
tool_call_id: toolCall.id,
content: JSON.stringify(toolResult)
});
}
// 4. Get final response from LLM
const finalResponse = await this.together.chat.completions.create({
model: this.model,
messages: messages
});
return finalResponse.choices[0].message.content;
}
// If no tools needed, return the assistant message directly
return assistantMessage.content;
}
}
```
## Use Case Examples
### Example 1: Summarize YouTube Video
Set up Together AI and Klavis API clients
Create a YouTube MCP server instance
Use the agent to analyze and summarize a YouTube video
```python Python
# Example YouTube video URL - replace with any video you'd like to analyze
YOUTUBE_VIDEO_URL = "https://www.youtube.com/watch?v=TG6QOa2JJJQ"
# 1. Create YouTube MCP server instance
youtube_mcp_instance = klavis_client.mcp_server.create_server_instance(
server_name=McpServerName.YOUTUBE,
user_id="1234",
platform_name="Klavis",
)
# 2. Create an agent with YouTube MCP server
agent = Agent(
together_client=together_client,
klavis_client=klavis_client,
mcp_server_url=youtube_mcp_instance.server_url,
model="meta-llama/Llama-3.3-70B-Instruct-Turbo"
)
# 3. Process the request
response = agent.process_request(
f"Please analyze this YouTube video and provide a comprehensive summary with timestamps: {YOUTUBE_VIDEO_URL}"
)
print(response)
```
```typescript TypeScript
// Example YouTube video URL - replace with any video you'd like to analyze
const YOUTUBE_VIDEO_URL = "https://www.youtube.com/watch?v=TG6QOa2JJJQ";
// 1. Create YouTube MCP server instance
const youtubeMcpInstance = await klavisClient.mcpServer.createServerInstance({
serverName: Klavis.McpServerName.Youtube,
userId: "1234",
platformName: "Klavis",
});
// 2. Create an agent with YouTube MCP server
const agent = new Agent(
togetherClient,
klavisClient,
youtubeMcpInstance.serverUrl,
"meta-llama/Llama-3.3-70B-Instruct-Turbo"
);
// 3. Process the request
const response = await agent.processRequest(
`Please analyze this YouTube video and provide a comprehensive summary with timestamps: ${YOUTUBE_VIDEO_URL}`
);
console.log(response);
```
### Example 2: Send Email via Gmail
Gmail integration requires OAuth authentication, so you'll need to authorize the application in your browser.
```python Python
import webbrowser
# Create Gmail MCP server instance
gmail_mcp_instance = klavis_client.mcp_server.create_server_instance(
server_name=McpServerName.GMAIL,
user_id="1234",
platform_name="Klavis",
)
# Redirect to Gmail OAuth page for authorization
webbrowser.open(gmail_mcp_instance.oauth_url)
print(f"🔐 Opening OAuth authorization for Gmail")
print(f"If you are not redirected automatically, please open this URL: {gmail_mcp_instance.oauth_url}")
# Email configuration
EMAIL_RECIPIENT = "recipient@example.com" # Replace with the recipient's email
EMAIL_SUBJECT = "Greetings from Together AI + Klavis Integration"
EMAIL_BODY = "This is a test email sent using the Together AI and Klavis AI integration. The email was sent automatically by your AI agent!"
# After OAuth authorization is complete, create the Gmail agent
gmail_agent = Agent(
together_client=together_client,
klavis_client=klavis_client,
mcp_server_url=gmail_mcp_instance.server_url,
model="Qwen/Qwen2.5-72B-Instruct-Turbo"
)
# Send the email
response = gmail_agent.process_request(
f"Please send an email to {EMAIL_RECIPIENT} with the subject '{EMAIL_SUBJECT}' and the following body: '{EMAIL_BODY}'"
)
print(response)
```
```typescript TypeScript
// Create Gmail MCP server instance
const gmailMcpInstance = await klavisClient.mcpServer.createServerInstance({
serverName: Klavis.McpServerName.Gmail,
userId: "1234",
platformName: "Klavis",
});
// Redirect to Gmail OAuth page for authorization
console.log("🔐 Opening OAuth authorization for Gmail");
console.log(`If you are not redirected automatically, please open this URL: ${gmailMcpInstance.oauthUrl}`);
// In a web environment, you might redirect the user
window.open(gmailMcpInstance.oauthUrl);
// Email configuration
const EMAIL_RECIPIENT = "recipient@example.com"; // Replace with the recipient's email
const EMAIL_SUBJECT = "Greetings from Together AI + Klavis Integration";
const EMAIL_BODY = "This is a test email sent using the Together AI and Klavis AI integration. The email was sent automatically by your AI agent!";
// After OAuth authorization is complete, create the Gmail agent
const gmailAgent = new Agent(
togetherClient,
klavisClient,
gmailMcpInstance.serverUrl,
"Qwen/Qwen2.5-72B-Instruct-Turbo"
);
// Send the email
const response = await gmailAgent.processRequest(
`Please send an email to ${EMAIL_RECIPIENT} with the subject '${EMAIL_SUBJECT}' and the following body: '${EMAIL_BODY}'`
);
console.log(response);
```
## Next Steps
Try other available servers like Slack, Notion, CRM etc.
Test various Together AI models for different use cases.
Create sophisticated agents that combine multiple services
Scale these patterns for production applications
## Useful Resources
* [Together AI Documentation](https://docs.together.ai/)
* [Klavis AI Documentation](https://docs.klavis.ai/)
* [MCP Protocol Specification](https://modelcontextprotocol.io/)
* [Together AI Models](https://docs.together.ai/docs/inference-models)
* [Klavis MCP Servers](/documentation/mcp-server)
**Happy building with Together AI and Klavis!** 🚀
# Introduction
Source: https://docs.klavis.ai/documentation/introduction
Klavis AI is open source MCP integrations for AI Applications. Our API provides hosted, secure MCP servers, eliminating auth management and client-side code.
## SDK Quickstart
Get started with Klavis AI using our Python and TypeScript SDKs for seamless integration.
## AI Platform Integration
Integrate Klavis AI with popular LLM and AI frameworks for enhanced functionality.
}
href="/documentation/ai-platform-integration/claude"
/>
{"CrewAI"}
}
href="/documentation/ai-platform-integration/crewai"
/>
{"Fireworks"}
}
href="/documentation/ai-platform-integration/fireworks-ai"
/>
{"Gemini"}
}
href="/documentation/ai-platform-integration/gemini"
/>
{"LangChain"}
}
href="/documentation/ai-platform-integration/langchain"
/>
{"LlamaIndex"}
}
href="/documentation/ai-platform-integration/llamaindex"
/>
}
href="/documentation/ai-platform-integration/mastra"
/>
{"OpenAI icon"}
}
href="/documentation/ai-platform-integration/openai"
/>
{"together.ai"}
}
href="/documentation/ai-platform-integration/together-ai"
/>
## MCP Server Quickstart
Learn how to easily integrate with Klavis remote hosted MCP Servers.
{"Affinity icon"}
}
href="/documentation/mcp-server/affinity"
/>
}
href="/documentation/mcp-server/airtable"
/>
}
href="/documentation/mcp-server/asana"
/>
}
href="/documentation/mcp-server/attio"
/>
{"Calendly icon"}
}
href="/documentation/mcp-server/calendly"
/>
}
href="/documentation/mcp-server/clickup"
/>
}
href="/documentation/mcp-server/close"
/>
}
href="/documentation/mcp-server/confluence"
/>
}
href="/documentation/mcp-server/discord"
/>
}
href="/documentation/mcp-server/dropbox"
/>
}
href="/documentation/mcp-server/github"
/>
}
href="/documentation/mcp-server/gmail"
/>
}
href="/documentation/mcp-server/gong"
/>
}
href="/documentation/mcp-server/google_calendar"
/>
{"Google Docs icon"}
}
href="/documentation/mcp-server/google_docs"
/>
}
href="/documentation/mcp-server/google_drive"
/>
}
href="/documentation/mcp-server/google_sheets"
/>
}
href="/documentation/mcp-server/hubspot"
/>
}
href="/documentation/mcp-server/jira"
/>
}
href="/documentation/mcp-server/klavis-reportgen"
/>
}
href="/documentation/mcp-server/linear"
/>
}
href="/documentation/mcp-server/linkedin"
/>
}
href="/documentation/mcp-server/motion"
/>
}
href="/documentation/mcp-server/notion"
/>
OfficeCore10_32x_24x_20x_16x_01-22-2019
}
href="/documentation/mcp-server/onedrive"
/>
}
href="/documentation/mcp-server/outlook_mail"
/>
}
href="/documentation/mcp-server/perplexity"
/>
}
href="/documentation/mcp-server/postgres"
/>
}
href="/documentation/mcp-server/resend"
/>
}
href="/documentation/mcp-server/slack"
/>
}
href="/documentation/mcp-server/stripe"
/>
{"Supabase icon"}
}
href="/documentation/mcp-server/supabase"
/>
}
href="/documentation/mcp-server/wordpress"
/>
}
href="/documentation/mcp-server/youtube"
/>
}
href="/documentation/mcp-server/zendesk"
/>
{"Affinity icon"}
}
href="/documentation/mcp-server/affinity"
/>
}
href="/documentation/mcp-server/attio"
/>
}
href="/documentation/mcp-server/close"
/>
}
href="/documentation/mcp-server/hubspot"
/>
}
href="/documentation/mcp-server/asana"
/>
}
href="/documentation/mcp-server/clickup"
/>
}
href="/documentation/mcp-server/jira"
/>
}
href="/documentation/mcp-server/linear"
/>
}
href="/documentation/mcp-server/confluence"
/>
}
href="/documentation/mcp-server/dropbox"
/>
}
href="/documentation/mcp-server/gmail"
/>
}
href="/documentation/mcp-server/google_calendar"
/>
{"Google Docs icon"}
}
href="/documentation/mcp-server/google_docs"
/>
}
href="/documentation/mcp-server/google_drive"
/>
}
href="/documentation/mcp-server/google_sheets"
/>
}
href="/documentation/mcp-server/notion"
/>
OfficeCore10_32x_24x_20x_16x_01-22-2019
}
href="/documentation/mcp-server/onedrive"
/>
}
href="/documentation/mcp-server/outlook_mail"
/>
}
href="/documentation/mcp-server/slack"
/>
}
href="/documentation/mcp-server/wordpress"
/>
}
href="/documentation/mcp-server/github"
/>
}
href="/documentation/mcp-server/postgres"
/>
{"Supabase icon"}
}
href="/documentation/mcp-server/supabase"
/>
}
href="/documentation/mcp-server/airtable"
/>
{"Calendly icon"}
}
href="/documentation/mcp-server/calendly"
/>
}
href="/documentation/mcp-server/klavis-reportgen"
/>
}
href="/documentation/mcp-server/motion"
/>
}
href="/documentation/mcp-server/zendesk"
/>
}
href="/documentation/mcp-server/gong"
/>
}
href="/documentation/mcp-server/perplexity"
/>
}
href="/documentation/mcp-server/discord"
/>
}
href="/documentation/mcp-server/linkedin"
/>
}
href="/documentation/mcp-server/resend"
/>
}
href="/documentation/mcp-server/youtube"
/>
}
href="/documentation/mcp-server/stripe"
/>
## MCP Client Quickstart
# Discord
Source: https://docs.klavis.ai/documentation/mcp-client/discord
please check out our open source readme file -
[https://github.com/Klavis-AI/klavis/blob/main/mcp-clients/README-Discord.md](https://github.com/Klavis-AI/klavis/blob/main/mcp-clients/README-Discord.md)
# Slack
Source: https://docs.klavis.ai/documentation/mcp-client/slack
please check out our open source readme file -
[https://github.com/Klavis-AI/klavis/blob/main/mcp-clients/Dockerfile.slack](https://github.com/Klavis-AI/klavis/blob/main/mcp-clients/Dockerfile.slack)
# Web
Source: https://docs.klavis.ai/documentation/mcp-client/web
please check out our open source readme file -
[https://github.com/Klavis-AI/klavis/blob/main/mcp-clients/README-Web.md](https://github.com/Klavis-AI/klavis/blob/main/mcp-clients/README-Web.md)
# Whatsapp
Source: https://docs.klavis.ai/documentation/mcp-client/whatsapp
please check out our open source readme file -
[https://github.com/Klavis-AI/klavis/blob/main/mcp-clients/README-WhatsApp.md](https://github.com/Klavis-AI/klavis/blob/main/mcp-clients/README-WhatsApp.md)
# Affinity
Source: https://docs.klavis.ai/documentation/mcp-server/affinity
Learn how to use Klavis to connect your AI application to Affinity MCP Server
## No-Code
**Connect to enterprise-grade MCP servers instantly!**
[Get Started →](https://www.klavis.ai/home/mcp-servers)
***
## For Developer
Follow the instructions below to integrate Affinity MCP server to your AI application using our API or SDK.
### Prerequisites
* [Create an API key](https://www.klavis.ai/home/api-keys)
### 1. Create an Affinity MCP Server
Use the following endpoint to create a new remote Affinity MCP server instance:
#### Request
```python Python
from klavis import Klavis
from klavis.types import McpServerName
klavis_client = Klavis(api_key="")
# Create an Affinity MCP server instance
affinity_server = klavis_client.mcp_server.create_server_instance(
server_name=McpServerName.AFFINITY,
user_id="",
platform_name="",
)
```
```javascript TypeScript
import { KlavisClient, Klavis } from 'klavis';
const klavisClient = new KlavisClient({ apiKey: '' });
// Create an Affinity MCP server instance
const affinityServer = await klavisClient.mcpServer.createServerInstance({
serverName: Klavis.McpServerName.Affinity,
userId: "",
platformName: "",
});
```
```bash cURL
curl --request POST \
--url https://api.klavis.ai/mcp-server/instance/create \
--header 'Authorization: Bearer ' \
--header 'Content-Type: application/json' \
--data '{
"serverName": "Affinity",
"userId": "",
"platformName": "",
}'
```
```go Go
package main
import (
"fmt"
"strings"
"net/http"
"io/ioutil"
)
func main() {
url := "https://api.klavis.ai/mcp-server/instance/create"
payload := strings.NewReader("{\n \"serverName\": \"Affinity\",\n \"userId\": \"\",\n \"platformName\": \"\"\n}")
req, _ := http.NewRequest("POST", url, payload)
req.Header.Add("Authorization", "Bearer ")
req.Header.Add("Content-Type", "application/json")
res, _ := http.DefaultClient.Do(req)
defer res.Body.Close()
body, _ := ioutil.ReadAll(res.Body)
fmt.Println(res)
fmt.Println(string(body))
}
```
```java Java
HttpResponse response = Unirest.post("https://api.klavis.ai/mcp-server/instance/create")
.header("Authorization", "Bearer ")
.header("Content-Type", "application/json")
.body("{\n \"serverName\": \"Affinity\",\n \"userId\": \"\",\n \"platformName\": \"\"\n}")
.asString();
```
#### Response
```json Response
{
"serverUrl": "https://affinity-mcp-server.klavis.ai/sse?instance_id=",
"instanceId": ""
}
```
**serverUrl** specifies the endpoint of the Affinity MCP server, which allows you to interact with your Affinity CRM data.**instanceId** is used for authentication and identification of your server instance.
### 2. Configure Affinity API Key
To use the Affinity MCP Server, you need to configure it with your Affinity API key.
#### Setting up Affinity API Key
```python Python
from klavis import Klavis
klavis_client = Klavis(api_key="")
# Set the Affinity API key for your instance
response = klavis_client.mcp_server.set_instance_auth_token(
instance_id="",
auth_token="",
)
print(response)
```
```javascript TypeScript
import { KlavisClient } from 'klavis';
const klavisClient = new KlavisClient({ apiKey: '' });
// Set the Affinity API key for your instance
const response = await klavisClient.mcpServer.setInstanceAuthToken({
instanceId: "",
authToken: ""
});
console.log(response);
```
```bash cURL
curl --request POST \
--url https://api.klavis.ai/mcp-server/instance/set-auth-token \
--header 'Authorization: Bearer ' \
--header 'Content-Type: application/json' \
--data '{
"instanceId": "",
"authToken": ""
}'
```
```go Go
package main
import (
"bytes"
"encoding/json"
"fmt"
"net/http"
)
func main() {
url := "https://api.klavis.ai/mcp-server/instance/set-auth-token"
payload := map[string]string{
"instanceId": "",
"authToken": "",
}
jsonPayload, _ := json.Marshal(payload)
req, _ := http.NewRequest("POST", url, bytes.NewBuffer(jsonPayload))
req.Header.Set("Authorization", "Bearer ")
req.Header.Set("Content-Type", "application/json")
client := &http.Client{}
resp, err := client.Do(req)
if err != nil {
panic(err)
}
defer resp.Body.Close()
fmt.Println("Response Status:", resp.Status)
}
```
```java Java
import java.net.URI;
import java.net.http.HttpClient;
import java.net.http.HttpRequest;
import java.net.http.HttpResponse;
import java.net.http.HttpResponse.BodyHandlers;
public class SetAuthToken {
public static void main(String[] args) {
try {
String requestBody = "{\"instanceId\":\"\",\"authToken\":\"\"}";
HttpClient client = HttpClient.newHttpClient();
HttpRequest request = HttpRequest.newBuilder()
.uri(URI.create("https://api.klavis.ai/mcp-server/instance/set-auth-token"))
.header("Authorization", "Bearer ")
.header("Content-Type", "application/json")
.POST(HttpRequest.BodyPublishers.ofString(requestBody))
.build();
HttpResponse response = client.send(request, BodyHandlers.ofString());
System.out.println("Response: " + response.body());
} catch (Exception e) {
e.printStackTrace();
}
}
}
```
#### Response
```json Response
{
"success": true,
"message": ""
}
```
### Explore MCP Server Tools
| Tool Name | Description |
| ---------------------------------------------------- | -------------------------------------------------------------------------------------------------------- |
| affinity\_get\_current\_user | Get current user information from Affinity |
| affinity\_get\_all\_list\_entries\_on\_a\_list | Get all List Entries on a List |
| affinity\_get\_metadata\_on\_all\_lists | Get metadata on all Lists |
| affinity\_get\_metadata\_on\_a\_single\_list | Get metadata on a single List |
| affinity\_get\_metadata\_on\_a\_single\_list\_fields | Get metadata on a single List's Fields |
| affinity\_get\_a\_single\_list\_entry\_on\_a\_list | Get a single List Entry on a List |
| affinity\_get\_all\_persons | Get all Persons in Affinity |
| affinity\_get\_single\_person | Get a single Person by ID |
| affinity\_get\_person\_fields\_metadata | Get metadata on Person Fields |
| affinity\_get\_person\_lists | Get a Person's Lists |
| affinity\_get\_person\_list\_entries | Get a Person's List Entries |
| affinity\_get\_all\_companies | Get all Companies in Affinity with basic information and field data |
| affinity\_get\_single\_company | Get a single Company by ID with basic information and field data |
| affinity\_get\_company\_fields\_metadata | Get metadata on Company Fields |
| affinity\_get\_company\_lists | Get all Lists that contain the specified Company |
| affinity\_get\_company\_list\_entries | Get List Entries for a Company across all Lists with field data |
| affinity\_get\_all\_opportunities | Get all Opportunities in Affinity |
| affinity\_get\_single\_opportunity | Get a single Opportunity by ID |
| affinity\_search\_persons | Search for persons in Affinity. Search term can be part of an email address, first name, or last name |
| affinity\_search\_organizations | Search for organizations / companies in Affinity. Search term can be part of organization name or domain |
| affinity\_search\_opportunities | Search for opportunities in Affinity. Search term can be part of opportunity name |
| affinity\_get\_all\_notes | Get all Notes in Affinity |
| affinity\_get\_specific\_note | Get a specific note by ID |
For more details about tool input schema, use the [list\_tool](https://docs.klavis.ai/api-reference/mcp-server/list-tools) API.
# Airtable
Source: https://docs.klavis.ai/documentation/mcp-server/airtable
Learn how to use Klavis to connect your AI application to Airtable MCP Server
## No-Code
**Connect to enterprise-grade MCP servers instantly!**

[Get Started →](https://www.klavis.ai/home/mcp-servers)
***
## For Developer
Follow the instructions below to integrate Airtable MCP server to your AI application using our API or SDK.
### Prerequisites
* [Create an API key](https://www.klavis.ai/home/api-keys)
### 1. Create an Airtable MCP Server
Use the following endpoint to create a new remote Airtable MCP server instance:
#### Request
```python Python
from klavis import Klavis
from klavis.types import McpServerName
klavis_client = Klavis(api_key="")
# Create an Airtable MCP server instance
airtable_server = klavis_client.mcp_server.create_server_instance(
server_name=McpServerName.AIRTABLE,
user_id="",
platform_name="",
)
```
```javascript TypeScript
import { KlavisClient, Klavis } from 'klavis';
const klavisClient = new KlavisClient({ apiKey: '' });
// Create an Airtable MCP server instance
const airtableServer = await klavisClient.mcpServer.createServerInstance({
serverName: Klavis.McpServerName.Airtable,
userId: "",
platformName: "",
});
```
```bash cURL
curl --request POST \
--url https://api.klavis.ai/mcp-server/instance/create \
--header 'Authorization: Bearer ' \
--header 'Content-Type: application/json' \
--data '{
"serverName": "Airtable",
"userId": "",
"platformName": "",
}'
```
```go Go
package main
import (
"fmt"
"strings"
"net/http"
"io/ioutil"
)
func main() {
url := "https://api.klavis.ai/mcp-server/instance/create"
payload := strings.NewReader("{\n \"serverName\": \"Airtable\",\n \"userId\": \"\",\n \"platformName\": \"\",\n }")
req, _ := http.NewRequest("POST", url, payload)
req.Header.Add("Authorization", "Bearer ")
req.Header.Add("Content-Type", "application/json")
res, _ := http.DefaultClient.Do(req)
defer res.Body.Close()
body, _ := ioutil.ReadAll(res.Body)
fmt.Println(res)
fmt.Println(string(body))
}
```
```java Java
HttpResponse response = Unirest.post("https://api.klavis.ai/mcp-server/instance/create")
.header("Authorization", "Bearer ")
.header("Content-Type", "application/json")
.body("{\n \"serverName\": \"Airtable\",\n \"userId\": \"\",\n \"platformName\": \"\",\n}")
.asString();
```
#### Response
```json SDK Response
{
"serverUrl": "https://airtable-mcp-server.klavis.ai/mcp/?instance_id=",
"instanceId": "",
"oauthUrl": "https://api.klavis.ai/oauth/airtable/authorize?instance_id="
}
```
**serverUrl** specifies the endpoint of the Airtable MCP server, which you can connect with the MCP client of your application. **instanceId** is used for authentication and identification of your server instance. After you complete the next steps, this token allows the MCP server to access user's private Airtable information.
### 2. Implement OAuth Authorization
Redirect users to the OAuth authorization flow:
```python Python
import webbrowser
webbrowser.open(airtable_server.oauth_url)
```
```javascript TypeScript
// The OAuth URL is provided in the server response
console.log('OAuth URL:', airtableServer.oauthUrl);
// Redirect user to authorize
window.location.href = airtableServer.oauthUrl;
```
```go Go
package main
import (
"fmt"
"net/url"
)
func main() {
instanceId := ""
baseUrl := "https://api.klavis.ai/oauth/airtable/authorize"
params := url.Values{}
params.Add("instance_id", instanceId)
authUrl := baseUrl + "?" + params.Encode()
fmt.Printf("Redirect to: %s\n", authUrl)
// In a web application, you would redirect the user:
// http.Redirect(w, r, authUrl, http.StatusFound)
}
```
```java Java
import java.net.URLEncoder;
import java.nio.charset.StandardCharsets;
public class AirtableOAuth {
public static void main(String[] args) {
String instanceId = "";
String authUrl = "https://api.klavis.ai/oauth/airtable/authorize?instance_id=" +
URLEncoder.encode(instanceId, StandardCharsets.UTF_8);
System.out.println("Redirect to: " + authUrl);
// In a web application, you would redirect the user:
// response.sendRedirect(authUrl);
}
}
```
You can also specify scope and redirect\_url in the authUrl, and we also support white-label. Check the API reference for more details.
### Explore MCP Server Tools
| Tool Name | Description |
| ---------------------------- | --------------------------------------------------------------------- |
| airtable\_list\_bases\_info | Get information about all bases |
| airtable\_list\_tables\_info | Get information about all tables in a base |
| airtable\_create\_table | Create a new table in a base |
| airtable\_update\_table | Update an existing table in a base |
| airtable\_create\_field | Create a new field in a table |
| airtable\_update\_field | Update an existing field in a table |
| airtable\_list\_records | Get all records from a table with optional filtering and formatting |
| airtable\_get\_record | Get a single record from a table |
| airtable\_create\_records | Create multiple records in a table |
| airtable\_update\_records | Update multiple records in a table with optional upsert functionality |
| airtable\_delete\_records | Delete multiple records from a table |
For more details about tool input schema, use the [list\_tool](https://docs.klavis.ai/api-reference/mcp-server/list-tools) API.
# Asana
Source: https://docs.klavis.ai/documentation/mcp-server/asana
Learn how to use Klavis to connect your AI application to Asana MCP Server
## No-Code
**Connect to enterprise-grade MCP servers instantly!**

[Get Started →](https://www.klavis.ai/home/mcp-servers)
***
## For Developer
Follow the instructions below to integrate Asana MCP server to your AI application using our API or SDK.
### Prerequisites
* [Create an API key](https://www.klavis.ai/home/api-keys)
### 1. Create an Asana MCP Server
Use the following endpoint to create a new remote Asana MCP server instance:
#### Request
```python Python
from klavis import Klavis
from klavis.types import McpServerName
klavis_client = Klavis(api_key="")
# Create an Asana MCP server instance
asana_server = klavis_client.mcp_server.create_server_instance(
server_name=McpServerName.ASANA,
user_id="",
platform_name="",
)
```
```javascript TypeScript
import { KlavisClient, Klavis } from 'klavis';
const klavisClient = new KlavisClient({ apiKey: '' });
// Create an Asana MCP server instance
const asanaServer = await klavisClient.mcpServer.createServerInstance({
serverName: Klavis.McpServerName.Asana,
userId: "",
platformName: "",
});
```
```bash cURL
curl --request POST \
--url https://api.klavis.ai/mcp-server/instance/create \
--header 'Authorization: Bearer ' \
--header 'Content-Type: application/json' \
--data '{
"serverName": "Asana",
"userId": "",
"platformName": "",
}'
```
```go Go
package main
import (
"fmt"
"strings"
"net/http"
"io/ioutil"
)
func main() {
url := "https://api.klavis.ai/mcp-server/instance/create"
payload := strings.NewReader("{\n \"serverName\": \"Asana\",\n \"userId\": \"\",\n \"platformName\": \"\",\n }")
req, _ := http.NewRequest("POST", url, payload)
req.Header.Add("Authorization", "Bearer ")
req.Header.Add("Content-Type", "application/json")
res, _ := http.DefaultClient.Do(req)
defer res.Body.Close()
body, _ := ioutil.ReadAll(res.Body)
fmt.Println(res)
fmt.Println(string(body))
}
```
```java Java
HttpResponse response = Unirest.post("https://api.klavis.ai/mcp-server/instance/create")
.header("Authorization", "Bearer ")
.header("Content-Type", "application/json")
.body("{\n \"serverName\": \"Asana\",\n \"userId\": \"\",\n \"platformName\": \"\",\n}")
.asString();
```
#### Response
```json SDK Response
{
"serverUrl": "https://asana-mcp-server.klavis.ai/mcp/?instance_id=",
"instanceId": "",
"oauthUrl": "https://api.klavis.ai/oauth/asana/authorize?instance_id="
}
```
**serverUrl** specifies the endpoint of the Asana MCP server, which you can connect with the MCP client of your application. **instanceId** is used for authentication and identification of your server instance. After you complete the next steps, this token allows the MCP server to access user's private Asana information.
### 2. Implement OAuth Authorization
Redirect users to the OAuth authorization flow:
```python Python
import webbrowser
webbrowser.open(asana_server.oauth_url)
```
```javascript TypeScript
// The OAuth URL is provided in the server response
console.log('OAuth URL:', asanaServer.oauthUrl);
// Redirect user to authorize
window.location.href = asanaServer.oauthUrl;
```
```go Go
package main
import (
"fmt"
"net/url"
)
func main() {
instanceId := ""
baseUrl := "https://api.klavis.ai/oauth/asana/authorize"
params := url.Values{}
params.Add("instance_id", instanceId)
authUrl := baseUrl + "?" + params.Encode()
fmt.Printf("Redirect to: %s\n", authUrl)
// In a web application, you would redirect the user:
// http.Redirect(w, r, authUrl, http.StatusFound)
}
```
```java Java
import java.net.URLEncoder;
import java.nio.charset.StandardCharsets;
public class AsanaOAuth {
public static void main(String[] args) {
String instanceId = "";
String authUrl = "https://api.klavis.ai/oauth/asana/authorize?instance_id=" +
URLEncoder.encode(instanceId, StandardCharsets.UTF_8);
System.out.println("Redirect to: " + authUrl);
// In a web application, you would redirect the user:
// response.sendRedirect(authUrl);
}
}
```
You can also specify scope and redirect\_url in the authUrl, and we also support white-label. Check the API reference for more details.
### Explore MCP Server Tools
| Tool Name | Description |
| ----------------------------- | ------------------------------------------------------------------------------------------------------- |
| asana\_create\_task | Create a new task in Asana with title, description, assignee, and due date |
| asana\_get\_task | Get detailed information about a specific task by its ID from Asana |
| asana\_search\_tasks | Search for tasks in Asana with filtering options by project, assignee, completion status, and keywords |
| asana\_update\_task | Update an existing task in Asana including title, description, assignee, due date, and other properties |
| asana\_mark\_task\_completed | Mark a specific task as completed in Asana |
| asana\_get\_subtasks | Retrieve all subtasks associated with a parent task in Asana |
| asana\_attach\_file\_to\_task | Attach a file or document to a specific task in Asana |
| asana\_get\_projects | Get a list of all projects accessible to the user in Asana |
| asana\_get\_project | Get detailed information about a specific project by its ID from Asana |
| asana\_get\_workspaces | Get all workspaces that the current user has access to in Asana |
| asana\_get\_workspace | Get detailed information about a specific workspace by its ID from Asana |
| asana\_get\_users | Get a list of users in the current workspace or organization in Asana |
| asana\_get\_user | Get detailed information about a specific user by their ID from Asana |
| asana\_get\_teams | Get all teams in the current workspace or organization in Asana |
| asana\_get\_team | Get detailed information about a specific team by its ID from Asana |
| asana\_get\_user\_teams | Get all teams that the current user is a member of in Asana |
| asana\_get\_tags | Get all tags available in the current workspace in Asana |
| asana\_get\_tag | Get detailed information about a specific tag by its ID from Asana |
| asana\_create\_tag | Create a new tag in Asana workspace for organizing and categorizing tasks |
For more details about tool input schema, use the [list\_tool](https://docs.klavis.ai/api-reference/mcp-server/list-tools) API.
# Attio
Source: https://docs.klavis.ai/documentation/mcp-server/attio
Learn how to use Klavis to connect your AI application to Attio MCP Server
## No-Code
**Connect to enterprise-grade MCP servers instantly!**

[Get Started →](https://www.klavis.ai/home/mcp-servers)
***
## For Developer
Follow the instructions below to integrate Attio MCP server to your AI application using our API or SDK.
### Prerequisites
* [Create an API key](https://www.klavis.ai/home/api-keys)
### 1. Create an Attio MCP Server
Use the following endpoint to create a new remote Attio MCP server instance:
#### Request
```python Python
from klavis import Klavis
from klavis.types import McpServerName
klavis_client = Klavis(api_key="")
# Create an Attio MCP server instance
attio_server = klavis_client.mcp_server.create_server_instance(
server_name=McpServerName.ATTIO,
user_id="",
platform_name="",
)
```
```javascript TypeScript
import { KlavisClient, Klavis } from 'klavis';
const klavisClient = new KlavisClient({ apiKey: '' });
// Create an Attio MCP server instance
const attioServer = await klavisClient.mcpServer.createServerInstance({
serverName: Klavis.McpServerName.Attio,
userId: "",
platformName: "",
});
```
```bash cURL
curl --request POST \
--url https://api.klavis.ai/mcp-server/instance/create \
--header 'Authorization: Bearer ' \
--header 'Content-Type: application/json' \
--data '{
"serverName": "Attio",
"userId": "",
"platformName": "",
}'
```
```go Go
package main
import (
"fmt"
"strings"
"net/http"
"io/ioutil"
)
func main() {
url := "https://api.klavis.ai/mcp-server/instance/create"
payload := strings.NewReader("{\n \"serverName\": \"Attio\",\n \"userId\": \"\",\n \"platformName\": \"\",\n}")
req, _ := http.NewRequest("POST", url, payload)
req.Header.Add("Authorization", "Bearer ")
req.Header.Add("Content-Type", "application/json")
res, _ := http.DefaultClient.Do(req)
defer res.Body.Close()
body, _ := ioutil.ReadAll(res.Body)
fmt.Println(res)
fmt.Println(string(body))
}
```
```java Java
HttpResponse response = Unirest.post("https://api.klavis.ai/mcp-server/instance/create")
.header("Authorization", "Bearer ")
.header("Content-Type", "application/json")
.body("{\n \"serverName\": \"Attio\",\n \"userId\": \"\",\n \"platformName\": \"\",\n }")
.asString();
```
#### Response
```json SDK Response
{
"serverUrl": "https://attio-mcp-server.klavis.ai/mcp/?instance_id=",
"instanceId": "",
"oauthUrl": "https://api.klavis.ai/oauth/attio/authorize?instance_id="
}
```
**serverUrl** specifies the endpoint of the Attio MCP server, which you can connect with the MCP client of your application. **instanceId** is used for authentication and identification of your server instance. After you complete the next steps, this token allows the MCP server to access user's private Attio information.
### 2. Implement OAuth Authorization
Redirect users to the OAuth authorization flow:
```python Python
import webbrowser
webbrowser.open(attio_server.oauth_url)
```
```javascript TypeScript
// The OAuth URL is provided in the server response
console.log('OAuth URL:', attioServer.oauthUrl);
// Redirect user to authorize
window.location.href = attioServer.oauthUrl;
```
```go Go
package main
import (
"fmt"
"net/url"
)
func main() {
instanceId := ""
baseUrl := "https://api.klavis.ai/oauth/attio/authorize"
params := url.Values{}
params.Add("instance_id", instanceId)
authUrl := baseUrl + "?" + params.Encode()
fmt.Printf("Redirect to: %s\n", authUrl)
// In a web application, you would redirect the user:
// http.Redirect(w, r, authUrl, http.StatusFound)
}
```
```java Java
import java.net.URLEncoder;
import java.nio.charset.StandardCharsets;
public class AttioOAuth {
public static void main(String[] args) {
String instanceId = "";
String authUrl = "https://api.klavis.ai/oauth/attio/authorize?instance_id=" +
URLEncoder.encode(instanceId, StandardCharsets.UTF_8);
System.out.println("Redirect to: " + authUrl);
// In a web application, you would redirect the user:
// response.sendRedirect(authUrl);
}
}
```
You can also specify scope and redirect\_url in the authUrl, and we also support white-label. Check the API reference for more details.
### Explore MCP Server Tools
| Tool Name | Description |
| ------------------------ | ----------------------------------------------------------------------------------------------------------- |
| attio\_search\_people | Search for people in your Attio workspace with advanced filtering options. |
| attio\_search\_companies | Search for companies in your Attio workspace with filtering and sorting. |
| attio\_search\_deals | Search for deals in your Attio workspace with stage and value filtering. |
| attio\_search\_notes | Search for notes across all objects in your Attio workspace by fetching all notes and filtering by content. |
| attio\_create\_note | Create a new note for a given record in Attio. |
For more details about tool input schema, use the [list\_tool](https://docs.klavis.ai/api-reference/mcp-server/list-tools) API.
# Calendly
Source: https://docs.klavis.ai/documentation/mcp-server/calendly
Learn how to use Klavis to connect your AI application to Calendly MCP Server
## No-Code
**Connect to enterprise-grade MCP servers instantly!**

[Get Started →](https://www.klavis.ai/home/mcp-servers)
***
## For Developer
Follow the instructions below to integrate Calendly MCP server to your AI application using our API or SDK.
Coming Soon
# ClickUp
Source: https://docs.klavis.ai/documentation/mcp-server/clickup
Learn how to use Klavis to connect your AI application to ClickUp MCP Server
## No-Code
**Connect to enterprise-grade MCP servers instantly!**

[Get Started →](https://www.klavis.ai/home/mcp-servers)
***
## For Developer
Follow the instructions below to integrate ClickUp MCP server to your AI application using our API or SDK.
### Prerequisites
* [Create an API key](https://www.klavis.ai/home/api-keys)
### 1. Create a ClickUp MCP Server
Use the following endpoint to create a new remote ClickUp MCP server instance:
#### Request
```python Python
from klavis import Klavis
from klavis.types import McpServerName
klavis_client = Klavis(api_key="")
# Create a ClickUp MCP server instance
clickup_server = klavis_client.mcp_server.create_server_instance(
server_name=McpServerName.CLICKUP,
user_id="",
platform_name="",
)
```
```javascript TypeScript
import { KlavisClient, Klavis } from 'klavis';
const klavisClient = new KlavisClient({ apiKey: '' });
// Create a ClickUp MCP server instance
const clickupServer = await klavisClient.mcpServer.createServerInstance({
serverName: Klavis.McpServerName.ClickUp,
userId: "",
platformName: "",
});
```
```bash cURL
curl --request POST \
--url https://api.klavis.ai/mcp-server/instance/create \
--header 'Authorization: Bearer ' \
--header 'Content-Type: application/json' \
--data '{
"serverName": "ClickUp",
"userId": "",
"platformName": "",
}'
```
```go Go
package main
import (
"fmt"
"strings"
"net/http"
"io/ioutil"
)
func main() {
url := "https://api.klavis.ai/mcp-server/instance/create"
payload := strings.NewReader("{\n \"serverName\": \"ClickUp\",\n \"userId\": \"\",\n \"platformName\": \"\"\n}")
req, _ := http.NewRequest("POST", url, payload)
req.Header.Add("Authorization", "Bearer ")
req.Header.Add("Content-Type", "application/json")
res, _ := http.DefaultClient.Do(req)
defer res.Body.Close()
body, _ := ioutil.ReadAll(res.Body)
fmt.Println(res)
fmt.Println(string(body))
}
```
```java Java
HttpResponse response = Unirest.post("https://api.klavis.ai/mcp-server/instance/create")
.header("Authorization", "Bearer ")
.header("Content-Type", "application/json")
.body("{\n \"serverName\": \"ClickUp\",\n \"userId\": \"\",\n \"platformName\": \"\"\n}")
.asString();
```
#### Response
```json SDK Response
{
"serverUrl": "https://clickup-mcp-server.klavis.ai/mcp/?instance_id=",
"instanceId": "",
"oauthUrl": "https://api.klavis.ai/oauth/clickup/authorize?instance_id="
}
```
**serverUrl** specifies the endpoint of the ClickUp MCP server, which you can connect with the MCP client of your application. **instanceId** is used for authentication and identification of your server instance. After you complete the next steps, this token allows the MCP server to access user's private ClickUp information.
### 2. Implement OAuth Authorization
Redirect users to the OAuth authorization flow:
```python Python
import webbrowser
webbrowser.open(clickup_server.oauth_url)
```
```javascript TypeScript
// Redirect user to authorize
window.location.href = clickupServer.oauthUrl;
```
```go Go
package main
import (
"fmt"
"net/url"
)
func main() {
instanceId := ""
baseUrl := "https://api.klavis.ai/oauth/clickup/authorize"
params := url.Values{}
params.Add("instance_id", instanceId)
authUrl := baseUrl + "?" + params.Encode()
fmt.Printf("Redirect to: %s\n", authUrl)
// In a web application, you would redirect the user:
// http.Redirect(w, r, authUrl, http.StatusFound)
}
```
```java Java
import java.net.URLEncoder;
import java.nio.charset.StandardCharsets;
public class ClickUpOAuth {
public static void main(String[] args) {
String instanceId = "";
String authUrl = "https://api.klavis.ai/oauth/clickup/authorize?instance_id=" +
URLEncoder.encode(instanceId, StandardCharsets.UTF_8);
System.out.println("Redirect to: " + authUrl);
// In a web application, you would redirect the user:
// response.sendRedirect(authUrl);
}
}
```
You can also specify scope and redirect\_url in the authUrl. Check the API reference for more details.
### Explore MCP Server Tools
| Tool Name | Description |
| --------------------------- | ------------------------------------------------------------------------------------------------------- |
| clickup\_get\_teams | Get all teams/workspaces the user has access to |
| clickup\_get\_workspaces | Get all workspaces (alias for get\_teams) |
| clickup\_get\_spaces | Get all spaces in a team |
| clickup\_create\_space | Create a new space in a team |
| clickup\_update\_space | Update an existing space |
| clickup\_get\_folders | Get all folders in a space |
| clickup\_create\_folder | Create a new folder in a space |
| clickup\_update\_folder | Update an existing folder |
| clickup\_get\_lists | Get all lists in a folder or space. Either folder\_id or space\_id must be provided |
| clickup\_create\_list | Create a new list in a folder or space. Either folder\_id or space\_id must be provided along with name |
| clickup\_update\_list | Update an existing list |
| clickup\_get\_tasks | Get tasks from a list with optional filtering |
| clickup\_get\_task\_by\_id | Get a specific task by ID |
| clickup\_create\_task | Create a new task in ClickUp |
| clickup\_update\_task | Update an existing task in ClickUp |
| clickup\_search\_tasks | Search for tasks by text query |
| clickup\_get\_comments | Get comments for a specific task |
| clickup\_create\_comment | Create a comment on a task |
| clickup\_update\_comment | Update an existing comment |
| clickup\_get\_user | Get the current user's information |
| clickup\_get\_team\_members | Get all team members |
For more details about tool input schema, use the [list\_tool](https://docs.klavis.ai/api-reference/mcp-server/list-tools) API.
# Close
Source: https://docs.klavis.ai/documentation/mcp-server/close
Learn how to use Klavis to connect your AI application to Close CRM MCP Server
## No-Code
**Connect to enterprise-grade MCP servers instantly!**

[Get Started →](https://www.klavis.ai/home/mcp-servers)
***
## For Developer
Follow the instructions below to integrate Close CRM MCP server to your AI application using our API or SDK.
### Prerequisites
* [Create an API key](https://www.klavis.ai/home/api-keys)
### 1. Create a Close CRM MCP Server
Use the following endpoint to create a new remote Close CRM MCP server instance:
#### Request
```python Python
from klavis import Klavis
from klavis.types import McpServerName
klavis_client = Klavis(api_key="")
# Create a Close MCP server instance
close_server = klavis_client.mcp_server.create_server_instance(
server_name=McpServerName.CLOSE,
user_id="",
platform_name="",
)
```
```javascript TypeScript
import { KlavisClient, Klavis } from 'klavis';
const klavisClient = new KlavisClient({ apiKey: '' });
// Create a Close MCP server instance
const closeServer = await klavisClient.mcpServer.createServerInstance({
serverName: Klavis.McpServerName.Close,
userId: "",
platformName: "",
});
```
```bash cURL
curl --request POST \
--url https://api.klavis.ai/mcp-server/instance/create \
--header 'Authorization: Bearer ' \
--header 'Content-Type: application/json' \
--data '{
"serverName": "Close",
"userId": "",
"platformName": "",
}'
```
```go Go
package main
import (
"fmt"
"strings"
"net/http"
"io/ioutil"
)
func main() {
url := "https://api.klavis.ai/mcp-server/instance/create"
payload := strings.NewReader("{\n \"serverName\": \"Close\",\n \"userId\": \"\",\n \"platformName\": \"\"\n}")
req, _ := http.NewRequest("POST", url, payload)
req.Header.Add("Authorization", "Bearer ")
req.Header.Add("Content-Type", "application/json")
res, _ := http.DefaultClient.Do(req)
defer res.Body.Close()
body, _ := ioutil.ReadAll(res.Body)
fmt.Println(res)
fmt.Println(string(body))
}
```
```java Java
HttpResponse response = Unirest.post("https://api.klavis.ai/mcp-server/instance/create")
.header("Authorization", "Bearer ")
.header("Content-Type", "application/json")
.body("{\n \"serverName\": \"Close\",\n \"userId\": \"\",\n \"platformName\": \"\"\n}")
.asString();
```
#### Response
```json SDK Response
{
"serverUrl": "https://close-mcp-server.klavis.ai/mcp/?instance_id=",
"instanceId": "",
"oauthUrl": "https://api.klavis.ai/oauth/close/authorize?instance_id="
}
```
**serverUrl** specifies the endpoint of the Close CRM MCP server, which you can connect with the MCP client of your application. **instanceId** is used for authentication and identification of your server instance. After you complete the next steps, this token allows the MCP server to access user's private Close CRM information.
### 2. Implement OAuth Authorization
Redirect users to the OAuth authorization flow:
```python Python
import webbrowser
webbrowser.open(close_server.oauth_url)
```
```javascript TypeScript
// Redirect user to authorize
window.location.href = closeServer.oauthUrl;
```
```go Go
package main
import (
"fmt"
"net/url"
)
func main() {
instanceId := ""
baseUrl := "https://api.klavis.ai/oauth/close/authorize"
params := url.Values{}
params.Add("instance_id", instanceId)
authUrl := baseUrl + "?" + params.Encode()
fmt.Printf("Redirect to: %s\n", authUrl)
// In a web application, you would redirect the user:
// http.Redirect(w, r, authUrl, http.StatusFound)
}
```
```java Java
import java.net.URLEncoder;
import java.nio.charset.StandardCharsets;
public class CloseOAuth {
public static void main(String[] args) {
String instanceId = "";
String authUrl = "https://api.klavis.ai/oauth/close/authorize?instance_id=" +
URLEncoder.encode(instanceId, StandardCharsets.UTF_8);
System.out.println("Redirect to: " + authUrl);
// In a web application, you would redirect the user:
// response.sendRedirect(authUrl);
}
}
```
You can also specify scope and redirect\_url in the authUrl. Check the API reference for more details.
### Explore MCP Server Tools
| Tool Name | Description |
| -------------------------- | ------------------------------------------- |
| close\_create\_lead | Create a new lead in Close CRM |
| close\_get\_lead | Get a lead by its ID from Close CRM |
| close\_search\_leads | Search for leads in Close CRM |
| close\_update\_lead | Update an existing lead in Close CRM |
| close\_delete\_lead | Delete a lead from Close CRM |
| close\_list\_leads | List leads from Close CRM |
| close\_create\_contact | Create a new contact in Close CRM |
| close\_get\_contact | Get a contact by its ID from Close CRM |
| close\_search\_contacts | Search for contacts in Close CRM |
| close\_update\_contact | Update an existing contact in Close CRM |
| close\_delete\_contact | Delete a contact from Close CRM |
| close\_create\_opportunity | Create a new opportunity in Close CRM |
| close\_get\_opportunity | Get an opportunity by its ID from Close CRM |
| close\_update\_opportunity | Update an existing opportunity in Close CRM |
| close\_delete\_opportunity | Delete an opportunity from Close CRM |
| close\_create\_task | Create a new task in Close CRM |
| close\_get\_task | Get a task by its ID from Close CRM |
| close\_update\_task | Update an existing task in Close CRM |
| close\_delete\_task | Delete a task from Close CRM |
| close\_list\_tasks | List tasks from Close CRM |
| close\_get\_current\_user | Get information about the current user |
| close\_list\_users | List users from Close CRM |
| close\_get\_user | Get a user by their ID from Close CRM |
For more details about tool input schema, use the [list\_tool](https://docs.klavis.ai/api-reference/mcp-server/list-tools) API.
# Confluence
Source: https://docs.klavis.ai/documentation/mcp-server/confluence
Learn how to use Klavis to connect your AI application to Confluence MCP Server
## No-Code
**Connect to enterprise-grade MCP servers instantly!**

[Get Started →](https://www.klavis.ai/home/mcp-servers)
***
## For Developer
Follow the instructions below to integrate Confluence MCP server to your AI application using our API or SDK.
### Prerequisites
* [Create an API key](https://www.klavis.ai/home/api-keys)
### 1. Create a Confluence MCP Server
Use the following endpoint to create a new remote Confluence MCP server instance:
#### Request
```python Python
from klavis import Klavis
from klavis.types import McpServerName
klavis_client = Klavis(api_key="")
# Create a Confluence MCP server instance
confluence_server = klavis_client.mcp_server.create_server_instance(
server_name=McpServerName.CONFLUENCE,
user_id="",
platform_name="",
)
```
```javascript TypeScript
import { KlavisClient, Klavis } from 'klavis';
const klavisClient = new KlavisClient({ apiKey: '' });
// Create a Confluence MCP server instance
const confluenceServer = await klavisClient.mcpServer.createServerInstance({
serverName: Klavis.McpServerName.Confluence,
userId: "",
platformName: "",
});
```
```bash cURL
curl --request POST \
--url https://api.klavis.ai/mcp-server/instance/create \
--header 'Authorization: Bearer ' \
--header 'Content-Type: application/json' \
--data '{
"serverName": "Confluence",
"userId": "",
"platformName": "",
}'
```
```go Go
package main
import (
"fmt"
"strings"
"net/http"
"io/ioutil"
)
func main() {
url := "https://api.klavis.ai/mcp-server/instance/create"
payload := strings.NewReader("{\n \"serverName\": \"Confluence\",\n \"userId\": \"\",\n \"platformName\": \"\"\n}")
req, _ := http.NewRequest("POST", url, payload)
req.Header.Add("Authorization", "Bearer ")
req.Header.Add("Content-Type", "application/json")
res, _ := http.DefaultClient.Do(req)
defer res.Body.Close()
body, _ := ioutil.ReadAll(res.Body)
fmt.Println(res)
fmt.Println(string(body))
}
```
```java Java
HttpResponse response = Unirest.post("https://api.klavis.ai/mcp-server/instance/create")
.header("Authorization", "Bearer ")
.header("Content-Type", "application/json")
.body("{\n \"serverName\": \"Confluence\",\n \"userId\": \"\",\n \"platformName\": \"\"\n}")
.asString();
```
#### Response
```json SDK Response
{
"serverUrl": "https://confluence-mcp-server.klavis.ai/mcp/?instance_id=",
"instanceId": "",
"oauthUrl": "https://api.klavis.ai/oauth/confluence/authorize?instance_id="
}
```
**serverUrl** specifies the endpoint of the Confluence MCP server, which allows you to interact with Confluence spaces, pages, and content.**instanceId** is used to get an authentication token. After you complete the OAuth flow, this token allows the MCP server to access Confluence on your behalf.
### 2. Confluence OAuth Flow
Redirect users to the OAuth authorization flow:
```python Python
import webbrowser
webbrowser.open(confluence_server.oauth_url)
```
```javascript TypeScript
// Redirect user to authorize
window.location.href = confluenceServer.oauthUrl;
```
```go Go
package main
import (
"fmt"
"net/url"
)
func main() {
instanceId := ""
baseUrl := "https://api.klavis.ai/oauth/confluence/authorize"
params := url.Values{}
params.Add("instance_id", instanceId)
authUrl := baseUrl + "?" + params.Encode()
fmt.Printf("Redirect to: %s\n", authUrl)
// In a web application, you would redirect the user:
// http.Redirect(w, r, authUrl, http.StatusFound)
}
```
```java Java
import java.net.URLEncoder;
import java.nio.charset.StandardCharsets;
public class ConfluenceOAuth {
public static void main(String[] args) {
String instanceId = "";
String authUrl = "https://api.klavis.ai/oauth/confluence/authorize?instance_id=" +
URLEncoder.encode(instanceId, StandardCharsets.UTF_8);
System.out.println("Redirect to: " + authUrl);
// In a web application, you would redirect the user:
// response.sendRedirect(authUrl);
}
}
```
### Explore MCP Server Tools
| Tool Name | Description |
| --------------------------------------- | ----------------------------------------------------------------------------------------------------------------------------------------------------------------------------------- |
| confluence\_create\_page | Create a new page in Confluence |
| confluence\_get\_page | Retrieve a SINGLE page's content by its ID or title. For retrieving MULTIPLE pages, use confluence\_get\_pages\_by\_id instead |
| confluence\_get\_pages\_by\_id | Get the content of MULTIPLE pages by their ID in a single efficient request |
| confluence\_list\_pages | Get the content of multiple pages with optional filtering and sorting |
| confluence\_update\_page\_content | Update a page's content |
| confluence\_rename\_page | Rename a page by changing its title |
| confluence\_create\_space | Create a new space in Confluence |
| confluence\_list\_spaces | List all spaces sorted by name in ascending order |
| confluence\_get\_space | Get the details of a space by its ID or key |
| confluence\_get\_space\_hierarchy | Retrieve the full hierarchical structure of a Confluence space as a tree structure |
| confluence\_search\_content | Search for content in Confluence. The search is performed across all content in the authenticated user's Confluence workspace. All search terms in Confluence are case insensitive. |
| confluence\_list\_attachments | List attachments in a workspace |
| confluence\_get\_attachments\_for\_page | Get attachments for a page by its ID or title. If a page title is provided, then the first page with an exact matching title will be returned. |
| confluence\_get\_attachment | Get a specific attachment by its ID |
For more details about tool input schema, use the [list\_tool](https://docs.klavis.ai/api-reference/mcp-server/list-tools) API.
# Discord
Source: https://docs.klavis.ai/documentation/mcp-server/discord
Learn how to use Klavis to connect your AI application to Discord MCP Server
## No-Code
**Connect to enterprise-grade MCP servers instantly!**

[Get Started →](https://www.klavis.ai/home/mcp-servers)
***
## For Developer
Follow the instructions below to integrate Discord MCP server to your AI application using our API or SDK.
### Prerequisites
* [Create an API key](https://www.klavis.ai/home/api-keys)
### 1. Create a Discord MCP Server
Use the following endpoint to create a new remote Discord MCP server instance:
#### Request
```python Python
from klavis import Klavis
from klavis.types import McpServerName
klavis_client = Klavis(api_key="")
# Create a Discord MCP server instance
discord_server = klavis_client.mcp_server.create_server_instance(
server_name=McpServerName.DISCORD,
user_id="",
platform_name="",
)
```
```javascript TypeScript
import { KlavisClient, Klavis } from 'klavis';
const klavisClient = new KlavisClient({ apiKey: '' });
// Create a Discord MCP server instance
const discordServer = await klavisClient.mcpServer.createServerInstance({
serverName: Klavis.McpServerName.Discord,
userId: "",
platformName: "",
});
```
```bash cURL
curl --request POST \
--url https://api.klavis.ai/mcp-server/instance/create \
--header 'Authorization: Bearer ' \
--header 'Content-Type: application/json' \
--data '{
"serverName": "Discord",
"userId": "",
"platformName": "",
}'
```
```go Go
package main
import (
"fmt"
"strings"
"net/http"
"io/ioutil"
)
func main() {
url := "https://api.klavis.ai/mcp-server/instance/create"
payload := strings.NewReader("{\n \"serverName\": \"Discord\",\n \"userId\": \"\",\n \"platformName\": \"\",\n}")
req, _ := http.NewRequest("POST", url, payload)
req.Header.Add("Authorization", "Bearer ")
req.Header.Add("Content-Type", "application/json")
res, _ := http.DefaultClient.Do(req)
defer res.Body.Close()
body, _ := ioutil.ReadAll(res.Body)
fmt.Println(res)
fmt.Println(string(body))
}
```
```java Java
HttpResponse response = Unirest.post("https://api.klavis.ai/mcp-server/instance/create")
.header("Authorization", "Bearer ")
.header("Content-Type", "application/json")
.body("{\n \"serverName\": \"Discord\",\n \"userId\": \"\",\n \"platformName\": \"\",\n}")
.asString();
```
#### Response
```json SDK Response
{
"serverUrl": "https://discord-mcp-server.klavis.ai/mcp/?instance_id=",
"instanceId": ""
}
```
**serverUrl** specifies the endpoint of the Discord MCP server, which allows you to interact with Discord servers and channels.**instanceId** is used to get an authentication token. After you complete the OAuth flow, this token allows the MCP server to access Discord on your behalf.
### 2. Discord Bot Setup
To enable your MCP server to access Discord, you need to add [Klavis AI bot](https://discord.com/oauth2/authorize?client_id=1349237156065050674) to your Discord Server.
#### Bot Permissions
When authorizing your bot, you'll be prompted to select a Discord server. The bot will request the following permissions:
* Read messages/view channels
* Send messages
* Read message history
* Attach files
* Embed links
### Explore MCP Server Tools
| Tool Name | Description |
| --------------------------------- | ------------------------------------------------------------------------------------------------- |
| discord\_get\_server\_info | Get information about a Discord server (guild) including name, member counts, and settings |
| discord\_list\_members | Get a list of members in a server with their roles and join dates (Default 100, Max 1000) |
| discord\_create\_text\_channel | Create a new text channel with optional category and topic |
| discord\_add\_reaction | Add a reaction emoji to a message. Supports Unicode and custom emojis |
| discord\_add\_multiple\_reactions | Add multiple reaction emojis to a message in a single operation |
| discord\_remove\_reaction | Remove the bot's own reaction emoji from a message |
| discord\_send\_message | Send a text message to a specific Discord channel |
| discord\_read\_messages | Read recent messages from a Discord channel including content and reactions (Default 50, Max 100) |
| discord\_get\_user\_info | Get detailed information about a Discord user including username and avatar |
For more details about tool input schema, use the [list\_tool](https://docs.klavis.ai/api-reference/mcp-server/list-tools) API.
# Doc2markdown
Source: https://docs.klavis.ai/documentation/mcp-server/doc2markdown
Learn how to use Klavis to connect your AI application to Doc2markdown MCP Server
## No-Code
**Connect to enterprise-grade MCP servers instantly!**

[Get Started →](https://www.klavis.ai/home/mcp-servers)
***
## For Developer
Follow the instructions below to integrate Doc2markdown MCP server to your AI application using our API or SDK.
### Prerequisites
* [Create an API key](https://www.klavis.ai/home/api-keys)
### 1. Create a Doc2markdown MCP Server
Use the following endpoint to create a new remote Doc2markdown MCP server instance:
#### Request
```python Python
from klavis import Klavis
from klavis.types import McpServerName
klavis_client = Klavis(api_key="")
# Create a Doc2markdown MCP server instance
doc2markdown_server = klavis_client.mcp_server.create_server_instance(
server_name=McpServerName.DOC2MARKDOWN,
user_id="",
platform_name="",
)
```
```javascript TypeScript
import { KlavisClient, Klavis } from 'klavis';
const klavisClient = new KlavisClient({ apiKey: '' });
// Create a Doc2markdown MCP server instance
const doc2markdownServer = await klavisClient.mcpServer.createServerInstance({
serverName: Klavis.McpServerName.Doc2markdown,
userId: "",
platformName: "",
});
```
```bash cURL
curl --request POST \
--url https://api.klavis.ai/mcp-server/instance/create \
--header 'Authorization: Bearer ' \
--header 'Content-Type: application/json' \
--data '{
"serverName": "Doc2markdown",
"userId": "",
"platformName": "",
}'
```
```go Go
package main
import (
"fmt"
"strings"
"net/http"
"io/ioutil"
)
func main() {
url := "https://api.klavis.ai/mcp-server/instance/create"
payload := strings.NewReader("{\n \"serverName\": \"Doc2markdown\",\n \"userId\": \"\",\n \"platformName\": \"\"\n}")
req, _ := http.NewRequest("POST", url, payload)
req.Header.Add("Authorization", "Bearer ")
req.Header.Add("Content-Type", "application/json")
res, _ := http.DefaultClient.Do(req)
defer res.Body.Close()
body, _ := ioutil.ReadAll(res.Body)
fmt.Println(res)
fmt.Println(string(body))
}
```
```java Java
HttpResponse response = Unirest.post("https://api.klavis.ai/mcp-server/instance/create")
.header("Authorization", "Bearer ")
.header("Content-Type", "application/json")
.body("{\n \"serverName\": \"Doc2markdown\",\n \"userId\": \"\",\n \"platformName\": \"\"\n}")
.asString();
```
#### Response
```json Response
{
"serverUrl": "https://doc2markdown-mcp-server.klavis.ai/sse?instance_id=",
"instanceId": ""
}
```
**serverUrl** specifies the endpoint of the Doc2markdown MCP server, which allows you to convert various document formats to markdown.**instanceId** is used for authentication and identification of your server instance.
### Explore MCP Server Tools
| Tool Name | Description |
| ------------------------------- | -------------------------------------------------------------------------------------------------------------------------------- |
| convert\_document\_to\_markdown | Convert a document from a URI to markdown. Supports PDF, PowerPoint, Word, Excel, HTML, text-based formats, ZIP files, and EPubs |
For more details about tool input schema, use the [list\_tool](https://docs.klavis.ai/api-reference/mcp-server/list-tools) API.
# Dropbox
Source: https://docs.klavis.ai/documentation/mcp-server/dropbox
Learn how to use Klavis to connect your AI application to Dropbox MCP Server
## No-Code
**Connect to enterprise-grade MCP servers instantly!**

[Get Started →](https://www.klavis.ai/home/mcp-servers)
***
## For Developer
Follow the instructions below to integrate Dropbox MCP server to your AI application using our API or SDK.
Coming Soon
# Firecrawl Deep Research
Source: https://docs.klavis.ai/documentation/mcp-server/firecrawl-deep-research
Learn how to use Klavis to connect your AI application to Firecrawl Deep Research MCP Server
## No-Code
**Connect to enterprise-grade MCP servers instantly!**

[Get Started →](https://www.klavis.ai/home/mcp-servers)
***
## For Developer
Follow the instructions below to integrate Firecrawl Deep Research MCP server to your AI application using our API or SDK.
### Prerequisites
* [Create an API key](https://www.klavis.ai/home/api-keys)
### 1. Create a Firecrawl Deep Research MCP Server
Use the following endpoint to create a new remote Firecrawl Deep Research MCP server instance:
#### Request
```python Python
from klavis import Klavis
from klavis.types import McpServerName
klavis_client = Klavis(api_key="")
# Create a Firecrawl Deep Research MCP server instance
firecrawl_deep_research_server = klavis_client.mcp_server.create_server_instance(
server_name=McpServerName.FIRECRAWL_DEEP_RESEARCH,
user_id="",
platform_name="",
)
```
```javascript TypeScript
import { KlavisClient, Klavis } from 'klavis';
const klavisClient = new KlavisClient({ apiKey: '' });
// Create a Firecrawl Deep Research MCP server instance
const firecrawlDeepResearchServer = await klavisClient.mcpServer.createServerInstance({
serverName: Klavis.McpServerName.FirecrawlDeepResearch,
userId: "",
platformName: "",
});
```
```bash cURL
curl --request POST \
--url https://api.klavis.ai/mcp-server/instance/create \
--header 'Authorization: Bearer ' \
--header 'Content-Type: application/json' \
--data '{
"serverName": "Firecrawl Deep Research",
"userId": "",
"platformName": "",
}'
```
```go Go
package main
import (
"fmt"
"strings"
"net/http"
"io/ioutil"
)
func main() {
url := "https://api.klavis.ai/mcp-server/instance/create"
payload := strings.NewReader("{\n \"serverName\": \"Firecrawl Deep Research\",\n \"userId\": \"\",\n \"platformName\": \"\"\n}")
req, _ := http.NewRequest("POST", url, payload)
req.Header.Add("Authorization", "Bearer ")
req.Header.Add("Content-Type", "application/json")
res, _ := http.DefaultClient.Do(req)
defer res.Body.Close()
body, _ := ioutil.ReadAll(res.Body)
fmt.Println(res)
fmt.Println(string(body))
}
```
```java Java
HttpResponse response = Unirest.post("https://api.klavis.ai/mcp-server/instance/create")
.header("Authorization", "Bearer ")
.header("Content-Type", "application/json")
.body("{\n \"serverName\": \"Firecrawl Deep Research\",\n \"userId\": \"\",\n \"platformName\": \"\"\n}")
.asString();
```
#### Response
```json Response
{
"serverUrl": "https://firecrawl-deepresearch-mcp-server.klavis.ai/sse?instance_id=",
"instanceId": ""
}
```
**serverUrl** specifies the endpoint of the Firecrawl Deep Research MCP server, which you can connect and use this MCP Server to perform comprehensive research on any topic.**instanceId** is used for authentication and identification of your server instance.
### 2. Configure Firecrawl API Key
To use the Firecrawl Deep Research MCP Server, you need to configure it with your Firecrawl API key.
#### Setting up Firecrawl API Key
```bash cURL
curl --request POST \
--url https://api.klavis.ai/mcp-server/instance/set-auth-token \
--header 'Authorization: Bearer ' \
--header 'Content-Type: application/json' \
--data '{
"instanceId": "",
"authToken": ""
}'
```
```python Python
from klavis import Klavis
klavis_client = Klavis(api_key="")
# Set the Firecrawl API key for your instance
response = klavis_client.mcp_server.set_instance_auth_token(
instance_id="",
auth_token="",
)
print(response)
```
```javascript TypeScript
import { KlavisClient } from 'klavis';
const klavisClient = new KlavisClient({ apiKey: '' });
// Set the Firecrawl API key for your instance
const response = await klavisClient.mcpServer.setInstanceAuthToken({
instanceId: "",
authToken: ""
});
console.log(response);
```
```go Go
package main
import (
"bytes"
"encoding/json"
"fmt"
"net/http"
)
func main() {
url := "https://api.klavis.ai/mcp-server/instance/set-auth-token"
payload := map[string]string{
"instanceId": "",
"authToken": "",
}
jsonPayload, _ := json.Marshal(payload)
req, _ := http.NewRequest("POST", url, bytes.NewBuffer(jsonPayload))
req.Header.Set("Authorization", "Bearer ")
req.Header.Set("Content-Type", "application/json")
client := &http.Client{}
resp, err := client.Do(req)
if err != nil {
panic(err)
}
defer resp.Body.Close()
fmt.Println("Response Status:", resp.Status)
}
```
```java Java
import java.net.URI;
import java.net.http.HttpClient;
import java.net.http.HttpRequest;
import java.net.http.HttpResponse;
import java.net.http.HttpResponse.BodyHandlers;
public class SetAuthToken {
public static void main(String[] args) {
try {
String requestBody = "{\"instanceId\":\"\",\"authToken\":\"\"}";
HttpClient client = HttpClient.newHttpClient();
HttpRequest request = HttpRequest.newBuilder()
.uri(URI.create("https://api.klavis.ai/mcp-server/instance/set-auth-token"))
.header("Authorization", "Bearer ")
.header("Content-Type", "application/json")
.POST(HttpRequest.BodyPublishers.ofString(requestBody))
.build();
HttpResponse response = client.send(request, BodyHandlers.ofString());
System.out.println("Response: " + response.body());
} catch (Exception e) {
e.printStackTrace();
}
}
}
```
#### Response
```json Response
{
"success": true,
"message": ""
}
```
### Explore MCP Server Tools
| Tool Name | Description |
| ------------------------- | ---------------------------------------------------------------------------- |
| firecrawl\_deep\_research | Conduct deep research on a query using web crawling, search, and AI analysis |
For more details about tool input schema, use the [list\_tool](https://docs.klavis.ai/api-reference/mcp-server/list-tools) API.
# Firecrawl Web Search
Source: https://docs.klavis.ai/documentation/mcp-server/firecrawl-web-search
Learn how to use Klavis to connect your AI application to Firecrawl Web Search MCP Server
## No-Code
**Connect to enterprise-grade MCP servers instantly!**

[Get Started →](https://www.klavis.ai/home/mcp-servers)
***
## For Developer
Follow the instructions below to integrate Firecrawl Web Search MCP server to your AI application using our API or SDK.
### Prerequisites
* [Create an API key](https://www.klavis.ai/home/api-keys)
### 1. Create a Firecrawl Web Search MCP Server
Use the following endpoint to create a new remote Firecrawl Web Search MCP server instance:
#### Request
```python Python
from klavis import Klavis
from klavis.types import McpServerName
klavis_client = Klavis(api_key="")
# Create a Firecrawl Web Search MCP server instance
firecrawl_web_search_server = klavis_client.mcp_server.create_server_instance(
server_name=McpServerName.FIRECRAWL_WEB_SEARCH,
user_id="",
platform_name="",
)
```
```javascript TypeScript
import { KlavisClient, Klavis } from 'klavis';
const klavisClient = new KlavisClient({ apiKey: '' });
// Create a Firecrawl Web Search MCP server instance
const firecrawlWebSearchServer = await klavisClient.mcpServer.createServerInstance({
serverName: Klavis.McpServerName.FirecrawlWebSearch,
userId: "",
platformName: "",
});
```
```bash cURL
curl --request POST \
--url https://api.klavis.ai/mcp-server/instance/create \
--header 'Authorization: Bearer ' \
--header 'Content-Type: application/json' \
--data '{
"serverName": "Firecrawl Web Search",
"userId": "",
"platformName": "",
}'
```
```go Go
package main
import (
"fmt"
"strings"
"net/http"
"io/ioutil"
)
func main() {
url := "https://api.klavis.ai/mcp-server/instance/create"
payload := strings.NewReader("{\n \"serverName\": \"Firecrawl Web Search\",\n \"userId\": \"\",\n \"platformName\": \"\"\n}")
req, _ := http.NewRequest("POST", url, payload)
req.Header.Add("Authorization", "Bearer ")
req.Header.Add("Content-Type", "application/json")
res, _ := http.DefaultClient.Do(req)
defer res.Body.Close()
body, _ := ioutil.ReadAll(res.Body)
fmt.Println(res)
fmt.Println(string(body))
}
```
```java Java
HttpResponse response = Unirest.post("https://api.klavis.ai/mcp-server/instance/create")
.header("Authorization", "Bearer ")
.header("Content-Type", "application/json")
.body("{\n \"serverName\": \"Firecrawl Web Search\",\n \"userId\": \"\",\n \"platformName\": \"\"\n}")
.asString();
```
#### Response
```json Response
{
"serverUrl": "https://firecrawl-websearch-mcp-server.klavis.ai/sse?instance_id=",
"instanceId": ""
}
```
**serverUrl** specifies the endpoint of the Firecrawl Web Search MCP server, which allows you to perform real-time web searches. **instanceId** is used for authentication and identification of your server instance.
### 2. Configure Firecrawl API Key
To use the Firecrawl Deep Research MCP Server, you need to configure it with your Firecrawl API key.
#### Setting up Firecrawl API Key
```bash cURL
curl --request POST \
--url https://api.klavis.ai/mcp-server/instance/set-auth-token \
--header 'Authorization: Bearer ' \
--header 'Content-Type: application/json' \
--data '{
"instanceId": "",
"authToken": ""
}'
```
```python Python
from klavis import Klavis
klavis_client = Klavis(api_key="")
# Set the Firecrawl API key for your instance
response = klavis_client.mcp_server.set_instance_auth_token(
instance_id="",
auth_token="",
)
print(response)
```
```javascript TypeScript
import { KlavisClient } from 'klavis';
const klavisClient = new KlavisClient({ apiKey: '' });
// Set the Firecrawl API key for your instance
const response = await klavisClient.mcpServer.setInstanceAuthToken({
instanceId: "",
authToken: ""
});
console.log(response);
```
```go Go
package main
import (
"bytes"
"encoding/json"
"fmt"
"net/http"
)
func main() {
url := "https://api.klavis.ai/mcp-server/instance/set-auth-token"
payload := map[string]string{
"instanceId": "",
"authToken": "",
}
jsonPayload, _ := json.Marshal(payload)
req, _ := http.NewRequest("POST", url, bytes.NewBuffer(jsonPayload))
req.Header.Set("Authorization", "Bearer ")
req.Header.Set("Content-Type", "application/json")
client := &http.Client{}
resp, err := client.Do(req)
if err != nil {
panic(err)
}
defer resp.Body.Close()
fmt.Println("Response Status:", resp.Status)
}
```
```java Java
import java.net.URI;
import java.net.http.HttpClient;
import java.net.http.HttpRequest;
import java.net.http.HttpResponse;
import java.net.http.HttpResponse.BodyHandlers;
public class SetAuthToken {
public static void main(String[] args) {
try {
String requestBody = "{\"instanceId\":\"\",\"authToken\":\"\"}";
HttpClient client = HttpClient.newHttpClient();
HttpRequest request = HttpRequest.newBuilder()
.uri(URI.create("https://api.klavis.ai/mcp-server/instance/set-auth-token"))
.header("Authorization", "Bearer ")
.header("Content-Type", "application/json")
.POST(HttpRequest.BodyPublishers.ofString(requestBody))
.build();
HttpResponse response = client.send(request, BodyHandlers.ofString());
System.out.println("Response: " + response.body());
} catch (Exception e) {
e.printStackTrace();
}
}
}
```
#### Response
```json Response
{
"success": true,
"message": ""
}
```
### Explore MCP Server Tools
| Tool Name | Description |
| ------------------------------- | ---------------------------------------------------------------------------------------------------------------------------------------------------------------------------------------------------------------- |
| firecrawl\_scrape | Scrape a single webpage with advanced options for content extraction. Supports various formats including markdown, HTML, and screenshots. Can execute custom actions like clicking or scrolling before scraping. |
| firecrawl\_map | Discover URLs from a starting point. Can use both sitemap.xml and HTML link discovery. |
| firecrawl\_crawl | Start an asynchronous crawl of multiple pages from a starting URL. Supports depth control, path filtering, and webhook notifications. |
| firecrawl\_check\_crawl\_status | Check the status of a crawl job. |
| firecrawl\_batch\_scrape | Scrape multiple URLs in batch mode. Returns a job ID that can be used to check status. |
| firecrawl\_check\_batch\_status | Check the status of a batch scraping job. |
| firecrawl\_search | Search and retrieve content from web pages with optional scraping. Returns SERP results by default (url, title, description) or full page content when scrapeOptions are provided. |
| firecrawl\_extract | Extract structured information from web pages using LLM. Supports both cloud AI and self-hosted LLM extraction. |
| firecrawl\_generate\_llmstxt | Generate standardized LLMs.txt file for a given URL, which provides context about how LLMs should interact with the website. |
For more details about tool input schema, use the [list\_tool](https://docs.klavis.ai/api-reference/mcp-server/list-tools) API.
# GitHub
Source: https://docs.klavis.ai/documentation/mcp-server/github
Learn how to use Klavis to connect your AI application to GitHub MCP Server
## No-Code
**Connect to enterprise-grade MCP servers instantly!**

[Get Started →](https://www.klavis.ai/home/mcp-servers)
***
## For Developer
Follow the instructions below to integrate GitHub MCP server to your AI application using our API or SDK.
### Prerequisites
* [Create an API key](https://www.klavis.ai/home/api-keys)
### 1. Create a GitHub MCP Server
Use the following endpoint to create a new remote GitHub MCP server instance:
#### Request
```python Python
from klavis import Klavis
from klavis.types import McpServerName
klavis_client = Klavis(api_key="")
# Create a GitHub MCP server instance
github_server = klavis_client.mcp_server.create_server_instance(
server_name=McpServerName.GITHUB,
user_id="",
platform_name="",
)
```
```javascript TypeScript
import { KlavisClient, Klavis } from 'klavis';
const klavisClient = new KlavisClient({ apiKey: '' });
// Create a GitHub MCP server instance
const githubServer = await klavisClient.mcpServer.createServerInstance({
serverName: Klavis.McpServerName.Github,
userId: "",
platformName: "",
});
```
```bash cURL
curl --request POST \
--url https://api.klavis.ai/mcp-server/instance/create \
--header 'Authorization: Bearer ' \
--header 'Content-Type: application/json' \
--data '{
"serverName": "Github",
"userId": "",
"platformName": "",
}'
```
```go Go
package main
import (
"fmt"
"strings"
"net/http"
"io/ioutil"
)
func main() {
url := "https://api.klavis.ai/mcp-server/instance/create"
payload := strings.NewReader("{\n \"serverName\": \"Github\",\n \"userId\": \"\",\n \"platformName\": \"\",\n}")
req, _ := http.NewRequest("POST", url, payload)
req.Header.Add("Authorization", "Bearer ")
req.Header.Add("Content-Type", "application/json")
res, _ := http.DefaultClient.Do(req)
defer res.Body.Close()
body, _ := ioutil.ReadAll(res.Body)
fmt.Println(res)
fmt.Println(string(body))
}
```
```java Java
HttpResponse response = Unirest.post("https://api.klavis.ai/mcp-server/instance/create")
.header("Authorization", "Bearer ")
.header("Content-Type", "application/json")
.body("{\n \"serverName\": \"Github\",\n \"userId\": \"\",\n \"platformName\": \"\",\n}")
.asString();
```
#### Response
```json SDK Response
{
"serverUrl": "https://github-mcp-server.klavis.ai/mcp/?instance_id=",
"instanceId": "",
"oauthUrl": "https://api.klavis.ai/oauth/github/authorize?instance_id="
}
```
**serverUrl** specifies the endpoint of the GitHub MCP server, which you can connect with the MCP client of your application. **instanceId** is used for authentication and identification of your server instance. After you complete the next steps, this token allows the MCP server to access user's private GitHub information.
### 2. Implement OAuth Authorization
Redirect users to the OAuth authorization flow:
```python Python
import webbrowser
webbrowser.open(github_server.oauth_url)
```
```javascript TypeScript
// Redirect user to authorize
window.location.href = githubServer.oauthUrl;
```
```go Go
package main
import (
"fmt"
"net/url"
)
func main() {
instanceId := ""
baseUrl := "https://api.klavis.ai/oauth/github/authorize"
params := url.Values{}
params.Add("instance_id", instanceId)
authUrl := baseUrl + "?" + params.Encode()
fmt.Printf("Redirect to: %s\n", authUrl)
// In a web application, you would redirect the user:
// http.Redirect(w, r, authUrl, http.StatusFound)
}
```
```java Java
import java.net.URLEncoder;
import java.nio.charset.StandardCharsets;
public class GitHubOAuth {
public static void main(String[] args) {
String instanceId = "";
String authUrl = "https://api.klavis.ai/oauth/github/authorize?instance_id=" +
URLEncoder.encode(instanceId, StandardCharsets.UTF_8);
System.out.println("Redirect to: " + authUrl);
// In a web application, you would redirect the user:
// response.sendRedirect(authUrl);
}
}
```
You can also specify scope and redirect\_url in the authUrl, and we also support white-label. Check the API reference for more details.
### Watch the Example
### Explore MCP Server Tools
| Tool Name | Description |
| ------------------------------------- | ----------------------------------------------------------------------------------------- |
| github\_get\_me | Get details of the authenticated user |
| github\_get\_issue | Gets the contents of an issue within a repository |
| github\_search\_issues | Search for issues and pull requests |
| github\_list\_issues | List and filter repository issues |
| github\_get\_issue\_comments | Get comments for a GitHub issue |
| github\_create\_issue | Create a new issue in a GitHub repository |
| github\_add\_issue\_comment | Add a comment to an issue |
| github\_update\_issue | Update an existing issue in a GitHub repository |
| github\_get\_pull\_request | Get details of a specific pull request |
| github\_list\_pull\_requests | List and filter repository pull requests |
| github\_get\_pull\_request\_files | Get the list of files changed in a pull request |
| github\_get\_pull\_request\_status | Get the combined status of all status checks for a pull request |
| github\_get\_pull\_request\_comments | Get the review comments on a pull request |
| github\_get\_pull\_request\_reviews | Get the reviews on a pull request |
| github\_merge\_pull\_request | Merge a pull request |
| github\_update\_pull\_request\_branch | Update a pull request branch with the latest changes from the base branch |
| github\_create\_pull\_request\_review | Create a review on a pull request review |
| github\_create\_pull\_request | Create a new pull request |
| github\_update\_pull\_request | Update an existing pull request in a GitHub repository |
| github\_search\_repositories | Search for GitHub repositories |
| github\_get\_file\_contents | Get contents of a file or directory |
| github\_list\_commits | Get a list of commits of a branch in a repository |
| github\_create\_or\_update\_file | Create or update a single file in a repository |
| github\_create\_repository | Create a new GitHub repository |
| github\_fork\_repository | Fork a repository |
| github\_create\_branch | Create a new branch |
| github\_push\_files | Push multiple files in a single commit |
| github\_search\_code | Search for code across GitHub repositories |
| github\_search\_users | Search for GitHub users |
| github\_get\_code\_scanning\_alert | Get a code scanning alert |
| github\_list\_code\_scanning\_alerts | List code scanning alerts for a repository |
| github\_get\_commit | Get details for a commit from a repository |
| github\_list\_branches | List branches in a GitHub repository |
| github\_list\_recent\_stargazers | Get a comprehensive list of users who have recently starred a specified GitHub repository |
For more details about tool input schema, use the [list\_tool](https://docs.klavis.ai/api-reference/mcp-server/list-tools) API.
# Gmail
Source: https://docs.klavis.ai/documentation/mcp-server/gmail
Learn how to use Klavis to connect your AI application to Gmail MCP Server
## No-Code
**Connect to enterprise-grade MCP servers instantly!**

[Get Started →](https://www.klavis.ai/home/mcp-servers)
***
## For Developer
Follow the instructions below to integrate Gmail MCP server to your AI application using our API or SDK.
### Prerequisites
* [Create an API key](https://www.klavis.ai/home/api-keys)
### 1. Create a Gmail MCP Server
Use the following endpoint to create a new remote Gmail MCP server instance:
#### Request
```python Python
from klavis import Klavis
from klavis.types import McpServerName
klavis_client = Klavis(api_key="")
# Create a Gmail MCP server instance
gmail_server = klavis_client.mcp_server.create_server_instance(
server_name=McpServerName.GMAIL,
user_id="",
platform_name="",
)
```
```javascript TypeScript
import { KlavisClient, Klavis } from 'klavis';
const klavisClient = new KlavisClient({ apiKey: '' });
// Create a Gmail MCP server instance
const gmailServer = await klavisClient.mcpServer.createServerInstance({
serverName: Klavis.McpServerName.Gmail,
userId: "",
platformName: "",
});
```
```bash cURL
curl --request POST \
--url https://api.klavis.ai/mcp-server/instance/create \
--header 'Authorization: Bearer ' \
--header 'Content-Type: application/json' \
--data '{
"serverName": "Gmail",
"userId": "",
"platformName": "",
}'
```
```go Go
package main
import (
"fmt"
"strings"
"net/http"
"io/ioutil"
)
func main() {
url := "https://api.klavis.ai/mcp-server/instance/create"
payload := strings.NewReader("{\n \"serverName\": \"Gmail\",\n \"userId\": \"\",\n \"platformName\": \"\",\n}")
req, _ := http.NewRequest("POST", url, payload)
req.Header.Add("Authorization", "Bearer ")
req.Header.Add("Content-Type", "application/json")
res, _ := http.DefaultClient.Do(req)
defer res.Body.Close()
body, _ := ioutil.ReadAll(res.Body)
fmt.Println(res)
fmt.Println(string(body))
}
```
```java Java
HttpResponse response = Unirest.post("https://api.klavis.ai/mcp-server/instance/create")
.header("Authorization", "Bearer ")
.header("Content-Type", "application/json")
.body("{\n \"serverName\": \"Gmail\",\n \"userId\": \"\",\n \"platformName\": \"\",\n}")
.asString();
```
#### Response
```json SDK Response
{
"serverUrl": "https://gmail-mcp-server.klavis.ai/mcp/?instance_id=",
"instanceId": "",
"oauthUrl": "https://api.klavis.ai/oauth/gmail/authorize?instance_id="
}
```
**serverUrl** specifies the endpoint of the Gmail MCP server, which you can connect with the MCP client of your application.**instanceId** is used for authentication and identification of your server instance. After you complete the next steps, this token allows the MCP server to access user's private Gmail information.
### 2. Implement OAuth Authorization
Redirect users to the OAuth authorization flow:
```python Python
import webbrowser
webbrowser.open(gmail_server.oauth_url)
```
```javascript TypeScript
// The OAuth URL is provided in the server response
console.log('OAuth URL:', gmailServer.oauthUrl);
// Redirect user to authorize
window.location.href = gmailServer.oauthUrl;
```
```go Go
package main
import (
"fmt"
"net/url"
)
func main() {
instanceId := ""
baseUrl := "https://api.klavis.ai/oauth/gmail/authorize"
params := url.Values{}
params.Add("instance_id", instanceId)
authUrl := baseUrl + "?" + params.Encode()
fmt.Printf("Redirect to: %s\n", authUrl)
// In a web application, you would redirect the user:
// http.Redirect(w, r, authUrl, http.StatusFound)
}
```
```java Java
import java.net.URLEncoder;
import java.nio.charset.StandardCharsets;
public class GmailOAuth {
public static void main(String[] args) {
String instanceId = "";
String authUrl = "https://api.klavis.ai/oauth/gmail/authorize?instance_id=" +
URLEncoder.encode(instanceId, StandardCharsets.UTF_8);
System.out.println("Redirect to: " + authUrl);
// In a web application, you would redirect the user:
// response.sendRedirect(authUrl);
}
}
```
You can also specify scope and redirect\_url in the authUrl, and we also support white-label. Check the API reference for more details.
### Explore MCP Server Tools
| Tool Name | Description |
| ---------------------------- | ------------------------------------------------- |
| gmail\_send\_email | Sends a new email |
| gmail\_draft\_email | Draft a new email |
| gmail\_read\_email | Retrieves the content of a specific email |
| gmail\_search\_emails | Searches for emails using Gmail search syntax |
| gmail\_modify\_email | Modifies email labels (move to different folders) |
| gmail\_delete\_email | Permanently deletes an email |
| gmail\_batch\_modify\_emails | Modifies labels for multiple emails in batches |
| gmail\_batch\_delete\_emails | Permanently deletes multiple emails in batches |
For more details about tool input schema, use the [list\_tool](https://docs.klavis.ai/api-reference/mcp-server/list-tools) API.
# Gong
Source: https://docs.klavis.ai/documentation/mcp-server/gong
Learn how to use Klavis to connect your AI application to Gong MCP Server
## No-Code
**Connect to enterprise-grade MCP servers instantly!**

[Get Started →](https://www.klavis.ai/home/mcp-servers)
***
## For Developer
Follow the instructions below to integrate Gong MCP server to your AI application using our API or SDK.
### Prerequisites
* [Create an API key](https://www.klavis.ai/home/api-keys)
### 1. Create a Gong MCP Server
Use the following endpoint to create a new remote Gong MCP server instance:
#### Request
```python Python
from klavis import Klavis
from klavis.types import McpServerName
klavis_client = Klavis(api_key="")
# Create a Gong MCP server instance
gong_server = klavis_client.mcp_server.create_server_instance(
server_name=McpServerName.GONG,
user_id="",
platform_name="",
)
```
```javascript TypeScript
import { KlavisClient, Klavis } from 'klavis';
const klavisClient = new KlavisClient({ apiKey: '' });
// Create a Gong MCP server instance
const gongServer = await klavisClient.mcpServer.createServerInstance({
serverName: Klavis.McpServerName.Gong,
userId: "",
platformName: "",
});
```
```bash cURL
curl --request POST \
--url https://api.klavis.ai/mcp-server/instance/create \
--header 'Authorization: Bearer ' \
--header 'Content-Type: application/json' \
--data '{
"serverName": "Gong",
"userId": "",
"platformName": "",
}'
```
```python Python
import requests
url = "https://api.klavis.ai/mcp-server/instance/create"
payload = {
"serverName": "Gong",
"userId": "",
"platformName": ""
}
headers = {
"Authorization": "Bearer ",
"Content-Type": "application/json"
}
response = requests.request("POST", url, json=payload, headers=headers)
print(response.text)
```
```javascript JavaScript
const options = {
method: 'POST',
headers: {Authorization: 'Bearer ', 'Content-Type': 'application/json'},
body: '{"serverName":"Gong","userId":"","platformName":""}'
};
fetch('https://api.klavis.ai/mcp-server/instance/create', options)
.then(response => response.json())
.then(response => console.log(response))
.catch(err => console.error(err));
```
```php PHP
"https://api.klavis.ai/mcp-server/instance/create",
CURLOPT_RETURNTRANSFER => true,
CURLOPT_ENCODING => "",
CURLOPT_MAXREDIRS => 10,
CURLOPT_TIMEOUT => 30,
CURLOPT_HTTP_VERSION => CURL_HTTP_VERSION_1_1,
CURLOPT_CUSTOMREQUEST => "POST",
CURLOPT_POSTFIELDS => "{\n \"serverName\": \"Gong\",\n \"userId\": \"\",\n \"platformName\": \"\"\n}",
CURLOPT_HTTPHEADER => [
"Authorization: Bearer ",
"Content-Type: application/json"
],
]);
$response = curl_exec($curl);
$err = curl_error($curl);
curl_close($curl);
if ($err) {
echo "cURL Error #:" . $err;
} else {
echo $response;
}
```
```go Go
package main
import (
"fmt"
"strings"
"net/http"
"io/ioutil"
)
func main() {
url := "https://api.klavis.ai/mcp-server/instance/create"
payload := strings.NewReader("{\n \"serverName\": \"Gong\",\n \"userId\": \"\",\n \"platformName\": \"\"\n}")
req, _ := http.NewRequest("POST", url, payload)
req.Header.Add("Authorization", "Bearer ")
req.Header.Add("Content-Type", "application/json")
res, _ := http.DefaultClient.Do(req)
defer res.Body.Close()
body, _ := ioutil.ReadAll(res.Body)
fmt.Println(res)
fmt.Println(string(body))
}
```
```java Java
HttpResponse response = Unirest.post("https://api.klavis.ai/mcp-server/instance/create")
.header("Authorization", "Bearer ")
.header("Content-Type", "application/json")
.body("{\n \"serverName\": \"Gong\",\n \"userId\": \"\",\n \"platformName\": \"\"\n}")
.asString();
```
#### Response
```json Response
{
"serverUrl": "https://gong-mcp-server.klavis.ai/sse?instance_id=",
"instanceId": ""
}
```
**serverUrl** specifies the endpoint of the Gong MCP server, which you can connect with the MCP client of your application. **instanceId** is used for authentication and identification of your server instance. After you complete the next steps, this token allows the MCP server to access user's private Gong information.
### 2. Configure Gong API Key
To use the Gong MCP Server, you need to configure it with your Gong API key.
#### Setting up Gong API Key
```bash cURL
curl --request POST \
--url https://api.klavis.ai/mcp-server/instance/set-auth-token \
--header 'Authorization: Bearer ' \
--header 'Content-Type: application/json' \
--data '{
"instanceId": "",
"authToken": ""
}'
```
```python Python
from klavis import Klavis
klavis_client = Klavis(api_key="")
# Set the Gong API key for your instance
response = klavis_client.mcp_server.set_instance_auth_token(
instance_id="",
auth_token="",
)
print(response)
```
```javascript TypeScript
import { KlavisClient } from 'klavis';
const klavisClient = new KlavisClient({ apiKey: '' });
// Set the Gong API key for your instance
const response = await klavisClient.mcpServer.setInstanceAuthToken({
instanceId: "",
authToken: ""
});
console.log(response);
```
```javascript JavaScript
const options = {
method: 'POST',
headers: {
'Authorization': 'Bearer ',
'Content-Type': 'application/json'
},
body: JSON.stringify({
instanceId: '',
authToken: ''
})
};
fetch('https://api.klavis.ai/mcp-server/instance/set-auth-token', options)
.then(response => response.json())
.then(data => console.log(data))
.catch(err => console.error(err));
```
```php PHP
'',
'authToken' => ''
);
$options = array(
'http' => array(
'header' => "Content-type: application/json\r\nAuthorization: Bearer \r\n",
'method' => 'POST',
'content' => json_encode($data)
)
);
$context = stream_context_create($options);
$result = file_get_contents($url, false, $context);
echo $result;
?>
```
```go Go
package main
import (
"bytes"
"encoding/json"
"fmt"
"net/http"
)
func main() {
url := "https://api.klavis.ai/mcp-server/instance/set-auth-token"
payload := map[string]string{
"instanceId": "",
"authToken": "",
}
jsonPayload, _ := json.Marshal(payload)
req, _ := http.NewRequest("POST", url, bytes.NewBuffer(jsonPayload))
req.Header.Set("Authorization", "Bearer ")
req.Header.Set("Content-Type", "application/json")
client := &http.Client{}
resp, err := client.Do(req)
if err != nil {
panic(err)
}
defer resp.Body.Close()
fmt.Println("Response Status:", resp.Status)
}
```
```java Java
import java.net.URI;
import java.net.http.HttpClient;
import java.net.http.HttpRequest;
import java.net.http.HttpResponse;
import java.net.http.HttpResponse.BodyHandlers;
public class SetAuthToken {
public static void main(String[] args) {
try {
String requestBody = "{\"instanceId\":\"\",\"authToken\":\"\"}";
HttpClient client = HttpClient.newHttpClient();
HttpRequest request = HttpRequest.newBuilder()
.uri(URI.create("https://api.klavis.ai/mcp-server/instance/set-auth-token"))
.header("Authorization", "Bearer ")
.header("Content-Type", "application/json")
.POST(HttpRequest.BodyPublishers.ofString(requestBody))
.build();
HttpResponse response = client.send(request, BodyHandlers.ofString());
System.out.println("Response: " + response.body());
} catch (Exception e) {
e.printStackTrace();
}
}
}
```
#### Response
```json Response
{
"success": true,
"message": ""
}
```
### Explore MCP Server Tools
| Tool Name | Description |
| -------------------------------- | ----------------------------------------------------------------------------------------------------------------------- |
| gong\_get\_transcripts\_by\_user | Get call transcripts associated with a user by email address including all participants on the call and their companies |
| gong\_get\_extensive\_data | Lists detailed call data for specific call IDs |
| gong\_get\_call\_transcripts | Retrieve transcripts of specific calls |
| gong\_list\_calls | List calls within a date range |
| gong\_add\_new\_call | Add a new call record to Gong |
For more details about tool input schema, use the [list\_tool](https://docs.klavis.ai/api-reference/mcp-server/list-tools) API.
# Google Calendar
Source: https://docs.klavis.ai/documentation/mcp-server/google_calendar
Learn how to use Klavis to connect your AI application to Google Calendar MCP Server
## No-Code
**Connect to enterprise-grade MCP servers instantly!**

[Get Started →](https://www.klavis.ai/home/mcp-servers)
***
## For Developer
Follow the instructions below to integrate Google Calendar MCP server to your AI application using our API or SDK.
### Prerequisites
* [Create an API key](https://www.klavis.ai/home/api-keys)
### 1. Create a Google Calendar MCP Server
Use the following endpoint to create a new remote Google Calendar MCP server instance:
#### Request
```python Python
from klavis import Klavis
from klavis.types import McpServerName
klavis_client = Klavis(api_key="")
# Create a Google Calendar MCP server instance
google_calendar_server = klavis_client.mcp_server.create_server_instance(
server_name=McpServerName.GOOGLE_CALENDAR,
user_id="",
platform_name="",
)
```
```javascript TypeScript
import { KlavisClient, Klavis } from 'klavis';
const klavisClient = new KlavisClient({ apiKey: '' });
// Create a Google Calendar MCP server instance
const googleCalendarServer = await klavisClient.mcpServer.createServerInstance({
serverName: Klavis.McpServerName.GoogleCalendar,
userId: "",
platformName: "",
});
```
```bash cURL
curl --request POST \
--url https://api.klavis.ai/mcp-server/instance/create \
--header 'Authorization: Bearer ' \
--header 'Content-Type: application/json' \
--data '{
"serverName": "Google Calendar",
"userId": "",
"platformName": "",
}'
```
```go Go
package main
import (
"fmt"
"strings"
"net/http"
"io/ioutil"
)
func main() {
url := "https://api.klavis.ai/mcp-server/instance/create"
payload := strings.NewReader("{\n \"serverName\": \"Google Calendar\",\n \"userId\": \"\",\n \"platformName\": \"\",\n}")
req, _ := http.NewRequest("POST", url, payload)
req.Header.Add("Authorization", "Bearer ")
req.Header.Add("Content-Type", "application/json")
res, _ := http.DefaultClient.Do(req)
defer res.Body.Close()
body, _ := ioutil.ReadAll(res.Body)
fmt.Println(res)
fmt.Println(string(body))
}
```
```java Java
HttpResponse response = Unirest.post("https://api.klavis.ai/mcp-server/instance/create")
.header("Authorization", "Bearer ")
.header("Content-Type", "application/json")
.body("{\n \"serverName\": \"Google Calendar\",\n \"userId\": \"\",\n \"platformName\": \"\",\n}")
.asString();
```
#### Response
```json SDK Response
{
"serverUrl": "https://gcalendar-mcp-server.klavis.ai/mcp/?instance_id=",
"instanceId": "",
"oauthUrl": "https://api.klavis.ai/oauth/gcalendar/authorize?instance_id="
}
```
**serverUrl** specifies the endpoint of the Google Calendar MCP server, which you can connect with the MCP client of your application.**instanceId** is used for authentication and identification of your server instance. After you complete the next steps, this token allows the MCP server to access user's private Google Calendar information.
### 2. Implement OAuth Authorization
Redirect users to the OAuth authorization flow:
```python Python
import webbrowser
webbrowser.open(google_calendar_server.oauth_url)
```
```javascript TypeScript
// The OAuth URL is provided in the server response
console.log('OAuth URL:', googleCalendarServer.oauthUrl);
// Redirect user to authorize
window.location.href = googleCalendarServer.oauthUrl;
```
```go Go
package main
import (
"fmt"
"net/url"
)
func main() {
instanceId := ""
baseUrl := "https://api.klavis.ai/oauth/gcalendar/authorize"
params := url.Values{}
params.Add("instance_id", instanceId)
authUrl := baseUrl + "?" + params.Encode()
fmt.Printf("Redirect to: %s\n", authUrl)
// In a web application, you would redirect the user:
// http.Redirect(w, r, authUrl, http.StatusFound)
}
```
```java Java
import java.net.URLEncoder;
import java.nio.charset.StandardCharsets;
public class GoogleCalendarOAuth {
public static void main(String[] args) {
String instanceId = "";
String authUrl = "https://api.klavis.ai/oauth/gcalendar/authorize?instance_id=" +
URLEncoder.encode(instanceId, StandardCharsets.UTF_8);
System.out.println("Redirect to: " + authUrl);
// In a web application, you would redirect the user:
// response.sendRedirect(authUrl);
}
}
```
You can also specify scope and redirect\_url in the authUrl, and we also support white-label. Check the API reference for more details.
### Explore MCP Server Tools
| Tool Name | Description |
| ------------------------------------------- | ---------------------------------------------------------------------------- |
| google\_calendar\_list\_calendars | List all calendars accessible by the user |
| google\_calendar\_create\_event | Create a new event/meeting/sync/meetup in the specified calendar |
| google\_calendar\_list\_events | List events from the specified calendar within the given datetime range |
| google\_calendar\_update\_event | Update an existing event in the specified calendar with the provided details |
| google\_calendar\_add\_attendees\_to\_event | Add attendees to an existing event in Google Calendar |
| google\_calendar\_delete\_event | Delete an event from Google Calendar |
For more details about tool input schema, use the [list\_tool](https://docs.klavis.ai/api-reference/mcp-server/list-tools) API.
# Google Docs
Source: https://docs.klavis.ai/documentation/mcp-server/google_docs
Learn how to use Klavis to connect your AI application to Google Docs MCP Server
## No-Code
**Connect to enterprise-grade MCP servers instantly!**

[Get Started →](https://www.klavis.ai/home/mcp-servers)
***
## For Developer
Follow the instructions below to integrate Google Docs MCP server to your AI application using our API or SDK.
### Prerequisites
* [Create an API key](https://www.klavis.ai/home/api-keys)
### 1. Create a Google Docs MCP Server
Use the following endpoint to create a new remote Google Docs MCP server instance:
#### Request
```python Python
from klavis import Klavis
from klavis.types import McpServerName
klavis_client = Klavis(api_key="")
# Create a Google Docs MCP server instance
google_docs_server = klavis_client.mcp_server.create_server_instance(
server_name=McpServerName.GOOGLE_DOCS,
user_id="",
platform_name="",
)
```
```javascript TypeScript
import { KlavisClient, Klavis } from 'klavis';
const klavisClient = new KlavisClient({ apiKey: '' });
// Create a Google Docs MCP server instance
const googleDocsServer = await klavisClient.mcpServer.createServerInstance({
serverName: Klavis.McpServerName.GoogleDocs,
userId: "",
platformName: "",
});
```
```bash cURL
curl --request POST \
--url https://api.klavis.ai/mcp-server/instance/create \
--header 'Authorization: Bearer ' \
--header 'Content-Type: application/json' \
--data '{
"serverName": "Google Docs",
"userId": "",
"platformName": "",
}'
```
```go Go
package main
import (
"fmt"
"strings"
"net/http"
"io/ioutil"
)
func main() {
url := "https://api.klavis.ai/mcp-server/instance/create"
payload := strings.NewReader("{\n \"serverName\": \"Google Docs\",\n \"userId\": \"\",\n \"platformName\": \"\",\n}")
req, _ := http.NewRequest("POST", url, payload)
req.Header.Add("Authorization", "Bearer ")
req.Header.Add("Content-Type", "application/json")
res, _ := http.DefaultClient.Do(req)
defer res.Body.Close()
body, _ := ioutil.ReadAll(res.Body)
fmt.Println(res)
fmt.Println(string(body))
}
```
```java Java
HttpResponse response = Unirest.post("https://api.klavis.ai/mcp-server/instance/create")
.header("Authorization", "Bearer ")
.header("Content-Type", "application/json")
.body("{\n \"serverName\": \"Google Docs\",\n \"userId\": \"\",\n \"platformName\": \"\",\n}")
.asString();
```
#### Response
```json SDK Response
{
"serverUrl": "https://gdocs-mcp-server.klavis.ai/mcp/?instance_id=",
"instanceId": "",
"oauthUrl": "https://api.klavis.ai/oauth/gdocs/authorize?instance_id="
}
```
**serverUrl** specifies the endpoint of the Google Docs MCP server, which you can connect with the MCP client of your application.**instanceId** is used for authentication and identification of your server instance. After you complete the next steps, this token allows the MCP server to access user's private Google Docs information.
### 2. Implement OAuth Authorization
**Google Picker API**
Klavis use Google Picker API to allow the user to create Drive files (including Docs) , and select and modify any file from their Drive that they want to share with your application , including files not created with the application. This gives users more control and confidence that your application's access to their files is limited and secure.
Or if you want to set up your own branding - [White Labeling](https://docs.klavis.ai/documentation/oauth_white_label)
After you have set up the white labeling for Google Docs, you can then do the following:
```python Python
import webbrowser
webbrowser.open(google_docs_server.oauth_url)
```
```javascript TypeScript
// The OAuth URL is provided in the server response
console.log('OAuth URL:', googleDocsServer.oauthUrl);
// Redirect user to authorize
window.location.href = googleDocsServer.oauthUrl;
```
```go Go
package main
import (
"fmt"
"net/url"
)
func main() {
instanceId := ""
baseUrl := "https://api.klavis.ai/oauth/gdocs/authorize"
params := url.Values{}
params.Add("instance_id", instanceId)
authUrl := baseUrl + "?" + params.Encode()
fmt.Printf("Redirect to: %s\n", authUrl)
// In a web application, you would redirect the user:
// http.Redirect(w, r, authUrl, http.StatusFound)
}
```
```java Java
import java.net.URLEncoder;
import java.nio.charset.StandardCharsets;
public class GoogleDocsOAuth {
public static void main(String[] args) {
String instanceId = "";
String authUrl = "https://api.klavis.ai/oauth/gdocs/authorize?instance_id=" +
URLEncoder.encode(instanceId, StandardCharsets.UTF_8);
System.out.println("Redirect to: " + authUrl);
// In a web application, you would redirect the user:
// response.sendRedirect(authUrl);
}
}
```
You can also specify scope and redirect\_url in the authUrl, and we also support white-label. Check the API reference for more details.
### Watch the Example
### Explore MCP Server Tools
| Tool Name | Description |
| ------------------------------------------ | ------------------------------------------------------------- |
| google\_docs\_get\_document\_by\_id | Retrieve a Google Docs document by ID |
| google\_docs\_get\_all\_documents | Get all Google Docs documents from the user's Drive |
| google\_docs\_insert\_text\_at\_end | Insert text at the end of a Google Docs document |
| google\_docs\_create\_blank\_document | Create a new blank Google Docs document with a title |
| google\_docs\_create\_document\_from\_text | Create a new Google Docs document with specified text content |
For more details about tool input schema, use the [list\_tool](https://docs.klavis.ai/api-reference/mcp-server/list-tools) API.
# Google Drive
Source: https://docs.klavis.ai/documentation/mcp-server/google_drive
Learn how to use Klavis to connect your AI application to Google Drive MCP Server
## No-Code
**Connect to enterprise-grade MCP servers instantly!**

[Get Started →](https://www.klavis.ai/home/mcp-servers)
***
## For Developer
Follow the instructions below to integrate Google Drive MCP server to your AI application using our API or SDK.
### Prerequisites
* [Create an API key](https://www.klavis.ai/home/api-keys)
### 1. Create a Google Drive MCP Server
Use the following endpoint to create a new remote Google Drive MCP server instance:
#### Request
```python Python
from klavis import Klavis
from klavis.types import McpServerName
klavis_client = Klavis(api_key="")
# Create a Google Drive MCP server instance
google_drive_server = klavis_client.mcp_server.create_server_instance(
server_name=McpServerName.GOOGLE_DRIVE,
user_id="",
platform_name="",
)
```
```javascript TypeScript
import { KlavisClient, Klavis } from 'klavis';
const klavisClient = new KlavisClient({ apiKey: '' });
// Create a Google Drive MCP server instance
const googleDriveServer = await klavisClient.mcpServer.createServerInstance({
serverName: Klavis.McpServerName.GoogleDrive,
userId: "",
platformName: "",
});
```
```bash cURL
curl --request POST \
--url https://api.klavis.ai/mcp-server/instance/create \
--header 'Authorization: Bearer ' \
--header 'Content-Type: application/json' \
--data '{
"serverName": "Google Drive",
"userId": "",
"platformName": "",
}'
```
```go Go
package main
import (
"fmt"
"strings"
"net/http"
"io/ioutil"
)
func main() {
url := "https://api.klavis.ai/mcp-server/instance/create"
payload := strings.NewReader("{\n \"serverName\": \"Google Drive\",\n \"userId\": \"\",\n \"platformName\": \"\",\n}")
req, _ := http.NewRequest("POST", url, payload)
req.Header.Add("Authorization", "Bearer ")
req.Header.Add("Content-Type", "application/json")
res, _ := http.DefaultClient.Do(req)
defer res.Body.Close()
body, _ := ioutil.ReadAll(res.Body)
fmt.Println(res)
fmt.Println(string(body))
}
```
```java Java
HttpResponse response = Unirest.post("https://api.klavis.ai/mcp-server/instance/create")
.header("Authorization", "Bearer ")
.header("Content-Type", "application/json")
.body("{\n \"serverName\": \"Google Drive\",\n \"userId\": \"\",\n \"platformName\": \"\",\n}")
.asString();
```
#### Response
```json SDK Response
{
"serverUrl": "https://gdrive-mcp-server.klavis.ai/mcp/?instance_id=",
"instanceId": "",
"oauthUrl": "https://api.klavis.ai/oauth/gdrive/authorize?instance_id="
}
```
**serverUrl** specifies the endpoint of the Google Drive MCP server, which you can connect with the MCP client of your application.**instanceId** is used for authentication and identification of your server instance. After you complete the next steps, this token allows the MCP server to access user's private Google Drive information.
### 2. Implement OAuth Authorization
**Google Picker API**
Klavis use Google Picker API to allow the user to create Drive files, and select and modify any file from their Drive that they want to share with your application , including files not created with the application. This gives users more control and confidence that your application's access to their files is limited and secure.
Or if you want to set up your own branding - [White Labeling](https://docs.klavis.ai/documentation/oauth_white_label)
After you have set up the white labeling for Google Drive, you can then do the following:
```python Python
import webbrowser
webbrowser.open(google_drive_server.oauth_url)
```
```javascript TypeScript
// The OAuth URL is provided in the server response
console.log('OAuth URL:', googleDriveServer.oauthUrl);
// Redirect user to authorize
window.location.href = googleDriveServer.oauthUrl;
```
```go Go
package main
import (
"fmt"
"net/url"
)
func main() {
instanceId := ""
baseUrl := "https://api.klavis.ai/oauth/gdrive/authorize"
params := url.Values{}
params.Add("instance_id", instanceId)
authUrl := baseUrl + "?" + params.Encode()
fmt.Printf("Redirect to: %s\n", authUrl)
// In a web application, you would redirect the user:
// http.Redirect(w, r, authUrl, http.StatusFound)
}
```
```java Java
import java.net.URLEncoder;
import java.nio.charset.StandardCharsets;
public class GoogleDriveOAuth {
public static void main(String[] args) {
String instanceId = "";
String authUrl = "https://api.klavis.ai/oauth/gdrive/authorize?instance_id=" +
URLEncoder.encode(instanceId, StandardCharsets.UTF_8);
System.out.println("Redirect to: " + authUrl);
// In a web application, you would redirect the user:
// response.sendRedirect(authUrl);
}
}
```
You can also specify scope and redirect\_url in the authUrl, and we also support white-label. Check the API reference for more details.
### Watch the Example
### Explore MCP Server Tools
| Tool Name | Description |
| ----------------------------------------------- | ------------------------------------------------------------------------------- |
| google\_drive\_search\_documents | Search for documents in the user's Google Drive |
| google\_drive\_search\_and\_retrieve\_documents | Search and retrieve the contents of Google documents in the user's Google Drive |
| google\_drive\_get\_file\_tree\_structure | Get the file/folder tree structure of the user's Google Drive |
For more details about tool input schema, use the [list\_tool](https://docs.klavis.ai/api-reference/mcp-server/list-tools) API.
# Google Sheets
Source: https://docs.klavis.ai/documentation/mcp-server/google_sheets
Learn how to use Klavis to connect your AI application to Google Sheets MCP Server
## No-Code
**Connect to enterprise-grade MCP servers instantly!**

[Get Started →](https://www.klavis.ai/home/mcp-servers)
***
## For Developer
Follow the instructions below to integrate Google Sheets MCP server to your AI application using our API or SDK.
### Prerequisites
* [Create an API key](https://www.klavis.ai/home/api-keys)
### 1. Create a Google Sheets MCP Server
Use the following endpoint to create a new remote Google Sheets MCP server instance:
#### Request
```python Python
from klavis import Klavis
from klavis.types import McpServerName
klavis_client = Klavis(api_key="")
# Create a Google Sheets MCP server instance
google_sheets_server = klavis_client.mcp_server.create_server_instance(
server_name=McpServerName.GOOGLE_SHEETS,
user_id="",
platform_name="",
)
```
```javascript TypeScript
import { KlavisClient, Klavis } from 'klavis';
const klavisClient = new KlavisClient({ apiKey: '' });
// Create a Google Sheets MCP server instance
const googleSheetsServer = await klavisClient.mcpServer.createServerInstance({
serverName: Klavis.McpServerName.GoogleSheets,
userId: "",
platformName: "",
});
```
```bash cURL
curl --request POST \
--url https://api.klavis.ai/mcp-server/instance/create \
--header 'Authorization: Bearer ' \
--header 'Content-Type: application/json' \
--data '{
"serverName": "Google Sheets",
"userId": "",
"platformName": "",
}'
```
```go Go
package main
import (
"fmt"
"strings"
"net/http"
"io/ioutil"
)
func main() {
url := "https://api.klavis.ai/mcp-server/instance/create"
payload := strings.NewReader("{\n \"serverName\": \"Google Sheets\",\n \"userId\": \"\",\n \"platformName\": \"\",\n}")
req, _ := http.NewRequest("POST", url, payload)
req.Header.Add("Authorization", "Bearer ")
req.Header.Add("Content-Type", "application/json")
res, _ := http.DefaultClient.Do(req)
defer res.Body.Close()
body, _ := ioutil.ReadAll(res.Body)
fmt.Println(res)
fmt.Println(string(body))
}
```
```java Java
HttpResponse response = Unirest.post("https://api.klavis.ai/mcp-server/instance/create")
.header("Authorization", "Bearer ")
.header("Content-Type", "application/json")
.body("{\n \"serverName\": \"Google Sheets\",\n \"userId\": \"\",\n \"platformName\": \"\",\n}")
.asString();
```
#### Response
```json SDK Response
{
"serverUrl": "https://gsheets-mcp-server.klavis.ai/mcp/?instance_id=",
"instanceId": "",
"oauthUrl": "https://api.klavis.ai/oauth/gsheets/authorize?instance_id="
}
```
**serverUrl** specifies the endpoint of the Google Sheets MCP server, which you can connect with the MCP client of your application.**instanceId** is used for authentication and identification of your server instance. After you complete the next steps, this token allows the MCP server to access user's private Google Sheets information.
### 2. Implement OAuth Authorization
Redirect users to the OAuth authorization flow:
```python Python
import webbrowser
webbrowser.open(google_sheets_server.oauth_url)
```
```javascript TypeScript
// The OAuth URL is provided in the server response
console.log('OAuth URL:', googleSheetsServer.oauthUrl);
// Redirect user to authorize
window.location.href = googleSheetsServer.oauthUrl;
```
```go Go
package main
import (
"fmt"
"net/url"
)
func main() {
instanceId := ""
baseUrl := "https://api.klavis.ai/oauth/gsheets/authorize"
params := url.Values{}
params.Add("instance_id", instanceId)
authUrl := baseUrl + "?" + params.Encode()
fmt.Printf("Redirect to: %s\n", authUrl)
// In a web application, you would redirect the user:
// http.Redirect(w, r, authUrl, http.StatusFound)
}
```
```java Java
import java.net.URLEncoder;
import java.nio.charset.StandardCharsets;
public class GoogleSheetsOAuth {
public static void main(String[] args) {
String instanceId = "";
String authUrl = "https://api.klavis.ai/oauth/gsheets/authorize?instance_id=" +
URLEncoder.encode(instanceId, StandardCharsets.UTF_8);
System.out.println("Redirect to: " + authUrl);
// In a web application, you would redirect the user:
// response.sendRedirect(authUrl);
}
}
```
You can also specify scope and redirect\_url in the authUrl, and we also support white-label. Check the API reference for more details.
### Watch the Example
### Explore MCP Server Tools
| Tool Name | Description |
| ----------------------------------- | -------------------------------------------------------------- |
| google\_sheets\_create\_spreadsheet | Create a new spreadsheet with a title and optional data |
| google\_sheets\_get\_spreadsheet | Retrieve spreadsheet properties and cell data for all sheets |
| google\_sheets\_write\_to\_cell | Write a value to a specific cell in a spreadsheet |
| google\_sheets\_list\_all\_sheets | List all Google Sheets spreadsheets in the user's Google Drive |
For more details about tool input schema, use the [list\_tool](https://docs.klavis.ai/api-reference/mcp-server/list-tools) API.
# HubSpot
Source: https://docs.klavis.ai/documentation/mcp-server/hubspot
Learn how to use Klavis to connect your AI application to HubSpot MCP Server
## No-Code
**Connect to enterprise-grade MCP servers instantly!**

[Get Started →](https://www.klavis.ai/home/mcp-servers)
***
## For Developer
Follow the instructions below to integrate HubSpot MCP server to your AI application using our API or SDK.
### Prerequisites
* [Create an API key](https://www.klavis.ai/home/api-keys)
### 1. Create a HubSpot MCP Server
Use the following endpoint to create a new remote HubSpot MCP server instance:
#### Request
```python Python
from klavis import Klavis
from klavis.types import McpServerName
klavis_client = Klavis(api_key="")
# Create a HubSpot MCP server instance
hubspot_server = klavis_client.mcp_server.create_server_instance(
server_name=McpServerName.HUBSPOT,
user_id="",
platform_name="",
)
```
```javascript TypeScript
import { KlavisClient, Klavis } from 'klavis';
const klavisClient = new KlavisClient({ apiKey: '' });
// Create a HubSpot MCP server instance
const hubspotServer = await klavisClient.mcpServer.createServerInstance({
serverName: Klavis.McpServerName.Hubspot,
userId: "",
platformName: "",
});
```
```bash cURL
curl --request POST \
--url https://api.klavis.ai/mcp-server/instance/create \
--header 'Authorization: Bearer ' \
--header 'Content-Type: application/json' \
--data '{
"serverName": "HubSpot",
"userId": "",
"platformName": "",
}'
```
```go Go
package main
import (
"fmt"
"strings"
"net/http"
"io/ioutil"
)
func main() {
url := "https://api.klavis.ai/mcp-server/instance/create"
payload := strings.NewReader("{\n \"serverName\": \"HubSpot\",\n \"userId\": \"\",\n \"platformName\": \"\",\n }")
req, _ := http.NewRequest("POST", url, payload)
req.Header.Add("Authorization", "Bearer ")
req.Header.Add("Content-Type", "application/json")
res, _ := http.DefaultClient.Do(req)
defer res.Body.Close()
body, _ := ioutil.ReadAll(res.Body)
fmt.Println(res)
fmt.Println(string(body))
}
```
```java Java
HttpResponse response = Unirest.post("https://api.klavis.ai/mcp-server/instance/create")
.header("Authorization", "Bearer ")
.header("Content-Type", "application/json")
.body("{\n \"serverName\": \"HubSpot\",\n \"userId\": \"\",\n \"platformName\": \"\",\n}")
.asString();
```
#### Response
```json SDK Response
{
"serverUrl": "https://hubspot-mcp-server.klavis.ai/mcp/?instance_id=",
"instanceId": "",
"oauthUrl": "https://api.klavis.ai/oauth/hubspot/authorize?instance_id="
}
```
**serverUrl** specifies the endpoint of the HubSpot MCP server, which you can connect with the MCP client of your application. **instanceId** is used for authentication and identification of your server instance. After you complete the next steps, this token allows the MCP server to access user's private HubSpot information.
### 2. Implement OAuth Authorization
Redirect users to the OAuth authorization flow:
```python Python
import webbrowser
webbrowser.open(hubspot_server.oauth_url)
```
```javascript TypeScript
// The OAuth URL is provided in the server response
console.log('OAuth URL:', hubspotServer.oauthUrl);
// Redirect user to authorize
window.location.href = hubspotServer.oauthUrl;
```
```go Go
package main
import (
"fmt"
"net/url"
)
func main() {
instanceId := ""
baseUrl := "https://api.klavis.ai/oauth/hubspot/authorize"
params := url.Values{}
params.Add("instance_id", instanceId)
authUrl := baseUrl + "?" + params.Encode()
fmt.Printf("Redirect to: %s\n", authUrl)
// In a web application, you would redirect the user:
// http.Redirect(w, r, authUrl, http.StatusFound)
}
```
```java Java
import java.net.URLEncoder;
import java.nio.charset.StandardCharsets;
public class HubSpotOAuth {
public static void main(String[] args) {
String instanceId = "";
String authUrl = "https://api.klavis.ai/oauth/hubspot/authorize?instance_id=" +
URLEncoder.encode(instanceId, StandardCharsets.UTF_8);
System.out.println("Redirect to: " + authUrl);
// In a web application, you would redirect the user:
// response.sendRedirect(authUrl);
}
}
```
You can also specify scope and redirect\_url in the authUrl, and we also support white-label. Check the API reference for more details.
### Explore MCP Server Tools
| Tool Name | Description |
| -------------------------------- | ------------------------------------------------------------------------------------------------- |
| hubspot\_list\_properties | List all property metadata for a HubSpot object type like contacts, companies, deals, or tickets |
| hubspot\_search\_by\_property | Search HubSpot objects by a specific property and value using a filter operator |
| hubspot\_get\_contacts | Fetch a list of contacts from HubSpot |
| hubspot\_get\_contact\_by\_id | Get a specific contact by HubSpot contact ID |
| hubspot\_create\_property | Create a new custom property for HubSpot contacts |
| hubspot\_delete\_contact\_by\_id | Delete a contact from HubSpot by contact ID |
| hubspot\_create\_contact | Create a new contact using a JSON string of properties |
| hubspot\_update\_contact\_by\_id | Update a contact in HubSpot by contact ID using JSON property updates |
| hubspot\_create\_companies | Create a new company using a JSON string of fields |
| hubspot\_get\_companies | Fetch a list of companies from HubSpot |
| hubspot\_get\_company\_by\_id | Get a company from HubSpot by company ID |
| hubspot\_update\_company\_by\_id | Update an existing company by ID using JSON property updates |
| hubspot\_delete\_company\_by\_id | Delete a company from HubSpot by company ID |
| hubspot\_get\_deals | Fetch a list of deals from HubSpot |
| hubspot\_get\_deal\_by\_id | Fetch a deal by its ID |
| hubspot\_create\_deal | Create a new deal using a JSON string of properties |
| hubspot\_update\_deal\_by\_id | Update an existing deal using a JSON string of updated properties |
| hubspot\_delete\_deal\_by\_id | Delete a deal from HubSpot by deal ID |
| hubspot\_get\_tickets | Fetch a list of tickets from HubSpot |
| hubspot\_get\_ticket\_by\_id | Fetch a ticket by its ID |
| hubspot\_create\_ticket | Create a new ticket using a JSON string of properties |
| hubspot\_update\_ticket\_by\_id | Update an existing ticket using a JSON string of updated properties |
| hubspot\_delete\_ticket\_by\_id | Delete a ticket from HubSpot by ticket ID |
| hubspot\_create\_note | Create a new note in HubSpot with optional associations to contacts, companies, deals, or tickets |
For more details about tool input schema, use the [list\_tool](https://docs.klavis.ai/api-reference/mcp-server/list-tools) API.
# Jira
Source: https://docs.klavis.ai/documentation/mcp-server/jira
Learn how to use Klavis to connect your AI application to Jira MCP Server
## No-Code
**Connect to enterprise-grade MCP servers instantly!**

[Get Started →](https://www.klavis.ai/home/mcp-servers)
***
## For Developer
Follow the instructions below to integrate Jira MCP server to your AI application using our API or SDK.
### Prerequisites
* [Create an API key](https://www.klavis.ai/home/api-keys)
### 1. Create a Jira MCP Server
Use the following endpoint to create a new remote Jira MCP server instance:
#### Request
```python Python
from klavis import Klavis
from klavis.types import McpServerName
klavis_client = Klavis(api_key="")
# Create a Jira MCP server instance
jira_server = klavis_client.mcp_server.create_server_instance(
server_name=McpServerName.JIRA,
user_id="",
platform_name="",
)
```
```javascript TypeScript
import { KlavisClient, Klavis } from 'klavis';
const klavisClient = new KlavisClient({ apiKey: '' });
// Create a Jira MCP server instance
const jiraServer = await klavisClient.mcpServer.createServerInstance({
serverName: Klavis.McpServerName.Jira,
userId: "",
platformName: "",
});
```
```bash cURL
curl --request POST \
--url https://api.klavis.ai/mcp-server/instance/create \
--header 'Authorization: Bearer ' \
--header 'Content-Type: application/json' \
--data '{
"serverName": "Jira",
"userId": "",
"platformName": "",
}'
```
```go Go
package main
import (
"fmt"
"strings"
"net/http"
"io/ioutil"
)
func main() {
url := "https://api.klavis.ai/mcp-server/instance/create"
payload := strings.NewReader("{\n \"serverName\": \"Jira\",\n \"userId\": \"\",\n \"platformName\": \"\"\n}")
req, _ := http.NewRequest("POST", url, payload)
req.Header.Add("Authorization", "Bearer ")
req.Header.Add("Content-Type", "application/json")
res, _ := http.DefaultClient.Do(req)
defer res.Body.Close()
body, _ := ioutil.ReadAll(res.Body)
fmt.Println(res)
fmt.Println(string(body))
}
```
```java Java
HttpResponse response = Unirest.post("https://api.klavis.ai/mcp-server/instance/create")
.header("Authorization", "Bearer ")
.header("Content-Type", "application/json")
.body("{\n \"serverName\": \"Jira\",\n \"userId\": \"\",\n \"platformName\": \"\"\n}")
.asString();
```
#### Response
```json SDK Response
{
"serverUrl": "https://jira-mcp-server.klavis.ai/mcp/?instance_id=",
"instanceId": "",
"oauthUrl": "https://api.klavis.ai/oauth/jira/authorize?instance_id="
}
```
**serverUrl** specifies the endpoint of the Jira MCP server, which allows you to interact with Jira projects and issues.**instanceId** is used to get an authentication token. After you complete the OAuth flow, this token allows the MCP server to access Jira on your behalf.
### 2. Jira OAuth Flow
Redirect users to the OAuth authorization flow:
```python Python
import webbrowser
webbrowser.open(jira_server.oauth_url)
```
```javascript TypeScript
// Redirect user to authorize
window.location.href = jiraServer.oauthUrl;
```
```go Go
package main
import (
"fmt"
"net/url"
)
func main() {
instanceId := ""
baseUrl := "https://api.klavis.ai/oauth/jira/authorize"
params := url.Values{}
params.Add("instance_id", instanceId)
authUrl := baseUrl + "?" + params.Encode()
fmt.Printf("Redirect to: %s\n", authUrl)
// In a web application, you would redirect the user:
// http.Redirect(w, r, authUrl, http.StatusFound)
}
```
```java Java
import java.net.URLEncoder;
import java.nio.charset.StandardCharsets;
public class JiraOAuth {
public static void main(String[] args) {
String instanceId = "";
String authUrl = "https://api.klavis.ai/oauth/jira/authorize?instance_id=" +
URLEncoder.encode(instanceId, StandardCharsets.UTF_8);
System.out.println("Redirect to: " + authUrl);
// In a web application, you would redirect the user:
// response.sendRedirect(authUrl);
}
}
```
### Watch the Example
### Explore MCP Server Tools
| Tool Name | Description |
| ------------------------------- | ------------------------------------------------------------------------------------------------- |
| jira\_search | Search Jira issues using JQL (Jira Query Language) |
| jira\_get\_issue | Get details of a specific Jira issue including its Epic links and relationship information |
| jira\_search\_fields | Search Jira fields by keyword with fuzzy match |
| jira\_get\_project\_issues | Get all issues for a specific Jira project |
| jira\_get\_epic\_issues | Get all issues linked to a specific epic |
| jira\_get\_sprints\_from\_board | Get jira sprints from board by state |
| jira\_create\_sprint | Create Jira sprint for a board |
| jira\_get\_sprint\_issues | Get jira issues from sprint |
| jira\_update\_sprint | Update jira sprint |
| jira\_create\_issue | Create a new Jira issue with optional Epic link or parent for subtasks |
| jira\_update\_issue | Update an existing Jira issue including changing status, adding Epic links, updating fields, etc. |
| jira\_delete\_issue | Delete an existing Jira issue |
| jira\_add\_comment | Add a comment to a Jira issue |
| jira\_get\_link\_types | Get all available issue link types |
For more details about tool input schema, use the [list\_tool](https://docs.klavis.ai/api-reference/mcp-server/list-tools) API.
# Klavis ReportGen
Source: https://docs.klavis.ai/documentation/mcp-server/klavis-reportgen
Learn how to use Klavis to connect your AI application to Klavis ReportGen MCP Server
## No-Code
**Connect to enterprise-grade MCP servers instantly!**

[Get Started →](https://www.klavis.ai/home/mcp-servers)
***
## For Developer
Follow the instructions below to integrate Klavis ReportGen MCP server to your AI application using our API or SDK.
### Prerequisites
* [Create an API key](https://www.klavis.ai/home/api-keys)
### 1. Create a Klavis ReportGen MCP Server
Use the following endpoint to create a new remote Klavis ReportGen MCP server instance:
#### Request
```python Python
from klavis import Klavis
from klavis.types import McpServerName
klavis_client = Klavis(api_key="")
# Create a Klavis ReportGen MCP server instance
klavis_reportgen_server = klavis_client.mcp_server.create_server_instance(
server_name=McpServerName.KLAVIS_REPORTGEN,
user_id="",
platform_name="",
)
```
```javascript TypeScript
import { KlavisClient, Klavis } from 'klavis';
const klavisClient = new KlavisClient({ apiKey: '' });
// Create a Klavis ReportGen MCP server instance
const klavisReportgenServer = await klavisClient.mcpServer.createServerInstance({
serverName: Klavis.McpServerName.KlavisReportgen,
userId: "",
platformName: "",
});
```
```bash cURL
curl --request POST \
--url https://api.klavis.ai/mcp-server/instance/create \
--header 'Authorization: Bearer ' \
--header 'Content-Type: application/json' \
--data '{
"serverName": "Klavis ReportGen",
"userId": "",
"platformName": "",
}'
```
```go Go
package main
import (
"fmt"
"strings"
"net/http"
"io/ioutil"
)
func main() {
url := "https://api.klavis.ai/mcp-server/instance/create"
payload := strings.NewReader("{\n \"serverName\": \"Klavis ReportGen\",\n \"userId\": \"\",\n \"platformName\": \"\"\n}")
req, _ := http.NewRequest("POST", url, payload)
req.Header.Add("Authorization", "Bearer ")
req.Header.Add("Content-Type", "application/json")
res, _ := http.DefaultClient.Do(req)
defer res.Body.Close()
body, _ := ioutil.ReadAll(res.Body)
fmt.Println(res)
fmt.Println(string(body))
}
```
```java Java
HttpResponse response = Unirest.post("https://api.klavis.ai/mcp-server/instance/create")
.header("Authorization", "Bearer ")
.header("Content-Type", "application/json")
.body("{\n \"serverName\": \"Klavis ReportGen\",\n \"userId\": \"\",\n \"platformName\": \"\"\n}")
.asString();
```
#### Response
```json Response
{
"serverUrl": "https://reportgen-mcp-server.klavis.ai/sse?instance_id=",
"instanceId": ""
}
```
**serverUrl** specifies the endpoint of the Klavis ReportGen MCP server, which you can connect and use this MCP Server to generate reports from a query. **instanceId** is used for authentication and identification of your server instance.
### Explore MCP Server Tools
| Tool Name | Description |
| ---------------------- | -------------------------------------------------------------------------- |
| generate\_web\_reports | Generate visually appealing JavaScript web reports based on search queries |
For more details about tool input schema, use the [list\_tool](https://docs.klavis.ai/api-reference/mcp-server/list-tools) API.
# Linear
Source: https://docs.klavis.ai/documentation/mcp-server/linear
Learn how to use Klavis to connect your AI application to Linear MCP Server
## No-Code
**Connect to enterprise-grade MCP servers instantly!**

[Get Started →](https://www.klavis.ai/home/mcp-servers)
***
## For Developer
Follow the instructions below to integrate Linear MCP server to your AI application using our API or SDK.
### Prerequisites
* [Create an API key](https://www.klavis.ai/home/api-keys)
### 1. Create a Linear MCP Server
Use the following endpoint to create a new remote Linear MCP server instance:
#### Request
```python Python
from klavis import Klavis
from klavis.types import McpServerName
klavis_client = Klavis(api_key="")
# Create a Linear MCP server instance
linear_server = klavis_client.mcp_server.create_server_instance(
server_name=McpServerName.LINEAR,
user_id="",
platform_name="",
)
```
```javascript TypeScript
import { KlavisClient, Klavis } from 'klavis';
const klavisClient = new KlavisClient({ apiKey: '' });
// Create a Linear MCP server instance
const linearServer = await klavisClient.mcpServer.createServerInstance({
serverName: Klavis.McpServerName.Linear,
userId: "",
platformName: "",
});
```
```bash cURL
curl --request POST \
--url https://api.klavis.ai/mcp-server/instance/create \
--header 'Authorization: Bearer ' \
--header 'Content-Type: application/json' \
--data '{
"serverName": "Linear",
"userId": "",
"platformName": "",
}'
```
```go Go
package main
import (
"fmt"
"strings"
"net/http"
"io/ioutil"
)
func main() {
url := "https://api.klavis.ai/mcp-server/instance/create"
payload := strings.NewReader("{\n \"serverName\": \"Linear\",\n \"userId\": \"\",\n \"platformName\": \"\"\n}")
req, _ := http.NewRequest("POST", url, payload)
req.Header.Add("Authorization", "Bearer ")
req.Header.Add("Content-Type", "application/json")
res, _ := http.DefaultClient.Do(req)
defer res.Body.Close()
body, _ := ioutil.ReadAll(res.Body)
fmt.Println(res)
fmt.Println(string(body))
}
```
```java Java
HttpResponse response = Unirest.post("https://api.klavis.ai/mcp-server/instance/create")
.header("Authorization", "Bearer ")
.header("Content-Type", "application/json")
.body("{\n \"serverName\": \"Linear\",\n \"userId\": \"\",\n \"platformName\": \"\"\n}")
.asString();
```
#### Response
```json SDK Response
{
"serverUrl": "https://linear-mcp-server.klavis.ai/mcp/?instance_id=",
"instanceId": "",
"oauthUrl": "https://api.klavis.ai/oauth/linear/authorize?instance_id="
}
```
**serverUrl** specifies the endpoint of the Linear MCP server, which you can connect with the MCP client of your application. **instanceId** is used for authentication and identification of your server instance. After you complete the next steps, this token allows the MCP server to access user's private Linear information.
### 2. Implement OAuth Authorization
Redirect users to the OAuth authorization flow:
```python Python
import webbrowser
webbrowser.open(linear_server.oauth_url)
```
```javascript TypeScript
// Redirect user to authorize
window.location.href = linearServer.oauthUrl;
```
```go Go
package main
import (
"fmt"
"net/url"
)
func main() {
instanceId := ""
baseUrl := "https://api.klavis.ai/oauth/linear/authorize"
params := url.Values{}
params.Add("instance_id", instanceId)
authUrl := baseUrl + "?" + params.Encode()
fmt.Printf("Redirect to: %s\n", authUrl)
// In a web application, you would redirect the user:
// http.Redirect(w, r, authUrl, http.StatusFound)
}
```
```java Java
import java.net.URLEncoder;
import java.nio.charset.StandardCharsets;
public class LinearOAuth {
public static void main(String[] args) {
String instanceId = "";
String authUrl = "https://api.klavis.ai/oauth/linear/authorize?instance_id=" +
URLEncoder.encode(instanceId, StandardCharsets.UTF_8);
System.out.println("Redirect to: " + authUrl);
// In a web application, you would redirect the user:
// response.sendRedirect(authUrl);
}
}
```
You can also specify scope and redirect\_url in the authUrl. Check the API reference for more details.
### Explore MCP Server Tools
| Tool Name | Description |
| -------------------------- | ----------------------------------------- |
| linear\_get\_teams | Get all teams in the Linear workspace |
| linear\_get\_issues | Get issues, optionally filtered by team |
| linear\_get\_issue\_by\_id | Get a specific issue by its ID |
| linear\_create\_issue | Create a new issue in Linear |
| linear\_update\_issue | Update an existing issue in Linear |
| linear\_get\_projects | Get projects, optionally filtered by team |
| linear\_create\_project | Create a new project in Linear |
| linear\_update\_project | Update an existing project in Linear |
| linear\_get\_comments | Get comments for a specific issue |
| linear\_create\_comment | Create a comment on an issue |
| linear\_update\_comment | Update an existing comment |
| linear\_search\_issues | Search for issues by text query |
For more details about tool input schema, use the [list\_tool](https://docs.klavis.ai/api-reference/mcp-server/list-tools) API.
# LinkedIn
Source: https://docs.klavis.ai/documentation/mcp-server/linkedin
Learn how to use Klavis to connect your AI application to LinkedIn MCP Server
## No-Code
**Connect to enterprise-grade MCP servers instantly!**

[Get Started →](https://www.klavis.ai/home/mcp-servers)
***
## For Developer
Follow the instructions below to integrate LinkedIn MCP server to your AI application using our API or SDK.
### Prerequisites
* [Create an API key](https://www.klavis.ai/home/api-keys)
### 1. Create a LinkedIn MCP Server
Use the following endpoint to create a new remote LinkedIn MCP server instance:
#### Request
```python Python
from klavis import Klavis
from klavis.types import McpServerName
klavis_client = Klavis(api_key="")
# Create a LinkedIn MCP server instance
linkedin_server = klavis_client.mcp_server.create_server_instance(
server_name=McpServerName.LINKEDIN,
user_id="",
platform_name="",
)
```
```javascript TypeScript
import { KlavisClient, Klavis } from 'klavis';
const klavisClient = new KlavisClient({ apiKey: '' });
// Create a LinkedIn MCP server instance
const linkedinServer = await klavisClient.mcpServer.createServerInstance({
serverName: Klavis.McpServerName.LinkedIn,
userId: "",
platformName: "",
});
```
```bash cURL
curl --request POST \
--url https://api.klavis.ai/mcp-server/instance/create \
--header 'Authorization: Bearer ' \
--header 'Content-Type: application/json' \
--data '{
"serverName": "LinkedIn",
"userId": "",
"platformName": "",
}'
```
```go Go
package main
import (
"fmt"
"strings"
"net/http"
"io/ioutil"
)
func main() {
url := "https://api.klavis.ai/mcp-server/instance/create"
payload := strings.NewReader("{\n \"serverName\": \"LinkedIn\",\n \"userId\": \"\",\n \"platformName\": \"\"\n}")
req, _ := http.NewRequest("POST", url, payload)
req.Header.Add("Authorization", "Bearer ")
req.Header.Add("Content-Type", "application/json")
res, _ := http.DefaultClient.Do(req)
defer res.Body.Close()
body, _ := ioutil.ReadAll(res.Body)
fmt.Println(res)
fmt.Println(string(body))
}
```
```java Java
HttpResponse response = Unirest.post("https://api.klavis.ai/mcp-server/instance/create")
.header("Authorization", "Bearer ")
.header("Content-Type", "application/json")
.body("{\n \"serverName\": \"LinkedIn\",\n \"userId\": \"\",\n \"platformName\": \"\"\n}")
.asString();
```
#### Response
```json SDK Response
{
"serverUrl": "https://linkedin-mcp-server.klavis.ai/mcp/?instance_id=",
"instanceId": "",
"oauthUrl": "https://api.klavis.ai/oauth/linkedin/authorize?instance_id="
}
```
**serverUrl** specifies the endpoint of the LinkedIn MCP server, which you can connect with the MCP client of your application.**instanceId** is used for authentication and identification of your server instance. After you complete the next steps, this token allows the MCP server to access user's private LinkedIn information.
### 2. Implement OAuth Authorization
Redirect users to the OAuth authorization flow:
```python Python
import webbrowser
webbrowser.open(linkedin_server.oauth_url)
```
```javascript TypeScript
// The OAuth URL is provided in the server response
console.log('OAuth URL:', linkedinServer.oauthUrl);
// Redirect user to authorize
window.location.href = linkedinServer.oauthUrl;
```
```go Go
package main
import (
"fmt"
"net/url"
)
func main() {
instanceId := ""
baseUrl := "https://api.klavis.ai/oauth/linkedin/authorize"
params := url.Values{}
params.Add("instance_id", instanceId)
authUrl := baseUrl + "?" + params.Encode()
fmt.Printf("Redirect to: %s\n", authUrl)
// In a web application, you would redirect the user:
// http.Redirect(w, r, authUrl, http.StatusFound)
}
```
```java Java
import java.net.URLEncoder;
import java.nio.charset.StandardCharsets;
public class LinkedInOAuth {
public static void main(String[] args) {
String instanceId = "";
String authUrl = "https://api.klavis.ai/oauth/linkedin/authorize?instance_id=" +
URLEncoder.encode(instanceId, StandardCharsets.UTF_8);
System.out.println("Redirect to: " + authUrl);
// In a web application, you would redirect the user:
// response.sendRedirect(authUrl);
}
}
```
You can also specify scope and redirect\_url in the authUrl, and we also support white-label. Check the API reference for more details.
### Explore MCP Server Tools
| Tool Name | Description |
| ---------------------------- | ------------------------------------------------------------------------ |
| linkedin\_get\_profile\_info | Retrieve LinkedIn profile information (current user or specified person) |
| linkedin\_create\_post | Create a text/article post on LinkedIn with customizable visibility |
For more details about tool input schema, use the [list\_tool](https://docs.klavis.ai/api-reference/mcp-server/list-tools) API.
# Markdown2doc
Source: https://docs.klavis.ai/documentation/mcp-server/markdown2doc
Learn how to use Klavis to connect your AI application to Markdown2doc MCP Server
## No-Code
**Connect to enterprise-grade MCP servers instantly!**

[Get Started →](https://www.klavis.ai/home/mcp-servers)
***
## For Developer
Follow the instructions below to integrate Markdown2doc MCP server to your AI application using our API or SDK.
### Prerequisites
* [Create an API key](https://www.klavis.ai/home/api-keys)
### 1. Create a Markdown2doc MCP Server
Use the following endpoint to create a new remote Markdown2doc MCP server instance:
#### Request
```python Python
from klavis import Klavis
from klavis.types import McpServerName
klavis_client = Klavis(api_key="")
# Create a Markdown2doc MCP server instance
markdown2doc_server = klavis_client.mcp_server.create_server_instance(
server_name=McpServerName.MARKDOWN2DOC,
user_id="",
platform_name="",
)
```
```javascript TypeScript
import { KlavisClient, Klavis } from 'klavis';
const klavisClient = new KlavisClient({ apiKey: '' });
// Create a Markdown2doc MCP server instance
const markdown2docServer = await klavisClient.mcpServer.createServerInstance({
serverName: Klavis.McpServerName.Markdown2doc,
userId: "",
platformName: "",
});
```
```bash cURL
curl --request POST \
--url https://api.klavis.ai/mcp-server/instance/create \
--header 'Authorization: Bearer ' \
--header 'Content-Type: application/json' \
--data '{
"serverName": "Markdown2doc",
"userId": "",
"platformName": "",
}'
```
```go Go
package main
import (
"fmt"
"strings"
"net/http"
"io/ioutil"
)
func main() {
url := "https://api.klavis.ai/mcp-server/instance/create"
payload := strings.NewReader("{\n \"serverName\": \"Markdown2doc\",\n \"userId\": \"\",\n \"platformName\": \"\"\n}")
req, _ := http.NewRequest("POST", url, payload)
req.Header.Add("Authorization", "Bearer ")
req.Header.Add("Content-Type", "application/json")
res, _ := http.DefaultClient.Do(req)
defer res.Body.Close()
body, _ := ioutil.ReadAll(res.Body)
fmt.Println(res)
fmt.Println(string(body))
}
```
```java Java
HttpResponse response = Unirest.post("https://api.klavis.ai/mcp-server/instance/create")
.header("Authorization", "Bearer ")
.header("Content-Type", "application/json")
.body("{\n \"serverName\": \"Markdown2doc\",\n \"userId\": \"\",\n \"platformName\": \"\"\n}")
.asString();
```
#### Response
```json Response
{
"serverUrl": "https://markdown2doc-mcp-server.klavis.ai/sse?instance_id=",
"instanceId": ""
}
```
**serverUrl** specifies the endpoint of the Markdown2doc MCP server, which allows you to convert markdown to various document formats.**instanceId** is used for authentication and identification of your server instance.
### Explore MCP Server Tools
| Tool Name | Description |
| --------------------------- | ----------------------------------------------------------------------------- |
| convert\_markdown\_to\_file | Convert markdown text to different file formats (pdf, docx, doc, html, html5) |
For more details about tool input schema, use the [list\_tool](https://docs.klavis.ai/api-reference/mcp-server/list-tools) API.
# Motion
Source: https://docs.klavis.ai/documentation/mcp-server/motion
Learn how to use Klavis to connect your AI application to Motion MCP Server
## No-Code
**Connect to enterprise-grade MCP servers instantly!**

[Get Started →](https://www.klavis.ai/home/mcp-servers)
***
## For Developer
Follow the instructions below to integrate Motion MCP server to your AI application using our API or SDK.
### Prerequisites
* [Create an API key](https://www.klavis.ai/home/api-keys)
### 1. Create a Motion MCP Server
Use the following endpoint to create a new remote Motion MCP server instance:
#### Request
```python Python
from klavis import Klavis
from klavis.types import McpServerName
klavis_client = Klavis(api_key="")
# Create a Motion MCP server instance
motion_server = klavis_client.mcp_server.create_server_instance(
server_name=McpServerName.MOTION,
user_id="",
platform_name="",
)
```
```javascript TypeScript
import { KlavisClient, Klavis } from 'klavis';
const klavisClient = new KlavisClient({ apiKey: '' });
// Create a Motion MCP server instance
const motionServer = await klavisClient.mcpServer.createServerInstance({
serverName: Klavis.McpServerName.Motion,
userId: "",
platformName: "",
});
```
```bash cURL
curl --request POST \
--url https://api.klavis.ai/mcp-server/instance/create \
--header 'Authorization: Bearer ' \
--header 'Content-Type: application/json' \
--data '{
"serverName": "Motion",
"userId": "",
"platformName": "",
}'
```
```python Python
import requests
url = "https://api.klavis.ai/mcp-server/instance/create"
payload = {
"serverName": "Motion",
"userId": "",
"platformName": ""
}
headers = {
"Authorization": "Bearer ",
"Content-Type": "application/json"
}
response = requests.request("POST", url, json=payload, headers=headers)
print(response.text)
```
```javascript JavaScript
const options = {
method: 'POST',
headers: {Authorization: 'Bearer ', 'Content-Type': 'application/json'},
body: '{"serverName":"Motion","userId":"","platformName":""}'
};
fetch('https://api.klavis.ai/mcp-server/instance/create', options)
.then(response => response.json())
.then(response => console.log(response))
.catch(err => console.error(err));
```
```php PHP
"https://api.klavis.ai/mcp-server/instance/create",
CURLOPT_RETURNTRANSFER => true,
CURLOPT_ENCODING => "",
CURLOPT_MAXREDIRS => 10,
CURLOPT_TIMEOUT => 30,
CURLOPT_HTTP_VERSION => CURL_HTTP_VERSION_1_1,
CURLOPT_CUSTOMREQUEST => "POST",
CURLOPT_POSTFIELDS => "{\n \"serverName\": \"Motion\",\n \"userId\": \"\",\n \"platformName\": \"\"\n}",
CURLOPT_HTTPHEADER => [
"Authorization: Bearer ",
"Content-Type: application/json"
],
]);
$response = curl_exec($curl);
$err = curl_error($curl);
curl_close($curl);
if ($err) {
echo "cURL Error #:" . $err;
} else {
echo $response;
}
```
```go Go
package main
import (
"fmt"
"strings"
"net/http"
"io/ioutil"
)
func main() {
url := "https://api.klavis.ai/mcp-server/instance/create"
payload := strings.NewReader("{\n \"serverName\": \"Motion\",\n \"userId\": \"\",\n \"platformName\": \"\"\n}")
req, _ := http.NewRequest("POST", url, payload)
req.Header.Add("Authorization", "Bearer ")
req.Header.Add("Content-Type", "application/json")
res, _ := http.DefaultClient.Do(req)
defer res.Body.Close()
body, _ := ioutil.ReadAll(res.Body)
fmt.Println(res)
fmt.Println(string(body))
}
```
```java Java
HttpResponse response = Unirest.post("https://api.klavis.ai/mcp-server/instance/create")
.header("Authorization", "Bearer ")
.header("Content-Type", "application/json")
.body("{\n \"serverName\": \"Motion\",\n \"userId\": \"\",\n \"platformName\": \"\"\n}")
.asString();
```
#### Response
```json Response
{
"serverUrl": "https://motion-mcp-server.klavis.ai/sse?instance_id=",
"instanceId": ""
}
```
**serverUrl** specifies the endpoint of the Motion MCP server, which allows you to manage tasks, projects, and workspaces through the Motion service.**instanceId** is used for authentication and identification of your server instance.
### 2. Configure Motion API Key
To use the Motion MCP Server, you need to configure it with your Motion API key.
#### Setting up Motion API Key
```bash cURL
curl --request POST \
--url https://api.klavis.ai/mcp-server/instance/set-auth-token \
--header 'Authorization: Bearer ' \
--header 'Content-Type: application/json' \
--data '{
"instanceId": "",
"authToken": ""
}'
```
```python Python
from klavis import Klavis
klavis_client = Klavis(api_key="")
# Set the Motion API key for your instance
response = klavis_client.mcp_server.set_instance_auth_token(
instance_id="",
auth_token="",
)
print(response)
```
```javascript TypeScript
import { KlavisClient } from 'klavis';
const klavisClient = new KlavisClient({ apiKey: '' });
// Set the Motion API key for your instance
const response = await klavisClient.mcpServer.setInstanceAuthToken({
instanceId: "",
authToken: ""
});
console.log(response);
```
```javascript JavaScript
const options = {
method: 'POST',
headers: {
'Authorization': 'Bearer ',
'Content-Type': 'application/json'
},
body: JSON.stringify({
instanceId: '',
authToken: ''
})
};
fetch('https://api.klavis.ai/mcp-server/instance/set-auth-token', options)
.then(response => response.json())
.then(data => console.log(data))
.catch(err => console.error(err));
```
```php PHP
'',
'authToken' => ''
);
$options = array(
'http' => array(
'header' => "Content-type: application/json\r\nAuthorization: Bearer \r\n",
'method' => 'POST',
'content' => json_encode($data)
)
);
$context = stream_context_create($options);
$result = file_get_contents($url, false, $context);
echo $result;
?>
```
```go Go
package main
import (
"bytes"
"encoding/json"
"fmt"
"net/http"
)
func main() {
url := "https://api.klavis.ai/mcp-server/instance/set-auth-token"
payload := map[string]string{
"instanceId": "",
"authToken": "",
}
jsonPayload, _ := json.Marshal(payload)
req, _ := http.NewRequest("POST", url, bytes.NewBuffer(jsonPayload))
req.Header.Set("Authorization", "Bearer ")
req.Header.Set("Content-Type", "application/json")
client := &http.Client{}
resp, err := client.Do(req)
if err != nil {
panic(err)
}
defer resp.Body.Close()
fmt.Println("Response Status:", resp.Status)
}
```
```java Java
import java.net.URI;
import java.net.http.HttpClient;
import java.net.http.HttpRequest;
import java.net.http.HttpResponse;
import java.net.http.HttpResponse.BodyHandlers;
public class SetAuthToken {
public static void main(String[] args) {
try {
String requestBody = "{\"instanceId\":\"\",\"authToken\":\"\"}";
HttpClient client = HttpClient.newHttpClient();
HttpRequest request = HttpRequest.newBuilder()
.uri(URI.create("https://api.klavis.ai/mcp-server/instance/set-auth-token"))
.header("Authorization", "Bearer ")
.header("Content-Type", "application/json")
.POST(HttpRequest.BodyPublishers.ofString(requestBody))
.build();
HttpResponse response = client.send(request, BodyHandlers.ofString());
System.out.println("Response: " + response.body());
} catch (Exception e) {
e.printStackTrace();
}
}
}
```
#### Response
```json Response
{
"success": true,
"message": ""
}
```
### Explore MCP Server Tools
| Tool Name | Description |
| ----------------------- | ----------------------------------------------- |
| motion\_get\_workspaces | Get all workspaces in the Motion account |
| motion\_get\_users | Get all users, optionally filtered by workspace |
| motion\_get\_my\_user | Get current user information |
| motion\_get\_tasks | Get tasks, optionally filtered by workspace |
| motion\_get\_task | Get a specific task by its ID |
| motion\_create\_task | Create a new task in Motion |
| motion\_update\_task | Update an existing task in Motion |
| motion\_delete\_task | Delete a task from Motion |
| motion\_search\_tasks | Search for tasks by name or description |
| motion\_get\_projects | Get projects, optionally filtered by workspace |
| motion\_get\_project | Get a specific project by its ID |
| motion\_create\_project | Create a new project in Motion |
| motion\_get\_comments | Get comments for a specific task |
| motion\_create\_comment | Create a comment on a task |
For more details about tool input schema, use the [list\_tool](https://docs.klavis.ai/api-reference/mcp-server/list-tools) API.
# Notion
Source: https://docs.klavis.ai/documentation/mcp-server/notion
Learn how to use Klavis to connect your AI application to Notion MCP Server
## No-Code
**Connect to enterprise-grade MCP servers instantly!**

[Get Started →](https://www.klavis.ai/home/mcp-servers)
***
## For Developer
Follow the instructions below to integrate Notion MCP server to your AI application using our API or SDK.
### Prerequisites
* [Create an API key](https://www.klavis.ai/home/api-keys)
### 1. Create a Notion MCP Server
Use the following endpoint to create a new remote Notion MCP server instance:
#### Request
```python Python
from klavis import Klavis
from klavis.types import McpServerName
klavis_client = Klavis(api_key="")
# Create a Notion MCP server instance
notion_server = klavis_client.mcp_server.create_server_instance(
server_name=McpServerName.NOTION,
user_id="",
platform_name="",
)
```
```javascript TypeScript
import { KlavisClient, Klavis } from 'klavis';
const klavisClient = new KlavisClient({ apiKey: '' });
// Create a Notion MCP server instance
const notionServer = await klavisClient.mcpServer.createServerInstance({
serverName: Klavis.McpServerName.Notion,
userId: "",
platformName: "",
});
```
```bash cURL
curl --request POST \
--url https://api.klavis.ai/mcp-server/instance/create \
--header 'Authorization: Bearer ' \
--header 'Content-Type: application/json' \
--data '{
"serverName": "Notion",
"userId": "",
"platformName": "",
}'
```
```go Go
package main
import (
"fmt"
"strings"
"net/http"
"io/ioutil"
)
func main() {
url := "https://api.klavis.ai/mcp-server/instance/create"
payload := strings.NewReader("{\n \"serverName\": \"Notion\",\n \"userId\": \"\",\n \"platformName\": \"\",\n}")
req, _ := http.NewRequest("POST", url, payload)
req.Header.Add("Authorization", "Bearer ")
req.Header.Add("Content-Type", "application/json")
res, _ := http.DefaultClient.Do(req)
defer res.Body.Close()
body, _ := ioutil.ReadAll(res.Body)
fmt.Println(res)
fmt.Println(string(body))
}
```
```java Java
HttpResponse response = Unirest.post("https://api.klavis.ai/mcp-server/instance/create")
.header("Authorization", "Bearer ")
.header("Content-Type", "application/json")
.body("{\n \"serverName\": \"Notion\",\n \"userId\": \"\",\n \"platformName\": \"\",\n}")
.asString();
```
#### Response
```json SDK Response
{
"serverUrl": "https://notion-mcp-server.klavis.ai/mcp/?instance_id=",
"instanceId": "",
"oauthUrl": "https://api.klavis.ai/oauth/notion/authorize?instance_id="
}
```
**serverUrl** specifies the endpoint of the Notion MCP server, which allows you to interact with Notion pages, databases, and blocks.**instanceId** is used to get an authentication token. After you complete the OAuth flow, this token allows the MCP server to access Notion on your behalf.
### 2. Notion OAuth Flow
Redirect users to the OAuth authorization flow:
```python Python
import webbrowser
webbrowser.open(notion_server.oauth_url)
```
```javascript TypeScript
// Redirect user to authorize
window.location.href = notionServer.oauthUrl;
```
```go Go
package main
import (
"fmt"
"net/url"
)
func main() {
instanceId := ""
baseUrl := "https://api.klavis.ai/oauth/notion/authorize"
params := url.Values{}
params.Add("instance_id", instanceId)
authUrl := baseUrl + "?" + params.Encode()
fmt.Printf("Redirect to: %s\n", authUrl)
// In a web application, you would redirect the user:
// http.Redirect(w, r, authUrl, http.StatusFound)
}
```
```java Java
import java.net.URLEncoder;
import java.nio.charset.StandardCharsets;
public class NotionOAuth {
public static void main(String[] args) {
String instanceId = "";
String authUrl = "https://api.klavis.ai/oauth/notion/authorize?instance_id=" +
URLEncoder.encode(instanceId, StandardCharsets.UTF_8);
System.out.println("Redirect to: " + authUrl);
// In a web application, you would redirect the user:
// response.sendRedirect(authUrl);
}
}
```
### Watch the Example
### Explore MCP Server Tools
| Tool Name | Description |
| ----------------------------------- | ------------------------------------- |
| notion\_get\_user | Retrieve a Notion user |
| notion\_get\_users | List all Notion users |
| notion\_get\_self | Retrieve your Notion token's bot user |
| notion\_post\_search | Search Notion by title |
| notion\_retrieve\_a\_page | Retrieve a Notion page |
| notion\_patch\_page | Update Notion page properties |
| notion\_post\_page | Create a Notion page |
| notion\_create\_a\_database | Create a Notion database |
| notion\_update\_a\_database | Update a Notion database |
| notion\_retrieve\_a\_database | Retrieve a Notion database |
| notion\_retrieve\_a\_page\_property | Retrieve a Notion page property item |
| notion\_retrieve\_a\_comment | Retrieve Notion comments |
| notion\_create\_a\_comment | Create a Notion comment |
For more details about tool input schema, use the [list\_tool](https://docs.klavis.ai/api-reference/mcp-server/list-tools) API.
# OneDrive
Source: https://docs.klavis.ai/documentation/mcp-server/onedrive
Learn how to use Klavis to connect your AI application to OneDrive MCP Server
## No-Code
**Connect to enterprise-grade MCP servers instantly!**

[Get Started →](https://www.klavis.ai/home/mcp-servers)
***
## For Developer
Follow the instructions below to integrate OneDrive MCP server to your AI application using our API or SDK.
Coming Soon
# Outlook Mail
Source: https://docs.klavis.ai/documentation/mcp-server/outlook_mail
Learn how to use Klavis to connect your AI application to Outlook Mail MCP Server
## No-Code
**Connect to enterprise-grade MCP servers instantly!**

[Get Started →](https://www.klavis.ai/home/mcp-servers)
***
## For Developer
Follow the instructions below to integrate Outlook Mail MCP server to your AI application using our API or SDK.
Coming Soon
# Perplexity
Source: https://docs.klavis.ai/documentation/mcp-server/perplexity
Learn how to use Klavis to connect your AI application to Perplexity MCP Server
## No-Code
**Connect to enterprise-grade MCP servers instantly!**

[Get Started →](https://www.klavis.ai/home/mcp-servers)
***
## For Developer
Follow the instructions below to integrate Perplexity MCP server to your AI application using our API or SDK.
Coming Soon
# Plai
Source: https://docs.klavis.ai/documentation/mcp-server/plai
Learn how to use Klavis to connect your AI application to Plai MCP Server
## No-Code
**Connect to enterprise-grade MCP servers instantly!**

[Get Started →](https://www.klavis.ai/home/mcp-servers)
***
## For Developer
Follow the instructions below to integrate Plai MCP server to your AI application using our API or SDK.
### Prerequisites
* [Create an API key](https://www.klavis.ai/home/api-keys)
### 1. Create a Plai MCP Server
Use the following endpoint to create a new remote Plai MCP server instance:
#### Request
```python Python
from klavis import Klavis
from klavis.types import McpServerName
klavis_client = Klavis(api_key="")
# Create a Plai MCP server instance
plai_server = klavis_client.mcp_server.create_server_instance(
server_name=McpServerName.PLAI,
user_id="",
platform_name="",
)
```
```javascript TypeScript
import { KlavisClient, Klavis } from 'klavis';
const klavisClient = new KlavisClient({ apiKey: '' });
// Create a Plai MCP server instance
const plaiServer = await klavisClient.mcpServer.createServerInstance({
serverName: Klavis.McpServerName.Plai,
userId: "",
platformName: "",
});
```
```bash cURL
curl --request POST \
--url https://api.klavis.ai/mcp-server/instance/create \
--header 'Authorization: Bearer ' \
--header 'Content-Type: application/json' \
--data '{
"serverName": "Plai",
"userId": "",
"platformName": "",
}'
```
```go Go
package main
import (
"fmt"
"strings"
"net/http"
"io/ioutil"
)
func main() {
url := "https://api.klavis.ai/mcp-server/instance/create"
payload := strings.NewReader("{\n \"serverName\": \"Plai\",\n \"userId\": \"\",\n \"platformName\": \"\"\n}")
req, _ := http.NewRequest("POST", url, payload)
req.Header.Add("Authorization", "Bearer ")
req.Header.Add("Content-Type", "application/json")
res, _ := http.DefaultClient.Do(req)
defer res.Body.Close()
body, _ := ioutil.ReadAll(res.Body)
fmt.Println(res)
fmt.Println(string(body))
}
```
```java Java
HttpResponse response = Unirest.post("https://api.klavis.ai/mcp-server/instance/create")
.header("Authorization", "Bearer ")
.header("Content-Type", "application/json")
.body("{\n \"serverName\": \"Plai\",\n \"userId\": \"\",\n \"platformName\": \"\"\n}")
.asString();
```
#### Response
```json Response
{
"serverUrl": "https://plai-mcp-server.klavis.ai/sse?instance_id=",
"instanceId": ""
}
```
**serverUrl** specifies the endpoint of the Plai MCP server, which allows you to create and manage Facebook, Instagram, and LinkedIn ad campaigns. **instanceId** is used for authentication and identification of your server instance.
### 2. Configure Plai API Key
To use the Plai MCP Server, you need to configure it with your Plai API key.
#### Setting up Plai API Key
```bash cURL
curl --request POST \
--url https://api.klavis.ai/mcp-server/instance/set-auth-token \
--header 'Authorization: Bearer ' \
--header 'Content-Type: application/json' \
--data '{
"instanceId": "",
"authToken": ""
}'
```
```python Python
from klavis import Klavis
klavis_client = Klavis(api_key="")
# Set the Plai API key for your instance
response = klavis_client.mcp_server.set_instance_auth_token(
instance_id="",
auth_token="",
)
print(response)
```
```javascript TypeScript
import { KlavisClient } from 'klavis';
const klavisClient = new KlavisClient({ apiKey: '' });
// Set the Plai API key for your instance
const response = await klavisClient.mcpServer.setInstanceAuthToken({
instanceId: "",
authToken: ""
});
console.log(response);
```
```go Go
package main
import (
"bytes"
"encoding/json"
"fmt"
"net/http"
)
func main() {
url := "https://api.klavis.ai/mcp-server/instance/set-auth-token"
payload := map[string]string{
"instanceId": "",
"authToken": "",
}
jsonPayload, _ := json.Marshal(payload)
req, _ := http.NewRequest("POST", url, bytes.NewBuffer(jsonPayload))
req.Header.Set("Authorization", "Bearer ")
req.Header.Set("Content-Type", "application/json")
client := &http.Client{}
resp, err := client.Do(req)
if err != nil {
panic(err)
}
defer resp.Body.Close()
fmt.Println("Response Status:", resp.Status)
}
```
```java Java
import java.net.URI;
import java.net.http.HttpClient;
import java.net.http.HttpRequest;
import java.net.http.HttpResponse;
import java.net.http.HttpResponse.BodyHandlers;
public class SetAuthToken {
public static void main(String[] args) {
try {
String requestBody = "{\"instanceId\":\"\",\"authToken\":\"\"}";
HttpClient client = HttpClient.newHttpClient();
HttpRequest request = HttpRequest.newBuilder()
.uri(URI.create("https://api.klavis.ai/mcp-server/instance/set-auth-token"))
.header("Authorization", "Bearer ")
.header("Content-Type", "application/json")
.POST(HttpRequest.BodyPublishers.ofString(requestBody))
.build();
HttpResponse response = client.send(request, BodyHandlers.ofString());
System.out.println("Response: " + response.body());
} catch (Exception e) {
e.printStackTrace();
}
}
}
```
#### Response
```json Response
{
"success": true,
"message": ""
}
```
### Explore MCP Server Tools
| Tool Name | Description |
| ---------------------------------- | ---------------------------------------------------------------------------------------------------------------------------------------------------------------------- |
| plai\_create\_user\_profile | Create a new user profile on the Plai platform. This allows onboarding new users into the system. |
| plai\_get\_user\_profile | Retrieve the current user profile using their email address. |
| plai\_create\_link | Generate a link that allows users to connect their Ad accounts (Facebook/Instagram or LinkedIn). |
| plai\_create\_leads\_dynamic | Create a dynamic Facebook Lead Ad campaign. Lead generation ads collect contact information directly from users on Meta platforms. |
| plai\_get\_campaign\_insights | Fetch campaign insights for a specific campaign with performance metrics. |
| plai\_update\_campaign\_status | Update the status of a campaign (pause, activate, or delete). |
| plai\_check\_leadform\_tos | Check whether the user has accepted the Terms of Service for their connected Facebook page. |
| plai\_create\_leadform | Create a lead form for Facebook Lead Ads with predefined questions (EMAIL and FULL\_NAME). |
| plai\_get\_leadform\_list | Get a list of all lead forms for the user. |
| plai\_search\_targeting\_locations | Search for advertising target locations based on search query. This helps in identifying relevant locations to improve the accuracy and effectiveness of ad targeting. |
For more details about tool input schema, use the [list\_tool](https://docs.klavis.ai/api-reference/mcp-server/list-tools) API.
# Postgres
Source: https://docs.klavis.ai/documentation/mcp-server/postgres
Learn how to use Klavis to connect your AI application to Postgres MCP Server
## No-Code
**Connect to enterprise-grade MCP servers instantly!**

[Get Started →](https://www.klavis.ai/home/mcp-servers)
***
## For Developer
Follow the instructions below to integrate Postgres MCP server to your AI application using our API or SDK.
### Prerequisites
* [Create an API key](https://www.klavis.ai/home/api-keys)
### 1. Create a Postgres MCP Server
Use the following endpoint to create a new remote Postgres MCP server instance:
#### Request
```python Python
from klavis import Klavis
from klavis.types import McpServerName
klavis_client = Klavis(api_key="")
# Create a Postgres MCP server instance
postgres_server = klavis_client.mcp_server.create_server_instance(
server_name=McpServerName.POSTGRES,
user_id="",
platform_name="",
)
```
```javascript TypeScript
import { KlavisClient, Klavis } from 'klavis';
const klavisClient = new KlavisClient({ apiKey: '' });
// Create a Postgres MCP server instance
const postgresServer = await klavisClient.mcpServer.createServerInstance({
serverName: Klavis.McpServerName.Postgres,
userId: "",
platformName: "",
});
```
```bash cURL
curl --request POST \
--url https://api.klavis.ai/mcp-server/instance/create \
--header 'Authorization: Bearer ' \
--header 'Content-Type: application/json' \
--data '{
"serverName": "Postgres",
"userId": "",
"platformName": "",
}'
```
```go Go
package main
import (
"fmt"
"strings"
"net/http"
"io/ioutil"
)
func main() {
url := "https://api.klavis.ai/mcp-server/instance/create"
payload := strings.NewReader("{\n \"serverName\": \"Postgres\",\n \"userId\": \"\",\n \"platformName\": \"\"\n}")
req, _ := http.NewRequest("POST", url, payload)
req.Header.Add("Authorization", "Bearer ")
req.Header.Add("Content-Type", "application/json")
res, _ := http.DefaultClient.Do(req)
defer res.Body.Close()
body, _ := ioutil.ReadAll(res.Body)
fmt.Println(res)
fmt.Println(string(body))
}
```
```java Java
HttpResponse response = Unirest.post("https://api.klavis.ai/mcp-server/instance/create")
.header("Authorization", "Bearer ")
.header("Content-Type", "application/json")
.body("{\n \"serverName\": \"Postgres\",\n \"userId\": \"\",\n \"platformName\": \"\"\n}")
.asString();
```
#### Response
```json Response
{
"serverUrl": "https://postgres-mcp-server.klavis.ai/sse?instance_id=",
"instanceId": ""
}
```
**serverUrl** specifies the endpoint of the Postgres MCP server, which allows you to interact with PostgreSQL databases.**instanceId** is used for authentication and identification of your server instance.
### 2. Configure Postgres Connection
To connect to your PostgreSQL database, you need to configure the MCP server with your database credentials.
They are usually in the form of `postgresql://:@:/`.
#### Setting up Postgres Connection
```bash cURL
curl --request POST \
--url https://api.klavis.ai/mcp-server/instance/set-auth-token \
--header 'Authorization: Bearer ' \
--header 'Content-Type: application/json' \
--data '{
"instanceId": "",
"authToken": ""
}'
```
```python Python
from klavis import Klavis
klavis_client = Klavis(api_key="")
# Set the PostgreSQL connection string for your instance
response = klavis_client.mcp_server.set_instance_auth_token(
instance_id="",
auth_token="",
)
print(response)
```
```javascript TypeScript
import { KlavisClient } from 'klavis';
const klavisClient = new KlavisClient({ apiKey: '' });
// Set the PostgreSQL connection string for your instance
const response = await klavisClient.mcpServer.setInstanceAuthToken({
instanceId: "",
authToken: ""
});
console.log(response);
```
```go Go
package main
import (
"bytes"
"encoding/json"
"fmt"
"net/http"
)
func main() {
url := "https://api.klavis.ai/mcp-server/instance/set-auth-token"
payload := map[string]string{
"instanceId": "",
"authToken": "",
}
jsonPayload, _ := json.Marshal(payload)
req, _ := http.NewRequest("POST", url, bytes.NewBuffer(jsonPayload))
req.Header.Set("Authorization", "Bearer ")
req.Header.Set("Content-Type", "application/json")
client := &http.Client{}
resp, err := client.Do(req)
if err != nil {
panic(err)
}
defer resp.Body.Close()
fmt.Println("Response Status:", resp.Status)
}
```
```java Java
import java.net.URI;
import java.net.http.HttpClient;
import java.net.http.HttpRequest;
import java.net.http.HttpResponse;
import java.net.http.HttpResponse.BodyHandlers;
public class SetAuthToken {
public static void main(String[] args) {
try {
String requestBody = "{\"instanceId\":\"\",\"authToken\":\"\"}";
HttpClient client = HttpClient.newHttpClient();
HttpRequest request = HttpRequest.newBuilder()
.uri(URI.create("https://api.klavis.ai/mcp-server/instance/set-auth-token"))
.header("Authorization", "Bearer ")
.header("Content-Type", "application/json")
.POST(HttpRequest.BodyPublishers.ofString(requestBody))
.build();
HttpResponse response = client.send(request, BodyHandlers.ofString());
System.out.println("Response: " + response.body());
} catch (Exception e) {
e.printStackTrace();
}
}
}
```
#### Response
```json Response
{
"success": true,
"message": ""
}
```
### Explore MCP Server Tools
| Tool Name | Description |
| --------- | ------------------------------------------------------- |
| query | Run a read-only SQL query against a PostgreSQL database |
For more details about tool input schema, use the [list\_tool](https://docs.klavis.ai/api-reference/mcp-server/list-tools) API.
# Resend
Source: https://docs.klavis.ai/documentation/mcp-server/resend
Learn how to use Klavis to connect your AI application to Resend MCP Server
## No-Code
**Connect to enterprise-grade MCP servers instantly!**

[Get Started →](https://www.klavis.ai/home/mcp-servers)
***
## For Developer
Follow the instructions below to integrate Resend MCP server to your AI application using our API or SDK.
### Prerequisites
* [Create an API key](https://www.klavis.ai/home/api-keys)
### 1. Create a Resend MCP Server
Use the following endpoint to create a new remote Resend MCP server instance:
#### Request
```python Python
from klavis import Klavis
from klavis.types import McpServerName
klavis_client = Klavis(api_key="")
# Create a Resend MCP server instance
resend_server = klavis_client.mcp_server.create_server_instance(
server_name=McpServerName.RESEND,
user_id="",
platform_name="",
)
```
```javascript TypeScript
import { KlavisClient, Klavis } from 'klavis';
const klavisClient = new KlavisClient({ apiKey: '' });
// Create a Resend MCP server instance
const resendServer = await klavisClient.mcpServer.createServerInstance({
serverName: Klavis.McpServerName.Resend,
userId: "",
platformName: "",
});
```
```bash cURL
curl --request POST \
--url https://api.klavis.ai/mcp-server/instance/create \
--header 'Authorization: Bearer ' \
--header 'Content-Type: application/json' \
--data '{
"serverName": "Resend",
"userId": "",
"platformName": "",
}'
```
```go Go
package main
import (
"fmt"
"strings"
"net/http"
"io/ioutil"
)
func main() {
url := "https://api.klavis.ai/mcp-server/instance/create"
payload := strings.NewReader("{\n \"serverName\": \"Resend\",\n \"userId\": \"\",\n \"platformName\": \"\"\n}")
req, _ := http.NewRequest("POST", url, payload)
req.Header.Add("Authorization", "Bearer ")
req.Header.Add("Content-Type", "application/json")
res, _ := http.DefaultClient.Do(req)
defer res.Body.Close()
body, _ := ioutil.ReadAll(res.Body)
fmt.Println(res)
fmt.Println(string(body))
}
```
```java Java
HttpResponse response = Unirest.post("https://api.klavis.ai/mcp-server/instance/create")
.header("Authorization", "Bearer ")
.header("Content-Type", "application/json")
.body("{\n \"serverName\": \"Resend\",\n \"userId\": \"\",\n \"platformName\": \"\"\n}")
.asString();
```
#### Response
```json Response
{
"serverUrl": "https://resend-mcp-server.klavis.ai/sse?instance_id=",
"instanceId": ""
}
```
**serverUrl** specifies the endpoint of the Resend MCP server, which allows you to send emails through the Resend service.**instanceId** is used for authentication and identification of your server instance.
### 2. Configure Resend API Key
To use the Resend MCP Server, you need to configure it with your Resend API key.
#### Setting up Resend API Key
```bash cURL
curl --request POST \
--url https://api.klavis.ai/mcp-server/instance/set-auth-token \
--header 'Authorization: Bearer ' \
--header 'Content-Type: application/json' \
--data '{
"instanceId": "",
"authToken": ""
}'
```
```python Python
from klavis import Klavis
klavis_client = Klavis(api_key="")
# Set the Resend API key for your instance
response = klavis_client.mcp_server.set_instance_auth_token(
instance_id="",
auth_token="",
)
print(response)
```
```javascript TypeScript
import { KlavisClient } from 'klavis';
const klavisClient = new KlavisClient({ apiKey: '' });
// Set the Resend API key for your instance
const response = await klavisClient.mcpServer.setInstanceAuthToken({
instanceId: "",
authToken: ""
});
console.log(response);
```
```go Go
package main
import (
"bytes"
"encoding/json"
"fmt"
"net/http"
)
func main() {
url := "https://api.klavis.ai/mcp-server/instance/set-auth-token"
payload := map[string]string{
"instanceId": "",
"authToken": "",
}
jsonPayload, _ := json.Marshal(payload)
req, _ := http.NewRequest("POST", url, bytes.NewBuffer(jsonPayload))
req.Header.Set("Authorization", "Bearer ")
req.Header.Set("Content-Type", "application/json")
client := &http.Client{}
resp, err := client.Do(req)
if err != nil {
panic(err)
}
defer resp.Body.Close()
fmt.Println("Response Status:", resp.Status)
}
```
```java Java
import java.net.URI;
import java.net.http.HttpClient;
import java.net.http.HttpRequest;
import java.net.http.HttpResponse;
import java.net.http.HttpResponse.BodyHandlers;
public class SetAuthToken {
public static void main(String[] args) {
try {
String requestBody = "{\"instanceId\":\"\",\"authToken\":\"\"}";
HttpClient client = HttpClient.newHttpClient();
HttpRequest request = HttpRequest.newBuilder()
.uri(URI.create("https://api.klavis.ai/mcp-server/instance/set-auth-token"))
.header("Authorization", "Bearer ")
.header("Content-Type", "application/json")
.POST(HttpRequest.BodyPublishers.ofString(requestBody))
.build();
HttpResponse response = client.send(request, BodyHandlers.ofString());
System.out.println("Response: " + response.body());
} catch (Exception e) {
e.printStackTrace();
}
}
}
```
#### Response
```json Response
{
"success": true,
"message": ""
}
```
### Explore MCP Server Tools
| Tool Name | Description |
| ------------------------- | --------------------------------------------------------------------------------------------------- |
| resend\_send\_email | Send an email using Resend service with options for HTML content, CC, BCC, scheduled delivery, etc. |
| resend\_create\_audience | Create a new audience in Resend |
| resend\_get\_audience | Retrieve audience details by ID in Resend |
| resend\_delete\_audience | Delete an audience by ID in Resend |
| resend\_list\_audiences | List all audiences in Resend |
| resend\_create\_contact | Create a new contact in a Resend audience |
| resend\_get\_contact | Retrieve a contact from a Resend audience by ID or email |
| resend\_update\_contact | Update a contact in a Resend audience by ID or email |
| resend\_delete\_contact | Delete a contact from a Resend audience by ID or email |
| resend\_list\_contacts | List all contacts in a Resend audience |
| resend\_create\_broadcast | Create a new broadcast in Resend |
| resend\_get\_broadcast | Retrieve a broadcast by ID from Resend |
| resend\_send\_broadcast | Send or schedule a broadcast in Resend |
| resend\_delete\_broadcast | Delete a broadcast by ID in Resend |
| resend\_list\_broadcasts | List all broadcasts in Resend |
For more details about tool input schema, use the [list\_tool](https://docs.klavis.ai/api-reference/mcp-server/list-tools) API.
# Salesforce
Source: https://docs.klavis.ai/documentation/mcp-server/salesforce
Learn how to use Klavis to connect your AI application to Salesforce MCP Server
## No-Code
**Connect to enterprise-grade MCP servers instantly!**

[Get Started →](https://www.klavis.ai/home/mcp-servers)
***
## For Developer
Follow the instructions below to integrate Salesforce MCP server to your AI application using our API or SDK.
### Prerequisites
* [Create an API key](https://www.klavis.ai/home/api-keys)
### 1. Create a Salesforce MCP Server
Use the following endpoint to create a new remote Salesforce MCP server instance:
#### Request
```python Python
from klavis import Klavis
from klavis.types import McpServerName
klavis_client = Klavis(api_key="")
# Create a Salesforce MCP server instance
salesforce_server = klavis_client.mcp_server.create_server_instance(
server_name=McpServerName.SALESFORCE,
user_id="",
platform_name="",
)
```
```javascript TypeScript
import { KlavisClient, Klavis } from 'klavis';
const klavisClient = new KlavisClient({ apiKey: '' });
// Create a Salesforce MCP server instance
const salesforceServer = await klavisClient.mcpServer.createServerInstance({
serverName: Klavis.McpServerName.Salesforce,
userId: "",
platformName: "",
});
```
```bash cURL
curl --request POST \
--url https://api.klavis.ai/mcp-server/instance/create \
--header 'Authorization: Bearer ' \
--header 'Content-Type: application/json' \
--data '{
"serverName": "Salesforce",
"userId": "",
"platformName": "",
}'
```
```go Go
package main
import (
"fmt"
"strings"
"net/http"
"io/ioutil"
)
func main() {
url := "https://api.klavis.ai/mcp-server/instance/create"
payload := strings.NewReader("{\n \"serverName\": \"Salesforce\",\n \"userId\": \"\",\n \"platformName\": \"\"\n}")
req, _ := http.NewRequest("POST", url, payload)
req.Header.Add("Authorization", "Bearer ")
req.Header.Add("Content-Type", "application/json")
res, _ := http.DefaultClient.Do(req)
defer res.Body.Close()
body, _ := ioutil.ReadAll(res.Body)
fmt.Println(res)
fmt.Println(string(body))
}
```
```java Java
HttpResponse response = Unirest.post("https://api.klavis.ai/mcp-server/instance/create")
.header("Authorization", "Bearer ")
.header("Content-Type", "application/json")
.body("{\n \"serverName\": \"Salesforce\",\n \"userId\": \"\",\n \"platformName\": \"\"\n}")
.asString();
```
#### Response
```json SDK Response
{
"serverUrl": "https://salesforce-mcp-server.klavis.ai/mcp/?instance_id=",
"instanceId": "",
"oauthUrl": "https://api.klavis.ai/oauth/salesforce/authorize?instance_id="
}
```
**serverUrl** specifies the endpoint of the Salesforce MCP server, which you can connect with the MCP client of your application. **instanceId** is used for authentication and identification of your server instance. After you complete the next steps, this token allows the MCP server to access user's private Salesforce information.
### 2. Implement OAuth Authorization
Redirect users to the OAuth authorization flow:
```python Python
import webbrowser
webbrowser.open(salesforce_server.oauth_url)
```
```javascript TypeScript
// Redirect user to authorize
window.location.href = salesforceServer.oauthUrl;
```
```go Go
package main
import (
"fmt"
"net/url"
)
func main() {
instanceId := ""
baseUrl := "https://api.klavis.ai/oauth/salesforce/authorize"
params := url.Values{}
params.Add("instance_id", instanceId)
authUrl := baseUrl + "?" + params.Encode()
fmt.Printf("Redirect to: %s\n", authUrl)
// In a web application, you would redirect the user:
// http.Redirect(w, r, authUrl, http.StatusFound)
}
```
```java Java
import java.net.URLEncoder;
import java.nio.charset.StandardCharsets;
public class SalesforceOAuth {
public static void main(String[] args) {
String instanceId = "";
String authUrl = "https://api.klavis.ai/oauth/salesforce/authorize?instance_id=" +
URLEncoder.encode(instanceId, StandardCharsets.UTF_8);
System.out.println("Redirect to: " + authUrl);
// In a web application, you would redirect the user:
// response.sendRedirect(authUrl);
}
}
```
You can also specify scope and redirect\_url in the authUrl. Check the API reference for more details.
### Watch the Example
### Explore MCP Server Tools
| Tool Name | Description |
| ------------------------------- | -------------------------------------------------------------------------------------------------------- |
| salesforce\_get\_accounts | Get accounts with flexible filtering options including name search, industry, and type. |
| salesforce\_create\_account | Create a new account in Salesforce. |
| salesforce\_update\_account | Update an existing account. |
| salesforce\_delete\_account | Delete an account. |
| salesforce\_get\_contacts | Get contacts with flexible filtering options including name, email, and title search. |
| salesforce\_create\_contact | Create a new contact in Salesforce. |
| salesforce\_update\_contact | Update an existing contact. |
| salesforce\_delete\_contact | Delete a contact. |
| salesforce\_get\_opportunities | Get opportunities, optionally filtered by account, stage, name, or account name. |
| salesforce\_create\_opportunity | Create a new opportunity in Salesforce. |
| salesforce\_update\_opportunity | Update an existing opportunity. |
| salesforce\_delete\_opportunity | Delete an opportunity. |
| salesforce\_get\_leads | Get leads with flexible filtering options including name, company, email, and industry search. |
| salesforce\_create\_lead | Create a new lead in Salesforce. |
| salesforce\_update\_lead | Update an existing lead. |
| salesforce\_delete\_lead | Delete a lead. |
| salesforce\_convert\_lead | Convert a lead to account, contact, and optionally opportunity. |
| salesforce\_get\_cases | Get cases with flexible filtering options including subject search, account, status, priority, and type. |
| salesforce\_create\_case | Create a new case in Salesforce. |
| salesforce\_update\_case | Update an existing case. |
| salesforce\_delete\_case | Delete a case. |
| salesforce\_get\_campaigns | Get campaigns, optionally filtered by status or type. |
| salesforce\_create\_campaign | Create a new campaign in Salesforce. |
| salesforce\_update\_campaign | Update an existing campaign. |
| salesforce\_delete\_campaign | Delete a campaign. |
| salesforce\_query | Execute a SOQL query on Salesforce |
| salesforce\_describe\_object | Get detailed schema and field information for any Salesforce object. |
For more details about tool input schema, use the [list\_tool](https://docs.klavis.ai/api-reference/mcp-server/list-tools) API.
# Slack
Source: https://docs.klavis.ai/documentation/mcp-server/slack
Learn how to use Klavis to connect your AI application to Slack MCP Server
## No-Code
**Connect to enterprise-grade MCP servers instantly!**

[Get Started →](https://www.klavis.ai/home/mcp-servers)
***
## For Developer
Follow the instructions below to integrate Slack MCP server to your AI application using our API or SDK.
### Prerequisites
* [Create an API key](https://www.klavis.ai/home/api-keys)
### 1. Create a Slack MCP Server
Use the following endpoint to create a new remote Slack MCP server instance:
#### Request
```python Python
from klavis import Klavis
from klavis.types import McpServerName
klavis_client = Klavis(api_key="")
# Create a Slack MCP server instance
slack_server = klavis_client.mcp_server.create_server_instance(
server_name=McpServerName.SLACK,
user_id="",
platform_name="",
)
```
```javascript TypeScript
import { KlavisClient, Klavis } from 'klavis';
const klavisClient = new KlavisClient({ apiKey: '' });
// Create a Slack MCP server instance
const slackServer = await klavisClient.mcpServer.createServerInstance({
serverName: Klavis.McpServerName.Slack,
userId: "",
platformName: "",
});
```
```bash cURL
curl --request POST \
--url https://api.klavis.ai/mcp-server/instance/create \
--header 'Authorization: Bearer ' \
--header 'Content-Type: application/json' \
--data '{
"serverName": "Slack",
"userId": "",
"platformName": "",
}'
```
```go Go
package main
import (
"fmt"
"strings"
"net/http"
"io/ioutil"
)
func main() {
url := "https://api.klavis.ai/mcp-server/instance/create"
payload := strings.NewReader("{\n \"serverName\": \"Slack\",\n \"userId\": \"\",\n \"platformName\": \"\",\n}")
req, _ := http.NewRequest("POST", url, payload)
req.Header.Add("Authorization", "Bearer ")
req.Header.Add("Content-Type", "application/json")
res, _ := http.DefaultClient.Do(req)
defer res.Body.Close()
body, _ := ioutil.ReadAll(res.Body)
fmt.Println(res)
fmt.Println(string(body))
}
```
```java Java
HttpResponse response = Unirest.post("https://api.klavis.ai/mcp-server/instance/create")
.header("Authorization", "Bearer ")
.header("Content-Type", "application/json")
.body("{\n \"serverName\": \"Slack\",\n \"userId\": \"\",\n \"platformName\": \"\",\n}")
.asString();
```
#### Response
```json SDK Response
{
"serverUrl": "https://slack-mcp-server.klavis.ai/mcp/?instance_id=",
"instanceId": "",
"oauthUrl": "https://api.klavis.ai/oauth/slack/authorize?instance_id="
}
```
**serverUrl** specifies the endpoint of the Slack MCP server, which allows you to interact with Slack workspaces and channels.**instanceId** is used to get an authentication token. After you complete the OAuth flow, this token allows the MCP server to access Slack on your behalf.
### 2. Slack OAuth Flow
Redirect users to the OAuth authorization flow:
```python Python
import webbrowser
webbrowser.open(slack_server.oauth_url)
```
```javascript TypeScript
// Redirect user to authorize
window.location.href = slackServer.oauthUrl;
```
```go Go
package main
import (
"fmt"
"net/url"
)
func main() {
instanceId := ""
baseUrl := "https://api.klavis.ai/oauth/slack/authorize"
params := url.Values{}
params.Add("instance_id", instanceId)
authUrl := baseUrl + "?" + params.Encode()
fmt.Printf("Redirect to: %s\n", authUrl)
// In a web application, you would redirect the user:
// http.Redirect(w, r, authUrl, http.StatusFound)
}
```
```java Java
import java.net.URLEncoder;
import java.nio.charset.StandardCharsets;
public class SlackOAuth {
public static void main(String[] args) {
String instanceId = "";
String authUrl = "https://api.klavis.ai/oauth/slack/authorize?instance_id=" +
URLEncoder.encode(instanceId, StandardCharsets.UTF_8);
System.out.println("Redirect to: " + authUrl);
// In a web application, you would redirect the user:
// response.sendRedirect(authUrl);
}
}
```
### Watch the Example
### Explore MCP Server Tools
| Tool Name | Description |
| ---------------------------- | ----------------------------------------------------------------------------- |
| slack\_list\_channels | List channels in the workspace with pagination |
| slack\_post\_message | Post a new message to a Slack channel |
| slack\_reply\_to\_thread | Reply to a specific message thread in Slack |
| slack\_add\_reaction | Add a reaction emoji to a message |
| slack\_get\_channel\_history | Get recent messages from a channel |
| slack\_get\_thread\_replies | Get all replies in a message thread |
| slack\_get\_users | Get a list of all users in the workspace with their basic profile information |
| slack\_get\_user\_profile | Get detailed profile information for a specific user |
| slack\_search\_messages | Search for messages in channels or across the workspace |
For more details about tool input schema, use the [list\_tool](https://docs.klavis.ai/api-reference/mcp-server/list-tools) API.
# Stripe
Source: https://docs.klavis.ai/documentation/mcp-server/stripe
Learn how to use Klavis to connect your AI application to Stripe MCP Server
## No-Code
**Connect to enterprise-grade MCP servers instantly!**

[Get Started →](https://www.klavis.ai/home/mcp-servers)
***
## For Developer
Follow the instructions below to integrate Stripe MCP server to your AI application using our API or SDK.
### Prerequisites
* [Create an API key](https://www.klavis.ai/home/api-keys)
### 1. Create a Stripe MCP Server
Use the following endpoint to create a new remote Stripe MCP server instance:
#### Request
```python Python
from klavis import Klavis
from klavis.types import McpServerName
klavis_client = Klavis(api_key="")
# Create a Stripe MCP server instance
stripe_server = klavis_client.mcp_server.create_server_instance(
server_name=McpServerName.STRIPE,
user_id="",
platform_name="",
)
```
```javascript TypeScript
import { KlavisClient, Klavis } from 'klavis';
const klavisClient = new KlavisClient({ apiKey: '' });
// Create a Stripe MCP server instance
const stripeServer = await klavisClient.mcpServer.createServerInstance({
serverName: Klavis.McpServerName.Stripe,
userId: "",
platformName: "",
});
```
```bash cURL
curl --request POST \
--url https://api.klavis.ai/mcp-server/instance/create \
--header 'Authorization: Bearer ' \
--header 'Content-Type: application/json' \
--data '{
"serverName": "Stripe",
"userId": "",
"platformName": "",
}'
```
```go Go
package main
import (
"fmt"
"strings"
"net/http"
"io/ioutil"
)
func main() {
url := "https://api.klavis.ai/mcp-server/instance/create"
payload := strings.NewReader("{\n \"serverName\": \"Stripe\",\n \"userId\": \"\",\n \"platformName\": \"\",\n}")
req, _ := http.NewRequest("POST", url, payload)
req.Header.Add("Authorization", "Bearer ")
req.Header.Add("Content-Type", "application/json")
res, _ := http.DefaultClient.Do(req)
defer res.Body.Close()
body, _ := ioutil.ReadAll(res.Body)
fmt.Println(res)
fmt.Println(string(body))
}
```
```java Java
HttpResponse response = Unirest.post("https://api.klavis.ai/mcp-server/instance/create")
.header("Authorization", "Bearer ")
.header("Content-Type", "application/json")
.body("{\n \"serverName\": \"Stripe\",\n \"userId\": \"\",\n \"platformName\": \"\",\n}")
.asString();
```
#### Response
```json SDK Response
{
"serverUrl": "https://stripe-mcp-server.klavis.ai/mcp/?instance_id=",
"instanceId": ""
}
```
**serverUrl** specifies the endpoint of the Stripe MCP server, which you can connect and use this MCP Server to interact with Stripe data and functionality. **instanceId** is used for authentication and identification of your server instance.
### Explore MCP Server Tools
| Tool Name | Description |
| ----------------------- | --------------------------------------------------- |
| create\_customer | Create a new customer in Stripe |
| create\_payment\_intent | Create a new payment intent for processing payments |
| retrieve\_payment | Get information about a specific payment |
| create\_subscription | Create a new subscription for a customer |
| list\_invoices | List invoices for a customer or your account |
For more details about tool input schema, use the [list\_tool](https://docs.klavis.ai/api-reference/mcp-server/list-tools) API.
# Supabase
Source: https://docs.klavis.ai/documentation/mcp-server/supabase
Learn how to use Klavis to connect your AI application to Supabase MCP Server
## No-Code
**Connect to enterprise-grade MCP servers instantly!**

[Get Started →](https://www.klavis.ai/home/mcp-servers)
***
## For Developer
Follow the instructions below to integrate Supabase MCP server to your API or SDK.
### Prerequisites
* [Create an API key](https://www.klavis.ai/home/api-keys)
### 1. Create a Supabase MCP Server
Use the following endpoint to create a new remote Supabase MCP server instance:
#### Request
```python Python
from klavis import Klavis
from klavis.types import McpServerName
klavis_client = Klavis(api_key="")
# Create a Supabase MCP server instance
supabase_server = klavis_client.mcp_server.create_server_instance(
server_name=McpServerName.SUPABASE,
user_id="",
platform_name="",
)
```
```javascript TypeScript
import { KlavisClient, Klavis } from 'klavis';
const klavisClient = new KlavisClient({ apiKey: '' });
// Create a Supabase MCP server instance
const supabaseServer = await klavisClient.mcpServer.createServerInstance({
serverName: Klavis.McpServerName.Supabase,
userId: "",
platformName: "",
});
```
```bash cURL
curl --request POST \
--url https://api.klavis.ai/mcp-server/instance/create \
--header 'Authorization: Bearer ' \
--header 'Content-Type: application/json' \
--data '{
"serverName": "Supabase",
"userId": "",
"platformName": "",
}'
```
```go Go
package main
import (
"fmt"
"strings"
"net/http"
"io/ioutil"
)
func main() {
url := "https://api.klavis.ai/mcp-server/instance/create"
payload := strings.NewReader("{\n \"serverName\": \"Supabase\",\n \"userId\": \"\",\n \"platformName\": \"\"\n}")
req, _ := http.NewRequest("POST", url, payload)
req.Header.Add("Authorization", "Bearer ")
req.Header.Add("Content-Type", "application/json")
res, _ := http.DefaultClient.Do(req)
defer res.Body.Close()
body, _ := ioutil.ReadAll(res.Body)
fmt.Println(res)
fmt.Println(string(body))
}
```
```java Java
HttpResponse response = Unirest.post("https://api.klavis.ai/mcp-server/instance/create")
.header("Authorization", "Bearer ")
.header("Content-Type", "application/json")
.body("{\n \"serverName\": \"Supabase\",\n \"userId\": \"\",\n \"platformName\": \"\"\n}")
.asString();
```
#### Response
```json SDK Response
{
"serverUrl": "https://supabase-mcp-server.klavis.ai/mcp/?instance_id=",
"instanceId": "",
"oauthUrl": "https://api.klavis.ai/oauth/supabase/authorize?instance_id="
}
```
**serverUrl** specifies the endpoint of the Supabase MCP server, which you can connect and use this MCP Server with your Supabase databases and services. **instanceId** is used for authentication and identification of your server instance.
### 2. Supabase OAuth Flow (Recommended)
If you want to enable your MCP server to access your private Supabase infomation:
#### Option 1: Supabase OAuth Flow
To enable your MCP server to access your private Supabase information through OAuth:
```python Python
import webbrowser
webbrowser.open(supabase_server.oauth_url)
```
```javascript TypeScript
// Redirect user to authorize
window.location.href = supabaseServer.oauthUrl;
```
```go Go
package main
import (
"fmt"
"net/url"
)
func main() {
instanceId := ""
baseUrl := "https://api.klavis.ai/oauth/supabase/authorize"
params := url.Values{}
params.Add("instance_id", instanceId)
authUrl := baseUrl + "?" + params.Encode()
fmt.Printf("Redirect to: %s\n", authUrl)
// In a web application, you would redirect the user:
// http.Redirect(w, r, authUrl, http.StatusFound)
}
```
```java Java
import java.net.URLEncoder;
import java.nio.charset.StandardCharsets;
public class SupabaseOAuth {
public static void main(String[] args) {
String instanceId = "";
String authUrl = "https://api.klavis.ai/oauth/supabase/authorize?instance_id=" +
URLEncoder.encode(instanceId, StandardCharsets.UTF_8);
System.out.println("Redirect to: " + authUrl);
// In a web application, you would redirect the user:
// response.sendRedirect(authUrl);
}
}
```
#### Option 2: Set Auth Token
Instead of OAuth, you can also set your [Supabase personal access token](https://supabase.com/dashboard/account/tokens) by calling our endpoint below:
```bash cURL
curl --request POST \
--url https://api.klavis.ai/mcp-server/instance/set-auth-token \
--header 'Authorization: Bearer ' \
--header 'Content-Type: application/json' \
--data '{
"instanceId": "",
"authToken": ""
}'
```
```python Python
from klavis import Klavis
klavis_client = Klavis(api_key="")
# Set the Supabase personal access token for your instance
response = klavis_client.mcp_server.set_instance_auth_token(
instance_id="",
auth_token="",
)
print(response)
```
```javascript TypeScript
import { KlavisClient } from 'klavis';
const klavisClient = new KlavisClient({ apiKey: '' });
// Set the Supabase personal access token for your instance
const response = await klavisClient.mcpServer.setInstanceAuthToken({
instanceId: "",
authToken: ""
});
console.log(response);
```
```go Go
package main
import (
"bytes"
"encoding/json"
"fmt"
"net/http"
)
func main() {
url := "https://api.klavis.ai/mcp-server/instance/set-auth-token"
payload := map[string]string{
"instanceId": "",
"authToken": "",
}
jsonPayload, _ := json.Marshal(payload)
req, _ := http.NewRequest("POST", url, bytes.NewBuffer(jsonPayload))
req.Header.Set("Authorization", "Bearer ")
req.Header.Set("Content-Type", "application/json")
client := &http.Client{}
resp, err := client.Do(req)
if err != nil {
panic(err)
}
defer resp.Body.Close()
fmt.Println("Response Status:", resp.Status)
}
```
```java Java
import java.net.URI;
import java.net.http.HttpClient;
import java.net.http.HttpRequest;
import java.net.http.HttpResponse;
import java.net.http.HttpResponse.BodyHandlers;
public class SetAuthToken {
public static void main(String[] args) {
try {
String requestBody = "{\"instanceId\":\"\",\"authToken\":\"\"}";
HttpClient client = HttpClient.newHttpClient();
HttpRequest request = HttpRequest.newBuilder()
.uri(URI.create("https://api.klavis.ai/mcp-server/instance/set-auth-token"))
.header("Authorization", "Bearer ")
.header("Content-Type", "application/json")
.POST(HttpRequest.BodyPublishers.ofString(requestBody))
.build();
HttpResponse response = client.send(request, BodyHandlers.ofString());
System.out.println("Response: " + response.body());
} catch (Exception e) {
e.printStackTrace();
}
}
}
```
#### Response
```json Response
{
"success": true,
"message": ""
}
```
### Watch the Example
### Explore MCP Server Tools
| Tool Name | Description |
| ------------------------------------- | ---------------------------------------------------------------------------- |
| supabase\_list\_projects | Lists all Supabase projects for the user |
| supabase\_get\_project | Gets details for a Supabase project |
| supabase\_get\_cost | Gets the cost of creating a new project or branch |
| supabase\_confirm\_cost | Ask the user to confirm their understanding of the cost |
| supabase\_create\_project | Creates a new Supabase project |
| supabase\_pause\_project | Pauses a Supabase project |
| supabase\_restore\_project | Restores a Supabase project |
| supabase\_list\_organizations | Lists all organizations that the user is a member of |
| supabase\_get\_organization | Gets details for an organization including subscription plan |
| supabase\_list\_tables | Lists all tables in a schema |
| supabase\_list\_extensions | Lists all extensions in the database |
| supabase\_list\_migrations | Lists all migrations in the database |
| supabase\_apply\_migration | Applies a migration to the database |
| supabase\_execute\_sql | Executes raw SQL in the Postgres database |
| supabase\_get\_logs | Gets logs for a Supabase project by service type |
| supabase\_get\_project\_url | Gets the API URL for a project |
| supabase\_get\_anon\_key | Gets the anonymous API key for a project |
| supabase\_generate\_typescript\_types | Generates TypeScript types for a project |
| supabase\_create\_branch | Creates a development branch on a Supabase project |
| supabase\_list\_branches | Lists all development branches of a Supabase project |
| supabase\_delete\_branch | Deletes a development branch |
| supabase\_merge\_branch | Merges migrations and edge functions from a development branch to production |
| supabase\_reset\_branch | Resets migrations of a development branch |
| supabase\_rebase\_branch | Rebases a development branch on production |
For more details about tool input schema, use the [list\_tool](https://docs.klavis.ai/api-reference/mcp-server/list-tools) API.
# WhatsApp
Source: https://docs.klavis.ai/documentation/mcp-server/whatsapp
Learn how to use Klavis to connect your AI application to WhatsApp MCP Server
## No-Code
**Connect to enterprise-grade MCP servers instantly!**

[Get Started →](https://www.klavis.ai/home/mcp-servers)
***
## For Developer
Follow the instructions below to integrate WhatsApp MCP server to your AI application using our API or SDK.
### Prerequisites
* [Create an API key](https://www.klavis.ai/home/api-keys)
### 1. Create a WhatsApp MCP Server
Use the following endpoint to create a new remote WhatsApp MCP server instance:
#### Request
```python Python
from klavis import Klavis
from klavis.types import McpServerName
klavis_client = Klavis(api_key="")
# Create a WhatsApp MCP server instance
whatsapp_server = klavis_client.mcp_server.create_server_instance(
server_name=McpServerName.WHATSAPP,
user_id="",
platform_name="",
)
```
```javascript TypeScript
import { KlavisClient, Klavis } from 'klavis';
const klavisClient = new KlavisClient({ apiKey: '' });
// Create a WhatsApp MCP server instance
const whatsappServer = await klavisClient.mcpServer.createServerInstance({
serverName: Klavis.McpServerName.WhatsApp,
userId: "",
platformName: "",
});
```
```bash cURL
curl --request POST \
--url https://api.klavis.ai/mcp-server/instance/create \
--header 'Authorization: Bearer ' \
--header 'Content-Type: application/json' \
--data '{
"serverName": "WhatsApp",
"userId": "",
"platformName": "",
}'
```
```go Go
package main
import (
"fmt"
"strings"
"net/http"
"io/ioutil"
)
func main() {
url := "https://api.klavis.ai/mcp-server/instance/create"
payload := strings.NewReader("{\n \"serverName\": \"WhatsApp\",\n \"userId\": \"\",\n \"platformName\": \"\"\n}")
req, _ := http.NewRequest("POST", url, payload)
req.Header.Add("Authorization", "Bearer ")
req.Header.Add("Content-Type", "application/json")
res, _ := http.DefaultClient.Do(req)
defer res.Body.Close()
body, _ := ioutil.ReadAll(res.Body)
fmt.Println(res)
fmt.Println(string(body))
}
```
```java Java
HttpResponse response = Unirest.post("https://api.klavis.ai/mcp-server/instance/create")
.header("Authorization", "Bearer ")
.header("Content-Type", "application/json")
.body("{\n \"serverName\": \"WhatsApp\",\n \"userId\": \"\",\n \"platformName\": \"\"\n}")
.asString();
```
#### Response
```json Response
{
"serverUrl": "https://whatsapp-mcp-server.klavis.ai/sse?instance_id=",
"instanceId": ""
}
```
**serverUrl** specifies the endpoint of the WhatsApp MCP server, which allows you to send messages and manage conversations through WhatsApp Business API. **instanceId** is used for authentication and identification of your server instance.
### 2. Configure WhatsApp API Key
To use the WhatsApp MCP Server, you need to configure it with your WhatsApp Business API key.
#### Setting up WhatsApp API Key
```bash cURL
curl --request POST \
--url https://api.klavis.ai/mcp-server/instance/set-auth-token \
--header 'Authorization: Bearer ' \
--header 'Content-Type: application/json' \
--data '{
"instanceId": "",
"authToken": ""
}'
```
```python Python
from klavis import Klavis
klavis_client = Klavis(api_key="")
# Set the WhatsApp API key for your instance
response = klavis_client.mcp_server.set_instance_auth_token(
instance_id="",
auth_token="",
)
print(response)
```
```javascript TypeScript
import { KlavisClient } from 'klavis';
const klavisClient = new KlavisClient({ apiKey: '' });
// Set the WhatsApp API key for your instance
const response = await klavisClient.mcpServer.setInstanceAuthToken({
instanceId: "",
authToken: ""
});
console.log(response);
```
```go Go
package main
import (
"bytes"
"encoding/json"
"fmt"
"net/http"
)
func main() {
url := "https://api.klavis.ai/mcp-server/instance/set-auth-token"
payload := map[string]string{
"instanceId": "",
"authToken": "",
}
jsonPayload, _ := json.Marshal(payload)
req, _ := http.NewRequest("POST", url, bytes.NewBuffer(jsonPayload))
req.Header.Set("Authorization", "Bearer ")
req.Header.Set("Content-Type", "application/json")
client := &http.Client{}
resp, err := client.Do(req)
if err != nil {
panic(err)
}
defer resp.Body.Close()
fmt.Println("Response Status:", resp.Status)
}
```
```java Java
import java.net.URI;
import java.net.http.HttpClient;
import java.net.http.HttpRequest;
import java.net.http.HttpResponse;
import java.net.http.HttpResponse.BodyHandlers;
public class SetAuthToken {
public static void main(String[] args) {
try {
String requestBody = "{\"instanceId\":\"\",\"authToken\":\"\"}";
HttpClient client = HttpClient.newHttpClient();
HttpRequest request = HttpRequest.newBuilder()
.uri(URI.create("https://api.klavis.ai/mcp-server/instance/set-auth-token"))
.header("Authorization", "Bearer ")
.header("Content-Type", "application/json")
.POST(HttpRequest.BodyPublishers.ofString(requestBody))
.build();
HttpResponse response = client.send(request, BodyHandlers.ofString());
System.out.println("Response: " + response.body());
} catch (Exception e) {
e.printStackTrace();
}
}
}
```
#### Response
```json Response
{
"success": true,
"message": ""
}
```
### Explore MCP Server Tools
| Tool Name | Description |
| -------------------- | ----------------------------------------------------------------------- |
| whatsapp\_send\_text | Send a text message to a WhatsApp user using the WhatsApp Business API. |
For more details about tool input schema, use the [list\_tool](https://docs.klavis.ai/api-reference/mcp-server/list-tools) API.
# WordPress
Source: https://docs.klavis.ai/documentation/mcp-server/wordpress
Learn how to use Klavis to connect your AI application to WordPress MCP Server
## No-Code
**Connect to enterprise-grade MCP servers instantly!**

[Get Started →](https://www.klavis.ai/home/mcp-servers)
***
## For Developer
Follow the instructions below to integrate WordPress MCP server to your AI application using our API or SDK.
### Prerequisites
* [Create an API key](https://www.klavis.ai/home/api-keys)
### 1. Create a WordPress MCP Server
Use the following endpoint to create a new remote WordPress MCP server instance:
#### Request
```python Python
from klavis import Klavis
from klavis.types import McpServerName
klavis_client = Klavis(api_key="")
# Create a WordPress MCP server instance
wordpress_server = klavis_client.mcp_server.create_server_instance(
server_name=McpServerName.WORDPRESS,
user_id="",
platform_name="",
)
```
```javascript TypeScript
import { KlavisClient, Klavis } from 'klavis';
const klavisClient = new KlavisClient({ apiKey: '' });
// Create a WordPress MCP server instance
const wordpressServer = await klavisClient.mcpServer.createServerInstance({
serverName: Klavis.McpServerName.WordPress,
userId: "",
platformName: "",
});
```
```bash cURL
curl --request POST \
--url https://api.klavis.ai/mcp-server/instance/create \
--header 'Authorization: Bearer ' \
--header 'Content-Type: application/json' \
--data '{
"serverName": "WordPress",
"userId": "",
"platformName": "",
}'
```
```go Go
package main
import (
"fmt"
"strings"
"net/http"
"io/ioutil"
)
func main() {
url := "https://api.klavis.ai/mcp-server/instance/create"
payload := strings.NewReader("{\n \"serverName\": \"WordPress\",\n \"userId\": \"\",\n \"platformName\": \"\"\n}")
req, _ := http.NewRequest("POST", url, payload)
req.Header.Add("Authorization", "Bearer ")
req.Header.Add("Content-Type", "application/json")
res, _ := http.DefaultClient.Do(req)
defer res.Body.Close()
body, _ := ioutil.ReadAll(res.Body)
fmt.Println(res)
fmt.Println(string(body))
}
```
```java Java
HttpResponse response = Unirest.post("https://api.klavis.ai/mcp-server/instance/create")
.header("Authorization", "Bearer ")
.header("Content-Type", "application/json")
.body("{\n \"serverName\": \"WordPress\",\n \"userId\": \"\",\n \"platformName\": \"\"\n}")
.asString();
```
#### Response
```json SDK Response
{
"serverUrl": "https://wordpress-mcp-server.klavis.ai/mcp/?instance_id=",
"instanceId": "",
"oauthUrl": "https://api.klavis.ai/oauth/wordpress/authorize?instance_id="
}
```
**serverUrl** specifies the endpoint of the WordPress MCP server, which allows you to interact with WordPress sites.**instanceId** is used to get an authentication token. After you complete the OAuth flow, this token allows the MCP server to access WordPress on your behalf.
### 2. WordPress OAuth Flow
Redirect users to the OAuth authorization flow:
```python Python
import webbrowser
webbrowser.open(wordpress_server.oauth_url)
```
```javascript TypeScript
// Redirect user to authorize
window.location.href = wordpressServer.oauthUrl;
```
```go Go
package main
import (
"fmt"
"net/url"
)
func main() {
instanceId := ""
baseUrl := "https://api.klavis.ai/oauth/wordpress/authorize"
params := url.Values{}
params.Add("instance_id", instanceId)
authUrl := baseUrl + "?" + params.Encode()
fmt.Printf("Redirect to: %s\n", authUrl)
// In a web application, you would redirect the user:
// http.Redirect(w, r, authUrl, http.StatusFound)
}
```
```java Java
import java.net.URLEncoder;
import java.nio.charset.StandardCharsets;
public class WordPressOAuth {
public static void main(String[] args) {
String instanceId = "";
String authUrl = "https://api.klavis.ai/oauth/wordpress/authorize?instance_id=" +
URLEncoder.encode(instanceId, StandardCharsets.UTF_8);
System.out.println("Redirect to: " + authUrl);
// In a web application, you would redirect the user:
// response.sendRedirect(authUrl);
}
}
```
### Watch the Example
### Explore MCP Server Tools
| Tool Name | Description |
| --------------------------- | ------------------------------------------------------------ |
| wordpress\_create\_post | Create a new WordPress post |
| wordpress\_get\_posts | Get a list of WordPress posts |
| wordpress\_update\_post | Update an existing WordPress post |
| wordpress\_get\_top\_posts | Get top WordPress posts for a site |
| wordpress\_get\_site\_info | Get information about a WordPress site |
| wordpress\_get\_site\_stats | Get statistics for a WordPress site |
| wordpress\_get\_user\_sites | Get all WordPress sites the authenticated user has access to |
For more details about tool input schema, use the [list\_tool](https://docs.klavis.ai/api-reference/mcp-server/list-tools) API.
# YouTube
Source: https://docs.klavis.ai/documentation/mcp-server/youtube
Learn how to use Klavis to connect your AI application to YouTube MCP Server
## No-Code
**Connect to enterprise-grade MCP servers instantly!**

[Get Started →](https://www.klavis.ai/home/mcp-servers)
***
## For Developer
Follow the instructions below to integrate YouTube MCP server to your AI application using our API or SDK.
### Prerequisites
* [Create an API key](https://www.klavis.ai/home/api-keys)
### 1. Create a YouTube MCP Server
Use the following endpoint to create a new remote YouTube MCP server instance:
#### Request
```python Python
from klavis import Klavis
from klavis.types import McpServerName
klavis_client = Klavis(api_key="")
# Create a YouTube MCP server instance
youtube_server = klavis_client.mcp_server.create_server_instance(
server_name=McpServerName.YOUTUBE,
user_id="",
platform_name="",
)
```
```javascript TypeScript
import { KlavisClient, Klavis } from 'klavis';
const klavisClient = new KlavisClient({ apiKey: '' });
// Create a YouTube MCP server instance
const youtubeServer = await klavisClient.mcpServer.createServerInstance({
serverName: Klavis.McpServerName.Youtube,
userId: "",
platformName: "",
});
```
```bash cURL
curl --request POST \
--url https://api.klavis.ai/mcp-server/instance/create \
--header 'Authorization: Bearer ' \
--header 'Content-Type: application/json' \
--data '{
"serverName": "YouTube",
"userId": "",
"platformName": "",
}'
```
```go Go
package main
import (
"fmt"
"strings"
"net/http"
"io/ioutil"
)
func main() {
url := "https://api.klavis.ai/mcp-server/instance/create"
payload := strings.NewReader("{\n \"serverName\": \"YouTube\",\n \"userId\": \"\",\n \"platformName\": \"\",\n}")
req, _ := http.NewRequest("POST", url, payload)
req.Header.Add("Authorization", "Bearer ")
req.Header.Add("Content-Type", "application/json")
res, _ := http.DefaultClient.Do(req)
defer res.Body.Close()
body, _ := ioutil.ReadAll(res.Body)
fmt.Println(res)
fmt.Println(string(body))
}
```
```java Java
HttpResponse response = Unirest.post("https://api.klavis.ai/mcp-server/instance/create")
.header("Authorization", "Bearer ")
.header("Content-Type", "application/json")
.body("{\n \"serverName\": \"YouTube\",\n \"userId\": \"\",\n \"platformName\": \"\",\n}")
.asString();
```
#### Response
```json SDK Response
{
"serverUrl": "https://youtube-mcp-server.klavis.ai/mcp/?instance_id=",
"instanceId": ""
}
```
**serverUrl** specifies the endpoint of the YouTube MCP server, which you can connect and use this MCP Server to interact with YouTube data and functionality. **instanceId** is used for authentication and identification of your server instance.
### Explore MCP Server Tools
| Tool Name | Description |
| ------------------------------- | ----------------------------------------------------------------------------------------------------------------------------------------- |
| get\_youtube\_video\_transcript | Retrieve the transcript or video details for a given YouTube video. The 'start' time in the transcript is formatted as MM:SS or HH:MM:SS. |
For more details about tool input schema, use the [list\_tool](https://docs.klavis.ai/api-reference/mcp-server/list-tools) API.
# Zendesk
Source: https://docs.klavis.ai/documentation/mcp-server/zendesk
Learn how to use Klavis to connect your AI application to Zendesk MCP Server
## No-Code
**Connect to enterprise-grade MCP servers instantly!**

[Get Started →](https://www.klavis.ai/home/mcp-servers)
***
## For Developer
Follow the instructions below to integrate Zendesk MCP server to your AI application using our API or SDK.
Coming Soon
# OAuth & White Labeling
Source: https://docs.klavis.ai/documentation/oauth_white_label
White Labeling allows you to integrate our OAuth flows with your own branding and custom OAuth applications
## Overview
## What is OAuth?
OAuth (Open Authorization) is an open standard protocol that allows third-party applications to access resources on behalf of users without exposing their credentials. Klavis AI implements OAuth 2.0 to securely connect with services like GitHub, Slack, Gmail, Notion, and more.
## What is White Labeling?
White labeling allows you to customize the authentication experience with your own branding. When enabled, users will see your application name, logo, and other brand elements during the OAuth flow instead of Klavis AI's.
## OAuth Flow ( w/ white labeling)
## Implementation
### Setting Up White Labeling
To set up white labeling for your OAuth integrations:
Register your application with the third-party service (GitHub, Slack, etc.) to obtain your client ID and client secret.
Go to the Klavis AI white label configuration page:
[https://www.klavis.ai/home/white-label](https://www.klavis.ai/home/white-label)
Make sure to add the callback url to your app's OAuth allow list.
Redirect users to the Klavis AI OAuth authorization endpoint with your client ID:
```javascript without SDK
// Example: Initiating GitHub OAuth with white labeling
const authUrl = `https://api.klavis.ai/oauth/github/authorize?instance_id=${instanceId}&client_id=${yourClientId}`;
window.location.href = authUrl;
```
```typescript TypeScript SDK
import { Klavis } from "@klavis/sdk";
const klavis = new Klavis({
apiKey: "YOUR_API_KEY"
});
// Example: Initiating GitHub OAuth with white labeling
const oauthUrl = await klavis.mcpServer.getOAuthUrl({
serverName: Klavis.McpServerName.Github,
instanceId: instanceId,
clientId: yourClientId,
// redirectUri: YOUR_REDIRECT_URI,
// scope: "YOUR_SCOPES",
});
window.location.href = oauthUrl;
```
```python Python SDK
import webbrowser
from klavis import Klavis
klavis = Klavis(api_key="YOUR_API_KEY")
# Example: Initiating GitHub OAuth with white labeling
oauth_url = klavis.mcp_server.get_oauth_url(
server_name="github",
instance_id=instance_id,
client_id=your_client_id,
# redirect_uri="YOUR_REDIRECT_URI",
# scope="YOUR_SCOPES"
)
# Open OAuth URL in user's default browser
webbrowser.open(oauth_url)
```
You can also specify scope and redirect\_url in the authUrl, check the api reference for more details.
For simplicity, you can use the default callback URL: [https://api.klavis.ai/oauth/\{server\_name}/callback](https://api.klavis.ai/oauth/\{server_name}/callback),
as shown in the previous step. This is the endpoint where we handle user credentials for authentication.
However, some OAuth consent screens (such as GitHub's) display the callback URL to the user. If this URL doesn't match your application's domain, it can appear untrustworthy.
To address this, you can use a callback URL under your own domain and set up a redirect—either via DNS or within your application—that forwards requests to:
[https://api.klavis.ai/oauth/\{server\_name}/callback](https://api.klavis.ai/oauth/\{server_name}/callback). Below is an example using FastAPI to simply redirect from your Github oauth application to Klavis oauth service in python -
```python
@app.get("/github/redirect")
async def redirect_to_jira_callback(request: Request):
target_url = "https://api.klavis.ai/oauth/github/callback"
query_params = request.query_params
if query_params:
query_string = str(query_params)
target_url = f"{target_url}?{query_string}"
return RedirectResponse(url=target_url)
```
For technical assistance with OAuth implementation or white labeling, please join our Discord community.
# Python
Source: https://docs.klavis.ai/documentation/sdk/python
Get started with Klavis AI Python SDK for MCP integrations
## Installation
```bash
pip install klavis
```
## Get Your API Key
Sign up at [klavis.ai](https://klavis.ai) and create your API key.
## Quick Start
```python
from klavis import Klavis
from klavis.types import McpServerName
klavis_client = Klavis(api_key="your-klavis-key")
# Create a YouTube MCP server instance
youtube_server = klavis_client.mcp_server.create_server_instance(
server_name=McpServerName.YOUTUBE,
user_id="user123", # Change to user id in your platform
platform_name="MyApp", # change to your platform
)
print(f"Server created: {youtube_server.server_url}")
```
## Integration with MCP Client
If you already have an MCP client implementation in your codebase:
```python
from klavis import Klavis
from klavis.types import McpServerName
klavis_client = Klavis(api_key="your-klavis-key")
# Create a YouTube MCP server instance
youtube_server = klavis_client.mcp_server.create_server_instance(
server_name=McpServerName.YOUTUBE,
user_id="user123",
platform_name="MyApp",
)
print(f"Server created: {youtube_server.server_url}")
```
## Function Calling with OpenAI
Integrate directly with OpenAI using function calling:
```python
import json
from openai import OpenAI
from klavis import Klavis
from klavis.types import McpServerName, ToolFormat
OPENAI_MODEL = "gpt-4o-mini"
openai_client = OpenAI(api_key="YOUR_OPENAI_API_KEY")
klavis_client = Klavis(api_key="YOUR_KLAVIS_API_KEY")
# Create server instance
youtube_server = klavis_client.mcp_server.create_server_instance(
server_name=McpServerName.YOUTUBE,
user_id="user123",
platform_name="MyApp",
)
# Get available tools in OpenAI format
tools = klavis_client.mcp_server.list_tools(
server_url=youtube_server.server_url,
format=ToolFormat.OPENAI,
)
# Initial conversation
messages = [{"role": "user", "content": "Summarize this video: https://youtube.com/watch?v=..."}]
# First OpenAI call with function calling
response = openai_client.chat.completions.create(
model=OPENAI_MODEL,
messages=messages,
tools=tools.tools
)
messages.append(response.choices[0].message)
# Handle tool calls
if response.choices[0].message.tool_calls:
for tool_call in response.choices[0].message.tool_calls:
result = klavis_client.mcp_server.call_tools(
server_url=youtube_server.server_url,
tool_name=tool_call.function.name,
tool_args=json.loads(tool_call.function.arguments),
)
# Add tool result to conversation
messages.append({
"role": "tool",
"tool_call_id": tool_call.id,
"content": str(result)
})
# Second OpenAI call to process tool results and generate final response
final_response = openai_client.chat.completions.create(
model=OPENAI_MODEL,
messages=messages
)
print(final_response.choices[0].message.content)
```
## Authentication
### OAuth Services
For OAuth services like Gmail, Google Drive, etc.:
```python
# Create server instance for OAuth service
server = klavis_client.mcp_server.create_server_instance(
server_name=McpServerName.GMAIL,
user_id="user123",
platform_name="MyApp"
)
# OAuth URL is provided in server.oauth_url
import webbrowser
webbrowser.open(server.oauth_url)
```
### API Key Services
For services that require API keys:
```python
# Set authentication token for API key services
klavis_client.mcp_server.set_auth_token(
instance_id=server.instance_id,
auth_token="your-service-api-key"
)
```
## Multi-Tool Workflows
Combine multiple MCP servers for complex workflows:
```python
# Create multiple servers
github_server = klavis_client.mcp_server.create_server_instance(
server_name=McpServerName.GITHUB,
user_id="user123",
platform_name="MyApp"
)
slack_server = klavis_client.mcp_server.create_server_instance(
server_name=McpServerName.SLACK,
user_id="user123",
platform_name="MyApp"
)
# Use tools from both servers in a single AI conversation
all_tools = []
all_tools.extend(klavis_client.mcp_server.list_tools(github_server.server_url).tools)
all_tools.extend(klavis_client.mcp_server.list_tools(slack_server.server_url).tools)
# Initialize conversation
messages = [{"role": "user", "content": "Create a GitHub issue and notify the team on Slack"}]
# Loop to let LLM work with multiple tools
max_iterations = 5
for iteration in range(max_iterations):
response = openai_client.chat.completions.create(
model="gpt-4",
messages=messages,
tools=all_tools
)
messages.append(response.choices[0].message)
# Check if LLM wants to use tools
if response.choices[0].message.tool_calls:
for tool_call in response.choices[0].message.tool_calls:
# Determine which server to use based on tool name
server_url = github_server.server_url if "github" in tool_call.function.name else slack_server.server_url
# Execute tool
result = klavis_client.mcp_server.call_tools(
server_url=server_url,
tool_name=tool_call.function.name,
tool_args=json.loads(tool_call.function.arguments),
)
# Add tool result to conversation
messages.append({
"role": "tool",
"tool_call_id": tool_call.id,
"content": str(result)
})
else:
# LLM finished the task
print(f"Task completed in {iteration + 1} iterations")
print(response.choices[0].message.content)
break
```
## Error Handling
```python
from klavis.exceptions import KlavisError
try:
server = klavis_client.mcp_server.create_server_instance(
server_name=McpServerName.YOUTUBE,
user_id="user123",
platform_name="MyApp"
)
except KlavisError as e:
print(f"Error creating server: {e}")
```
## Next Steps
Complete API documentation
Explore available MCP servers
# TypeScript
Source: https://docs.klavis.ai/documentation/sdk/typescript
Get started with Klavis AI TypeScript SDK for MCP integrations
## Installation
```bash
npm install klavis
```
## Get Your API Key
Sign up at [klavis.ai](https://klavis.ai) and create your API key.
## Quick Start
```javascript
import { KlavisClient, Klavis } from 'klavis';
const klavisClient = new KlavisClient({ apiKey: 'your-klavis-key' });
// Create Gmail MCP server with OAuth
const gmailServer = await klavisClient.mcpServer.createServerInstance({
serverName: Klavis.McpServerName.Gmail,
userId: "user123",
platformName: "MyApp",
});
// Gmail needs OAuth flow
await window.open(gmailServer.oauthUrl);
```
## Integration with MCP Client
If you already have an MCP client implementation in your codebase:
```javascript
import { KlavisClient, Klavis } from 'klavis';
const klavisClient = new KlavisClient({ apiKey: 'your-klavis-key' });
// Create Gmail MCP server with OAuth
const gmailServer = await klavisClient.mcpServer.createServerInstance({
serverName: Klavis.McpServerName.Gmail,
userId: "user123",
platformName: "MyApp",
});
// Gmail needs OAuth flow
if (gmailServer.oauthUrl) {
await window.open(gmailServer.oauthUrl);
}
```
## Function Calling with OpenAI
Integrate directly with OpenAI using function calling:
```javascript
import OpenAI from 'openai';
import { KlavisClient, Klavis } from 'klavis';
// Constants
const OPENAI_MODEL = "gpt-4o-mini";
const EMAIL_RECIPIENT = "john@example.com";
const EMAIL_SUBJECT = "Hello from Klavis";
const EMAIL_BODY = "This email was sent using Klavis MCP Server!";
const openaiClient = new OpenAI({ apiKey: 'your-openai-key' });
const klavisClient = new KlavisClient({ apiKey: 'your-klavis-key' });
// Create server and get tools
const gmailServer = await klavisClient.mcpServer.createServerInstance({
serverName: Klavis.McpServerName.Gmail,
userId: "user123",
platformName: "MyApp"
});
// Handle OAuth authentication for Gmail
if (gmailServer.oauthUrl) {
console.log("Please complete OAuth authorization:", gmailServer.oauthUrl);
await window.open(gmailServer.oauthUrl);
}
const tools = await klavisClient.mcpServer.listTools({
serverUrl: gmailServer.serverUrl,
format: Klavis.ToolFormat.Openai
});
// Initial conversation
const messages = [{
role: "user",
content: `Please send an email to ${EMAIL_RECIPIENT} with subject "${EMAIL_SUBJECT}" and body "${EMAIL_BODY}"`
}];
// First OpenAI call with function calling
const response = await openaiClient.chat.completions.create({
model: OPENAI_MODEL,
messages: messages,
tools: tools.tools
});
messages.push(response.choices[0].message);
// Handle tool calls
if (response.choices[0].message.tool_calls) {
for (const toolCall of response.choices[0].message.tool_calls) {
const result = await klavisClient.mcpServer.callTools({
serverUrl: gmailServer.serverUrl,
toolName: toolCall.function.name,
toolArgs: JSON.parse(toolCall.function.arguments),
});
// Add tool result to conversation
messages.push({
role: "tool",
tool_call_id: toolCall.id,
content: JSON.stringify(result)
});
}
}
// Second OpenAI call to process tool results and generate final response
const finalResponse = await openaiClient.chat.completions.create({
model: OPENAI_MODEL,
messages: messages
});
console.log(finalResponse.choices[0].message.content);
```
## Authentication
### OAuth Services
For OAuth services like Gmail, Google Drive, etc.:
```javascript
// Create server instance for OAuth service
const server = await klavisClient.mcpServer.createServerInstance({
serverName: Klavis.McpServerName.Gmail,
userId: "user123",
platformName: "MyApp"
});
// Handle OAuth flow
if (server.oauthUrl) {
console.log("Please complete OAuth authorization:", server.oauthUrl);
window.open(server.oauthUrl);
}
```
### API Key Services
For services that require API keys:
```javascript
// Set authentication token for API key services
await klavisClient.mcpServer.setAuthToken({
instanceId: server.instanceId,
authToken: "your-service-api-key"
});
```
## Multi-Tool Workflows
Combine multiple MCP servers for complex workflows:
```javascript
// Create multiple servers
const githubServer = await klavisClient.mcpServer.createServerInstance({
serverName: Klavis.McpServerName.Github,
userId: "user123",
platformName: "MyApp"
});
const slackServer = await klavisClient.mcpServer.createServerInstance({
serverName: Klavis.McpServerName.Slack,
userId: "user123",
platformName: "MyApp"
});
// Get tools from both servers
const githubTools = await klavisClient.mcpServer.listTools({
serverUrl: githubServer.serverUrl,
format: Klavis.ToolFormat.Openai
});
const slackTools = await klavisClient.mcpServer.listTools({
serverUrl: slackServer.serverUrl,
format: Klavis.ToolFormat.Openai
});
// Combine all tools
const allTools = [...githubTools.tools, ...slackTools.tools];
// Initialize conversation
const messages = [{
role: "user",
content: "Create a GitHub issue and notify the team on Slack"
}];
// Loop to let LLM work with multiple tools
const maxIterations = 5;
for (let iteration = 0; iteration < maxIterations; iteration++) {
const response = await openaiClient.chat.completions.create({
model: "gpt-4",
messages: messages,
tools: allTools
});
messages.push(response.choices[0].message);
// Check if LLM wants to use tools
if (response.choices[0].message.tool_calls) {
for (const toolCall of response.choices[0].message.tool_calls) {
// Determine which server to use based on tool name
const serverUrl = toolCall.function.name.includes('github')
? githubServer.serverUrl
: slackServer.serverUrl;
// Execute tool
const result = await klavisClient.mcpServer.callTools({
serverUrl: serverUrl,
toolName: toolCall.function.name,
toolArgs: JSON.parse(toolCall.function.arguments),
});
// Add tool result to conversation
messages.push({
role: "tool",
tool_call_id: toolCall.id,
content: JSON.stringify(result)
});
}
} else {
// LLM finished the task
console.log(`Task completed in ${iteration + 1} iterations`);
console.log(response.choices[0].message.content);
break;
}
}
```
## Error Handling
```javascript
import { KlavisError } from 'klavis';
try {
const server = await klavisClient.mcpServer.createServerInstance({
serverName: Klavis.McpServerName.Youtube,
userId: "user123",
platformName: "MyApp"
});
} catch (error) {
if (error instanceof KlavisError) {
console.error(`Klavis Error: ${error.message}`);
} else {
console.error(`Unexpected error: ${error}`);
}
}
```
## TypeScript Types
The SDK is fully typed for better development experience:
```typescript
import { KlavisClient, Klavis } from 'klavis';
import type {
ServerInstance,
ToolsResponse,
CallToolResponse
} from 'klavis/types';
const klavisClient = new KlavisClient({ apiKey: 'your-klavis-key' });
// Type-safe server creation
const server: ServerInstance = await klavisClient.mcpServer.createServerInstance({
serverName: Klavis.McpServerName.Github,
userId: "user123",
platformName: "MyApp",
});
// Type-safe tool listing
const tools: ToolsResponse = await klavisClient.mcpServer.listTools({
serverUrl: server.serverUrl,
format: Klavis.ToolFormat.Openai
});
// Type-safe tool calling
const result: CallToolResponse = await klavisClient.mcpServer.callTools({
serverUrl: server.serverUrl,
toolName: "get_repository",
toolArgs: { owner: "octocat", repo: "Hello-World" },
});
```
## Next Steps
Complete API documentation
Explore available MCP servers
# Cursor
Source: https://docs.klavis.ai/knowledge-base/developer/cursor
Connect Klavis MCP Servers with Cursor IDE in minutes and supercharge your AI coding experience
## Quick Setup Guide
Navigate to the [Klavis home page](https://www.klavis.ai/home) and click **"MCP Server"** in the left sidebar, pick MCP Server you like.
Click the **"Create"** button next to your chosen server.
* Automatically redirected to OAuth authorization
* Sign in to your account (GitHub, Google, Slack, etc.)
* Grant necessary permissions
* Redirected back to Klavis automatically
* Prompted to enter an API key
* Follow service-specific instructions to generate key
* Paste key in the provided field
* Click **"Save"** to continue
Copy Your Server URL, open Cursor IDE settings:
* **macOS**: `Cmd + ,` or **Cursor > Settings**
* **Windows/Linux**: `Ctrl + ,` or **File > Preferences > Settings**
Paste Your Server URL to **mcp.json** file like the screenshot below
📋 **Reopen Cursor Settings** to apply the new configuration
Open Cursor Chat (`Cmd/Ctrl + L`) and start using natural language:
```text GitHub
"Create a new issue titled 'Add dark mode' with priority label"
```
```text Slack
"Send a message to #general: 'Standup meeting in 5 minutes!'"
```
```text Gmail
"Send email to john@company.com about project update"
```
```text Notion
"Create a new page called 'Meeting Notes' with today's date"
```
🎯 Cursor Chat automatically detects when to use your MCP server tools based on context - no need to specify tool names!
You're all set! Your MCP server is now integrated with Cursor IDE.
## Troubleshooting
* Double-check your Server URL for typos
* Ensure stable internet connection
* Verify authentication in Klavis dashboard
* Check Cursor IDE logs for error messages
* Try completely restarting Cursor IDE
* Re-authenticate in the Klavis dashboard
* Check if your OAuth tokens have expired
* Verify API key permissions (for API key services)
* Ensure you've granted all necessary permissions
* Limit the number of active MCP servers
* Check your internet connection speed
* Restart Cursor IDE periodically
* Contact support if issues persist
## Need Help?
Join our Discord for community support and discussions
Contact our technical support team for assistance
***
# Kiro
Source: https://docs.klavis.ai/knowledge-base/developer/kiro
Connect Klavis MCP Servers with Kiro in minutes and supercharge your AI workflow experience
## Quick Setup Guide
Navigate to the [Klavis home page](https://www.klavis.ai/home) and click **"MCP Server"** in the left sidebar, pick MCP Server you like.
Click the **"Create"** button next to your chosen server.
* Automatically redirected to OAuth authorization
* Sign in to your account (GitHub, Google, Slack, etc.)
* Grant necessary permissions
* Redirected back to Klavis automatically
* Prompted to enter an API key
* Follow service-specific instructions to generate key
* Paste key in the provided field
* Click **"Save"** to continue
Copy Your Server URL and configure Kiro with your MCP server settings.
📋 **Verify Tools Loading** - tools will automatically reload
Open Kiro and start using natural language to interact with your connected services:
```text GitHub
"Create a new issue titled 'Add dark mode' with priority label"
```
```text Slack
"Send a message to #general: 'Standup meeting in 5 minutes!'"
```
```text Gmail
"Send email to john@company.com about project update"
```
```text Notion
"Create a new page called 'Meeting Notes' with today's date"
```
🎯 Kiro automatically detects when to use your MCP server tools based on context - no need to specify tool names!
You're all set! Your MCP server is now integrated with Kiro.
## Troubleshooting
* Double-check your Server URL for typos
* Ensure stable internet connection
* Verify authentication in Klavis dashboard
* Check Kiro logs for error messages
* Try completely restarting Kiro
* Re-authenticate in the Klavis dashboard
* Check if your OAuth tokens have expired
* Verify API key permissions (for API key services)
* Ensure you've granted all necessary permissions
* Limit the number of active MCP servers
* Check your internet connection speed
* Restart Kiro periodically
* Contact support if issues persist
## Need Help?
Join our Discord for community support and discussions
Contact our technical support team for assistance
***
# Introduction
Source: https://docs.klavis.ai/knowledge-base/introduction
A collection of answers to frequently asked questions about MCP
Learn how to integrate Klavis MCP Servers with Cursor IDE for enhanced AI coding experience.
Learn how to integrate Klavis MCP Servers with Kiro for enhanced AI workflow experience.
Step-by-step guide to setting up LinkedIn OAuth application
Step-by-step guide to setting up Canva OAuth application
Step-by-step guide to setting up Xero OAuth application
# Setting Up Canva OAuth App
Source: https://docs.klavis.ai/knowledge-base/oauth/canva
Complete guide to creating and configuring a Canva OAuth application
## Prerequisites
* Canva account
* Multi-Factor Authentication (MFA) enabled on your Canva account
Make sure your account has a password. Set it up by going to Settings > Login > Password.
**Without password configured:**
**With password configured (showing MFA option):**
## Step 1: Create Canva Developer Account & Integration
1. Visit [https://developer.canva.com/](https://developer.canva.com/) and sign in with your Canva credentials
2. Navigate to **"Your integrations"** page
3. Click **"Create an integration"** and fill out the form:
* **Integration type**: Choose between "Public" (available to all users after review) or "Private" (team only)
* **Integration name**: Choose a descriptive name
* Accept Canva's Developer Terms
## Step 2: Configure Integration Settings
1. Under **"Configuration"** → **"Configure your integration"**, set the following:
* **Integration name**: Add your application name
* **Client ID**: Make note of this value for later use
* **Generate secret**: Click to generate and securely save your Client Secret
## Step 3: Set Required Scopes
Klavis Canva MCP Server uses the following OAuth scopes: `app:read app:write asset:read asset:write brandtemplate:content:read brandtemplate:meta:read comment:read comment:write design:content:read design:content:write design:meta:read design:permission:read design:permission:write folder:read folder:write folder:permission:read folder:permission:write profile:read`
1. Under **"Scopes"** → **"Set the scopes"**, configure the required permissions as shown in the screenshot below:
## Step 4: Configure Authentication & Redirect URLs
1. Under **"Authentication"** → **"Add Authentication"**, add redirect URL:
* `https://api.klavis.ai/oauth/canva/callback`
## Step 5: Submit for Review (Public Integrations Only)
If you created a "Private" integration, you can skip this step. Private integrations are immediately available to your team.
For public integrations:
1. Complete all required configuration sections
2. Click **"Submit for Review"**
3. Wait for Canva's approval process
## Step 6: Integration Review Status
Once submitted, your integration will show "In Review" status. You'll receive email notifications about the review progress, and you will be asked to complete a questionnaire in the Jira ticket from the email.
You have successfully created a Canva OAuth application! You now have your Client ID and Client Secret ready for integration with Klavis AI.
## (Optional) Step 7: White Labeling
White labeling allows you to customize the OAuth experience with your own branding instead of Klavis AI's.
If you want to use your own Canva OAuth application with custom branding:
1. **Configure White Labeling**: Go to [https://www.klavis.ai/home/white-label](https://www.klavis.ai/home/white-label)
2. **Add Your Credentials**: Enter your Canva **Client ID** and **Client Secret** from Step 2
3. **Set Redirect URI**: Use `https://api.klavis.ai/oauth/canva/callback` or your custom callback URL
4. **Initiate OAuth**: Use your client ID when starting the OAuth flow:
```javascript
const authUrl = `https://api.klavis.ai/oauth/canva/authorize?instance_id=${instanceId}&client_id=${yourClientId}`;
```
For detailed white labeling implementation and code examples, see our [OAuth & White Labeling guide](/documentation/oauth_white_label).
## Resources
* [Canva Connect API Documentation](https://www.canva.dev/docs/connect/)
* [Canva OAuth 2.0 Authentication Guide](https://www.canva.dev/docs/connect/authentication/)
* [Canva Setting up Multi-Factor Authentication](https://www.canva.com/help/login-verification/)
# Setting Up LinkedIn OAuth App
Source: https://docs.klavis.ai/knowledge-base/oauth/linkedin
Complete guide to creating and configuring a LinkedIn OAuth application
## Prerequisites
* LinkedIn personal account
* LinkedIn company page (required for app creation with admin access)
## Step 1: Create LinkedIn Developer Account & App
1. Visit [https://developer.linkedin.com/](https://developer.linkedin.com/) and sign in
2. Click **"Create App"** and fill out the form:
* **App name**: Choose a descriptive name
* **LinkedIn Page**: Associate with your company page
* **App logo**: Upload 100x100px PNG (recommended)
* Accept LinkedIn's API Terms of Use
## Step 2: Configure OAuth Settings
1. Go to the **"Auth"** tab in your application dashboard
2. Add redirect URLs: `https://api.klavis.ai/oauth/linkedin/callback`
Here is an example of Klavis AI OAuth app configuration:
## Step 3: Request Scopes
Klavis LinkedIn MCP Server uses the following OAuth scopes: `openid,profile,email,w_member_social`
1. Go to **"Products"** tab and request **"Shared on LinkedIn"** and **"Sign In with LinkedIn using OpenID Connect"**
2. Once approved, you can see **Client ID** and **Client Secret** from the **"Auth"** tab
Here is an example of Klavis AI OAuth app configuration:
You have successfully created a LinkedIn OAuth application! You now have your Client ID and Client Secret ready for integration with Klavis AI.
## (Optional) Step 4: White Labeling
White labeling allows you to customize the OAuth experience with your own branding instead of Klavis AI's.
If you want to use your own LinkedIn OAuth application with custom branding:
1. **Configure White Labeling**: Go to [https://www.klavis.ai/home/white-label](https://www.klavis.ai/home/white-label)
2. **Add Your Credentials**: Enter your LinkedIn **Client ID** and **Client Secret** from Step 3
3. **Set Redirect URI**: Use `https://api.klavis.ai/oauth/linkedin/callback` or your custom callback URL
4. **Initiate OAuth**: Use your client ID when starting the OAuth flow:
```javascript
const authUrl = `https://api.klavis.ai/oauth/linkedin/authorize?instance_id=${instanceId}&client_id=${yourClientId}`;
```
For detailed white labeling implementation and code examples, see our [OAuth & White Labeling guide](/documentation/oauth_white_label).
## Resources
* [LinkedIn OAuth Documentation](https://docs.microsoft.com/en-us/linkedin/shared/authentication/authorization-code-flow)
# Setting Up Xero OAuth App
Source: https://docs.klavis.ai/knowledge-base/oauth/xero
Complete guide to creating and configuring a Xero OAuth application
## Prerequisites
* Xero account (personal or business)
* Access to Xero Developer Portal
## Step 1: Create Xero Developer Account
1. Visit [https://developer.xero.com/](https://developer.xero.com/)
2. Click **"Get started for free"** or **"Login"** if you already have an account
3. Sign in with your Xero account or create a new developer account
## Step 2: Create a New App
1. Once logged in, go to your developer dashboard
2. Click **"New app"** or **"Create an app"**
3. Choose **"Web App"** as the integration type
4. Fill in the app details:
* **App name**: Your application name (e.g., your brand name)
* **Company or application URL**: Your company website
* **Privacy policy URL**: Your privacy policy URL
* **Terms of service URL**: Your terms of service URL
Normally, the redirect URI should be set to: `https://api.klavis.ai/oauth/xero/callback`
## Step 3: Configure OAuth Settings
Klavis Xero MCP Server uses the following OAuth scopes: `accounting.transactions.read accounting.transactions offline_access`
1. **Redirect URIs**: Add your callback URL:
* `https://api.klavis.ai/oauth/xero/callback`
2. **Scopes**: Select the scopes your application needs:
* `offline_access` (required for refresh tokens)
* `accounting.transactions.read` (for reading transaction data)
* `accounting.transactions` (for transaction operations)
* Add any additional scopes based on your needs
You can connect up to 25 organisations to uncertified apps. [Read more about uncertified app limits](https://developer.xero.com/documentation/guides/oauth2/limits/).
## Step 4: Get Your Credentials
After creating the app, you'll see:
* **Client ID**: Copy this value
* **Client Secret**: Generate and copy this value (keep it secure!)
You have successfully created a Xero OAuth application! You now have your Client ID and Client Secret ready for integration with Klavis AI.
### Xero Token Expiration
* **Access Tokens**: Expire after 30 minutes
* **Refresh Tokens**: Expire after 60 days (rolling expiration - resets when used)
**Klavis handles all token management automatically** - we refresh your tokens before they expire so you maintain seamless access to your Xero data without any interruption.
## (Optional) Step 5: White Labeling
White labeling allows you to customize the OAuth experience with your own branding instead of Klavis AI's.
If you want to use your own Xero OAuth application with custom branding:
1. **Configure White Labeling**: Go to [https://www.klavis.ai/home/white-label](https://www.klavis.ai/home/white-label)
2. **Add Your Credentials**: Enter your Xero **Client ID** and **Client Secret** from Step 4
3. **Set Redirect URI**: Use `https://api.klavis.ai/oauth/xero/callback` or your custom callback URL
4. **Initiate OAuth**: Use your client ID when starting the OAuth flow:
```javascript
const authUrl = `https://api.klavis.ai/oauth/xero/authorize?instance_id=${instanceId}&client_id=${yourClientId}`;
```
For detailed white labeling implementation and code examples, see our [OAuth & White Labeling guide](/documentation/oauth_white_label).
## Resources
* [Xero Developer Documentation](https://developer.xero.com/documentation/)
* [Xero OAuth 2.0 Authentication Guide](https://developer.xero.com/documentation/guides/oauth2/overview/)
* [Xero API Scopes Reference](https://developer.xero.com/documentation/guides/oauth2/scopes/)
* [Xero OAuth Limits for Uncertified Apps](https://developer.xero.com/documentation/guides/oauth2/limits/)
 ## Option 2: Copy-paste llms-full.txt
You'll find a `llms-full.txt` file at the root level of this documentation. It is a compiled text document designed to provide context for LLMs.
Copy the following content and paste it in the prompt for your coding assistant: [https://docs.klavis.ai/llms-full.txt](https://docs.klavis.ai/llms-full.txt)
## Option 3: Use the documentation's built-in assistant
This documentation portal has a built-in AI assistant. Simply click "✨**Ask AI**" at the top of any page to use it.
## Option 2: Copy-paste llms-full.txt
You'll find a `llms-full.txt` file at the root level of this documentation. It is a compiled text document designed to provide context for LLMs.
Copy the following content and paste it in the prompt for your coding assistant: [https://docs.klavis.ai/llms-full.txt](https://docs.klavis.ai/llms-full.txt)
## Option 3: Use the documentation's built-in assistant
This documentation portal has a built-in AI assistant. Simply click "✨**Ask AI**" at the top of any page to use it.
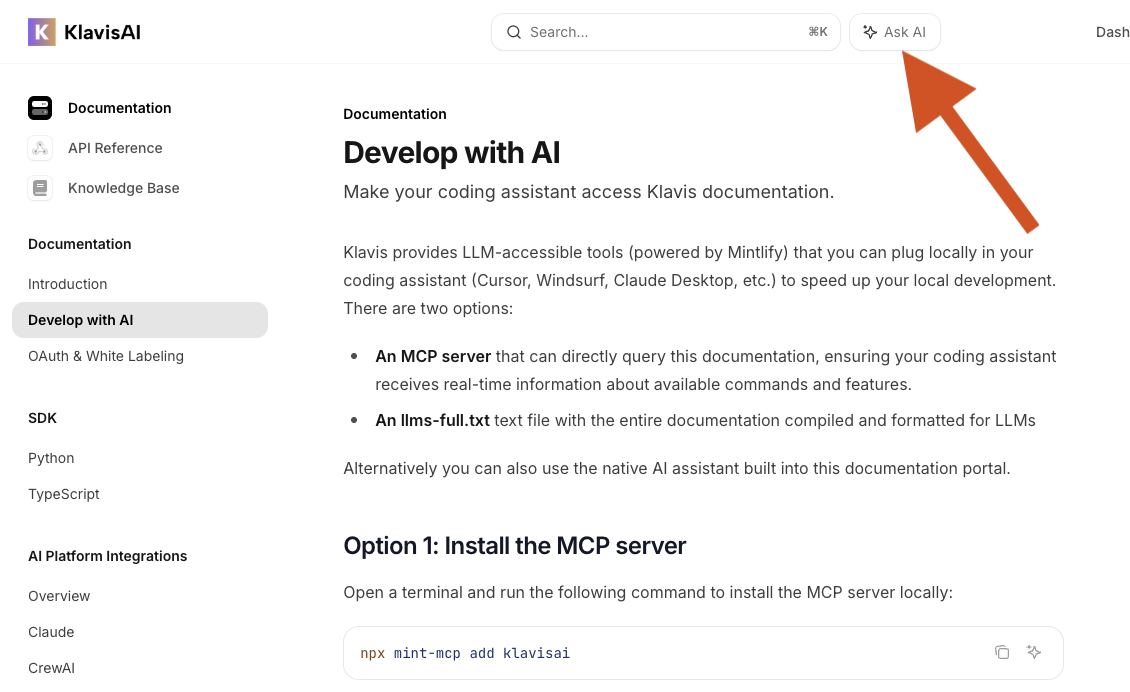 # Claude
Source: https://docs.klavis.ai/documentation/ai-platform-integration/claude
Learn how to build AI agents that integrate Anthropic's Claude with Klavis MCP Servers for enhanced functionality
[](https://colab.research.google.com/github/klavis-ai/klavis/blob/main/examples/claude/Use_Klavis_with_Claude.ipynb)
# Claude + Klavis AI Integration
This tutorial demonstrates how to use Anthropic's Claude with tool use (function calling) with Klavis MCP (Model Context Protocol) servers.
## Prerequisites
Before we begin, you'll need:
# Claude
Source: https://docs.klavis.ai/documentation/ai-platform-integration/claude
Learn how to build AI agents that integrate Anthropic's Claude with Klavis MCP Servers for enhanced functionality
[](https://colab.research.google.com/github/klavis-ai/klavis/blob/main/examples/claude/Use_Klavis_with_Claude.ipynb)
# Claude + Klavis AI Integration
This tutorial demonstrates how to use Anthropic's Claude with tool use (function calling) with Klavis MCP (Model Context Protocol) servers.
## Prerequisites
Before we begin, you'll need:
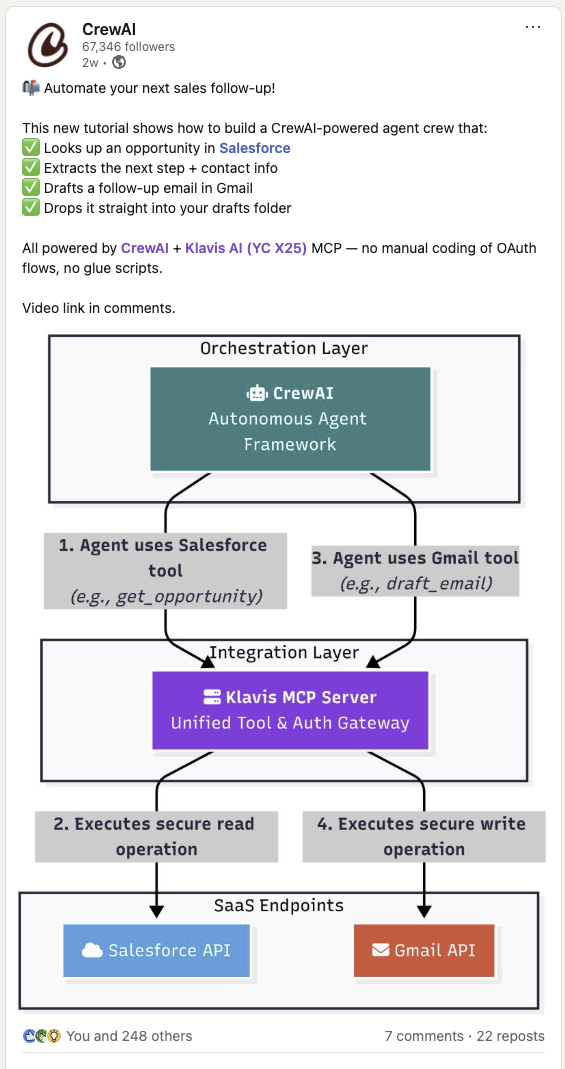 ## Prerequisites
Before we begin, you'll need:
## Prerequisites
Before we begin, you'll need:
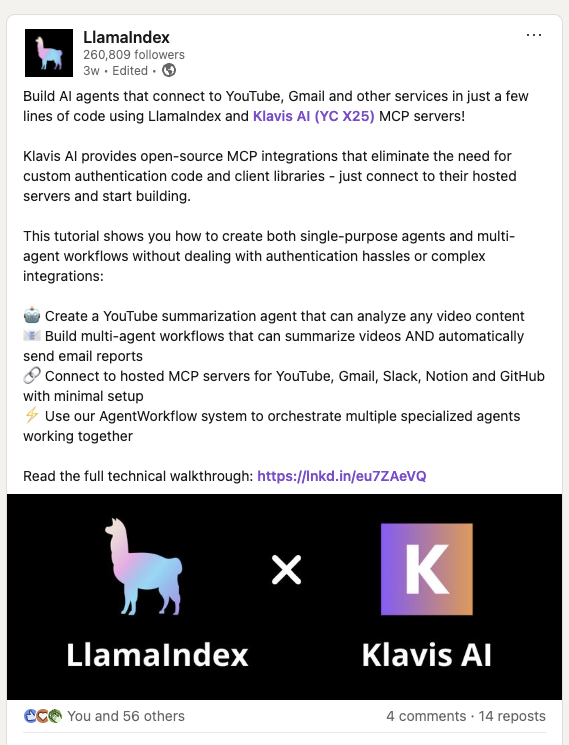 ## Prerequisites
Before we begin, you'll need:
## Prerequisites
Before we begin, you'll need:
 # Mastra + Klavis AI Integration
This tutorial demonstrates how to use Mastra, an open-source TypeScript framework for building AI agents, with Klavis MCP (Model Context Protocol) servers.
## Prerequisites
Before we begin, you'll need:
# Mastra + Klavis AI Integration
This tutorial demonstrates how to use Mastra, an open-source TypeScript framework for building AI agents, with Klavis MCP (Model Context Protocol) servers.
## Prerequisites
Before we begin, you'll need:
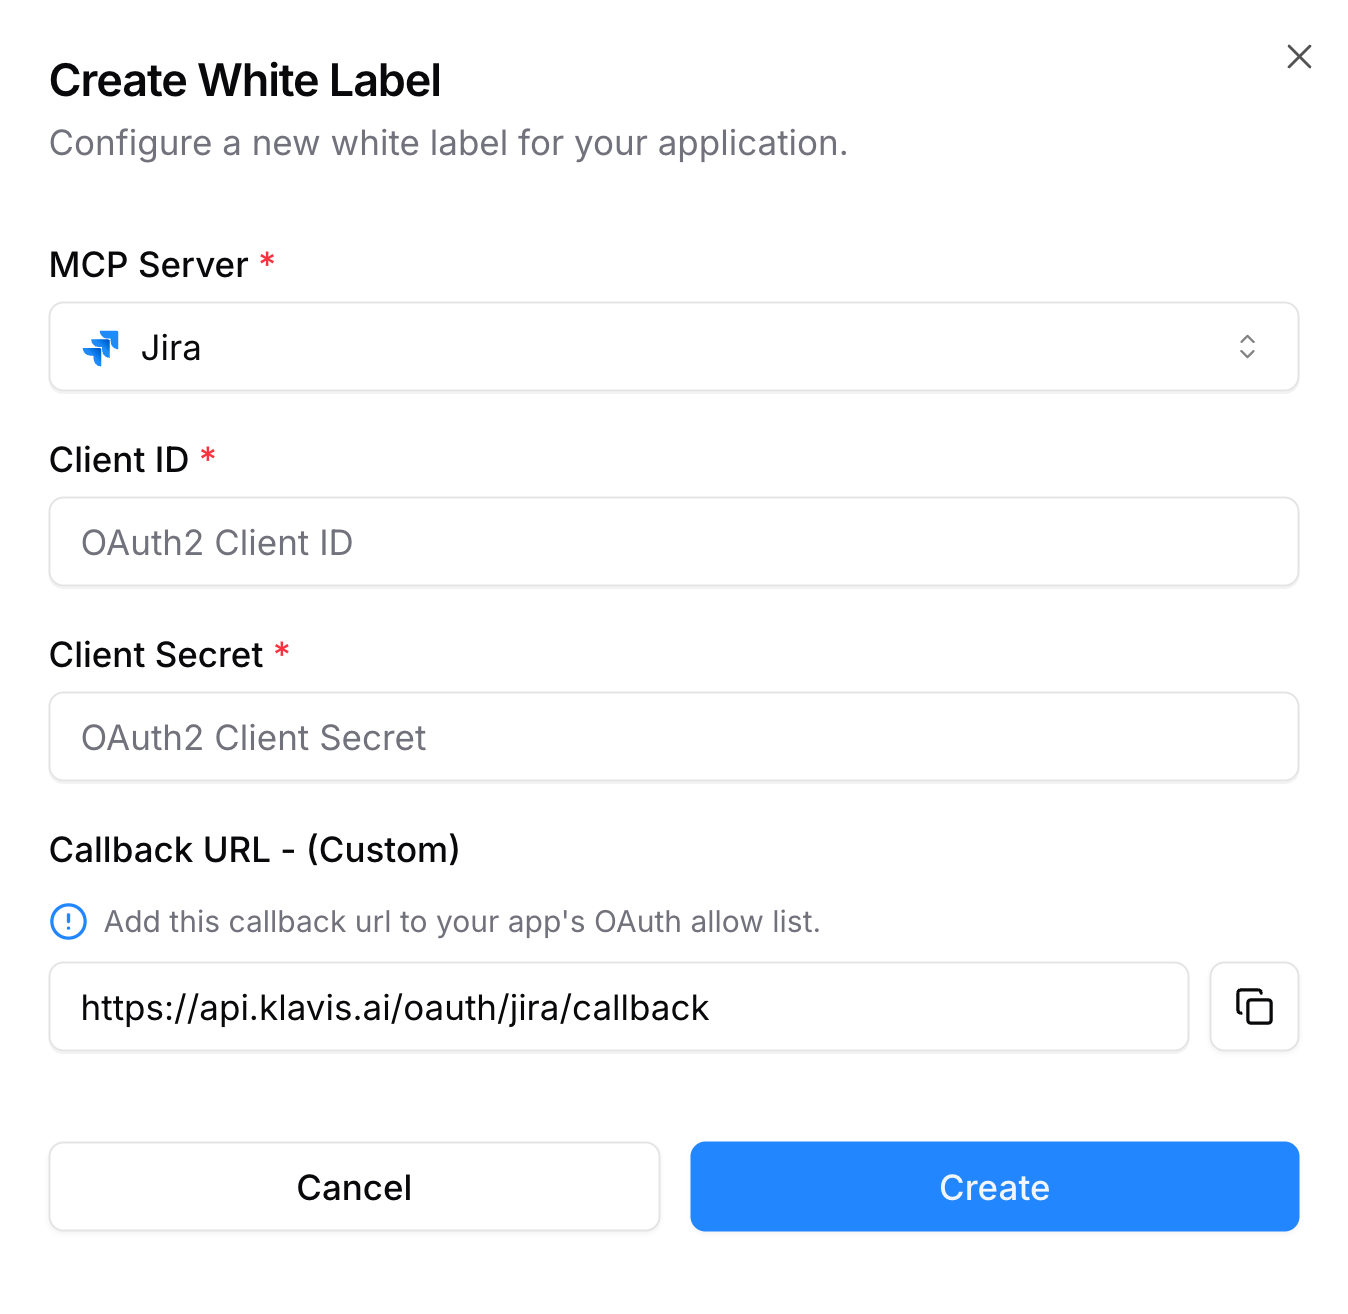

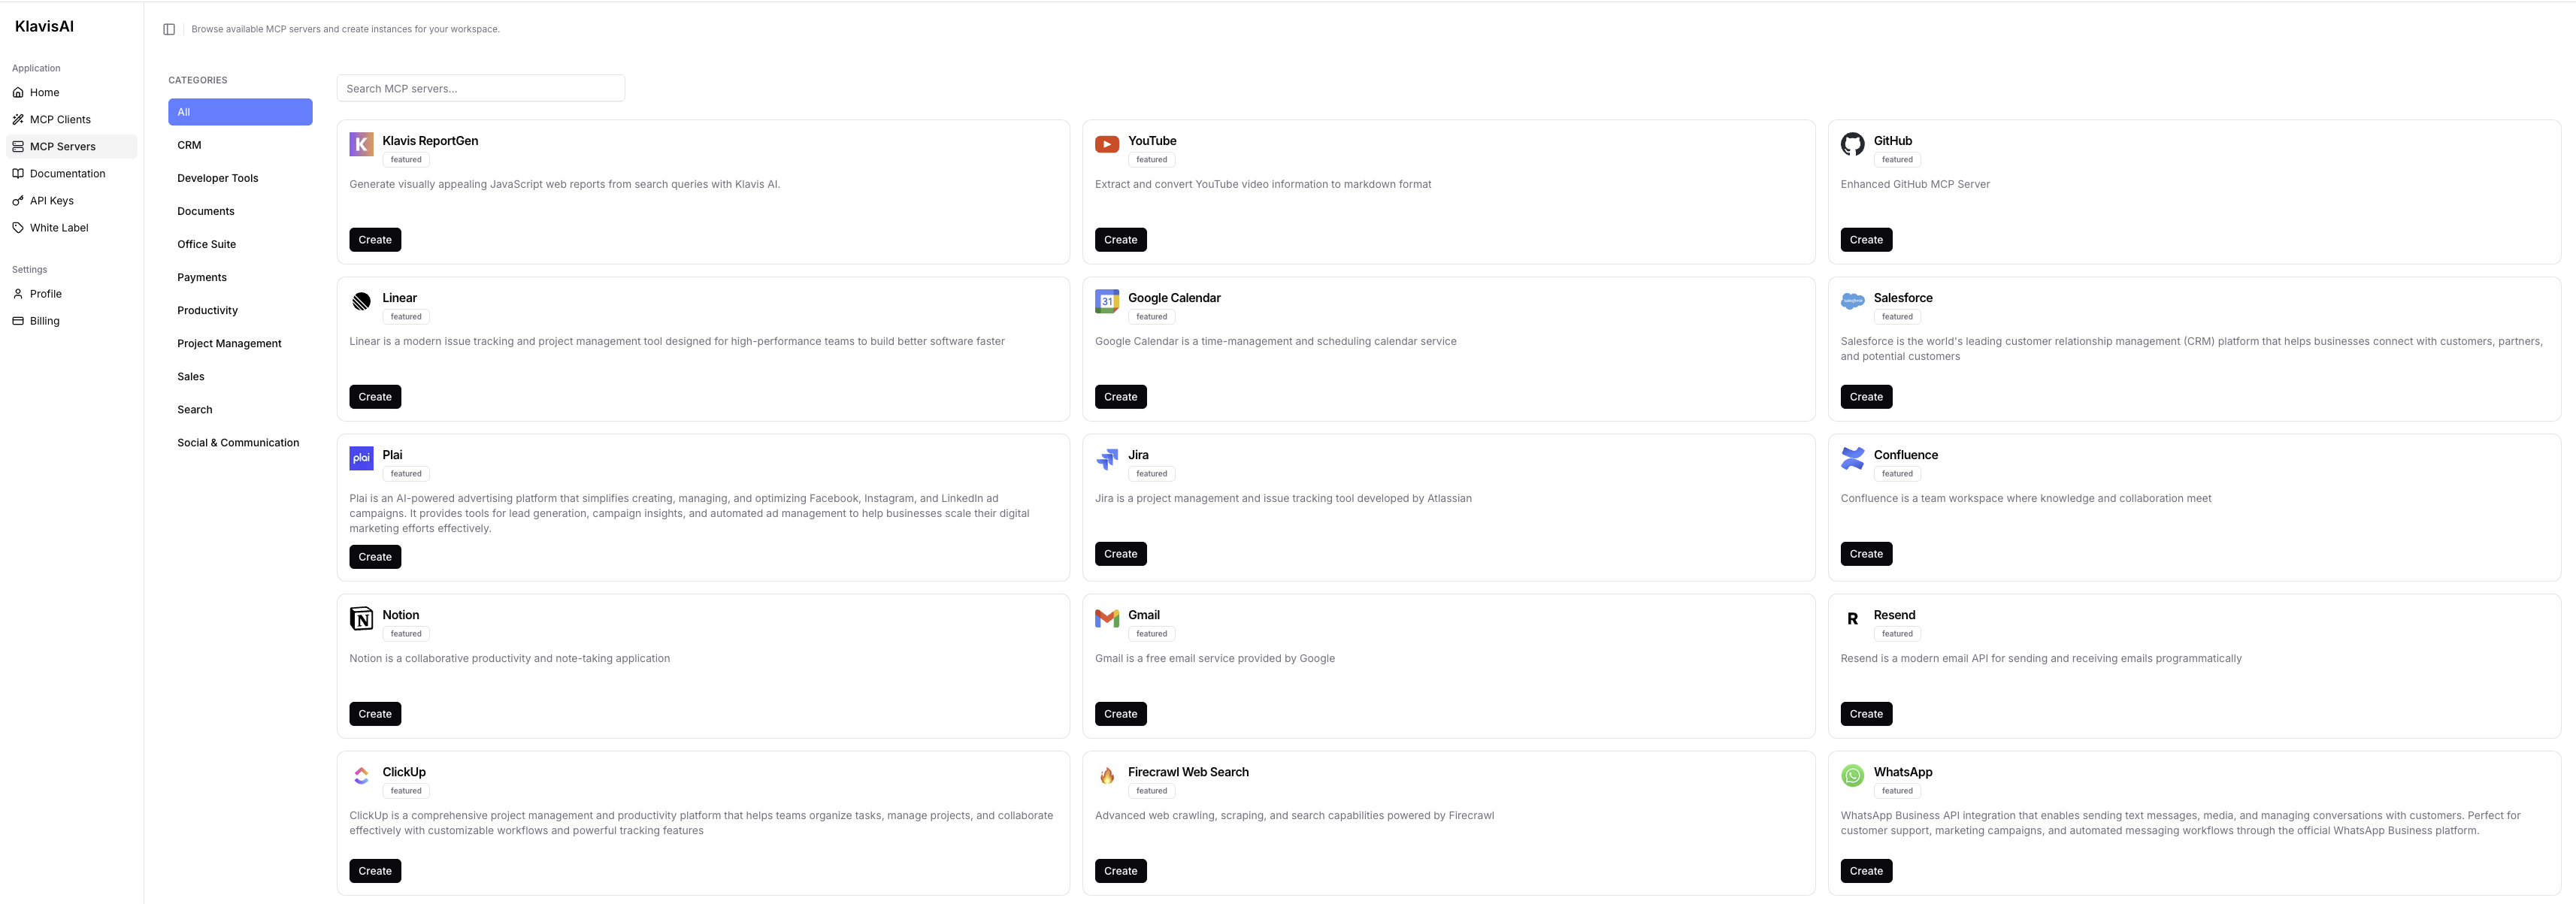 Click the **"Create"** button next to your chosen server.
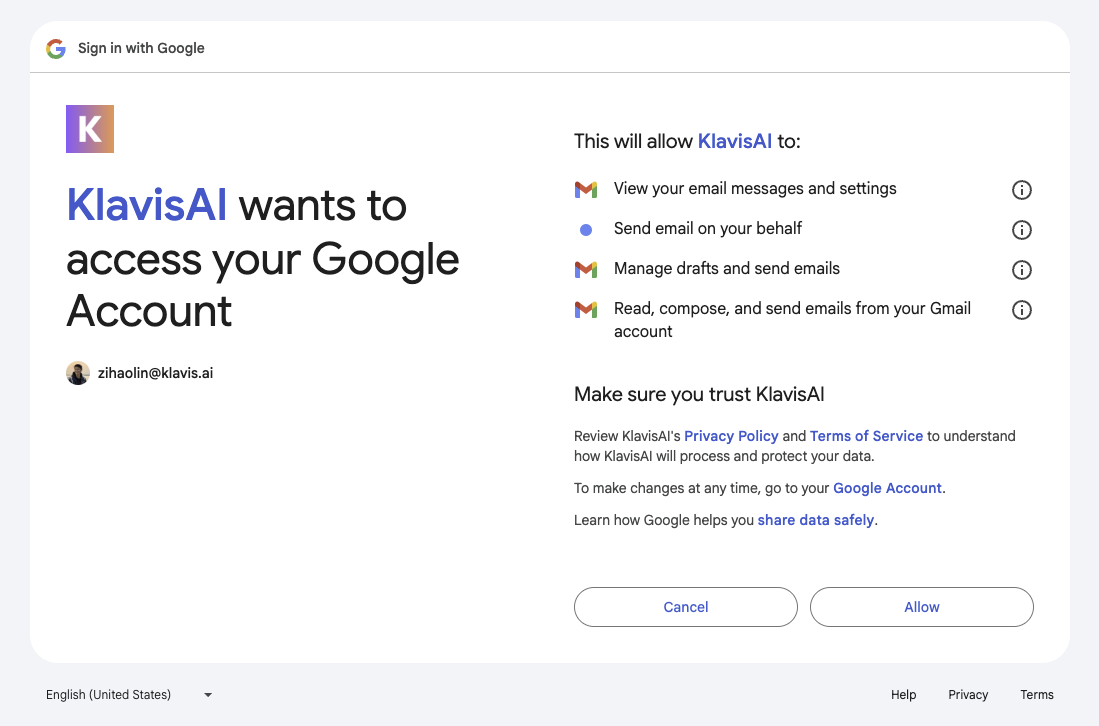


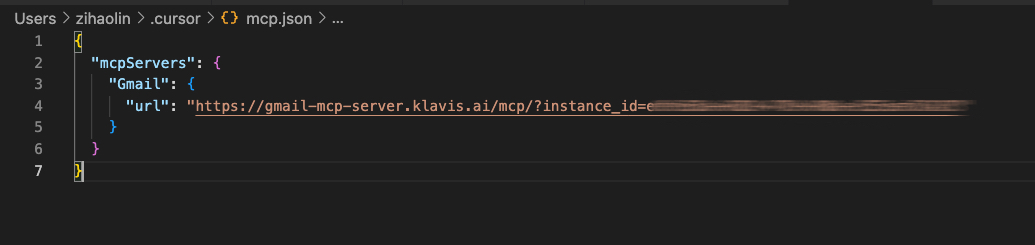

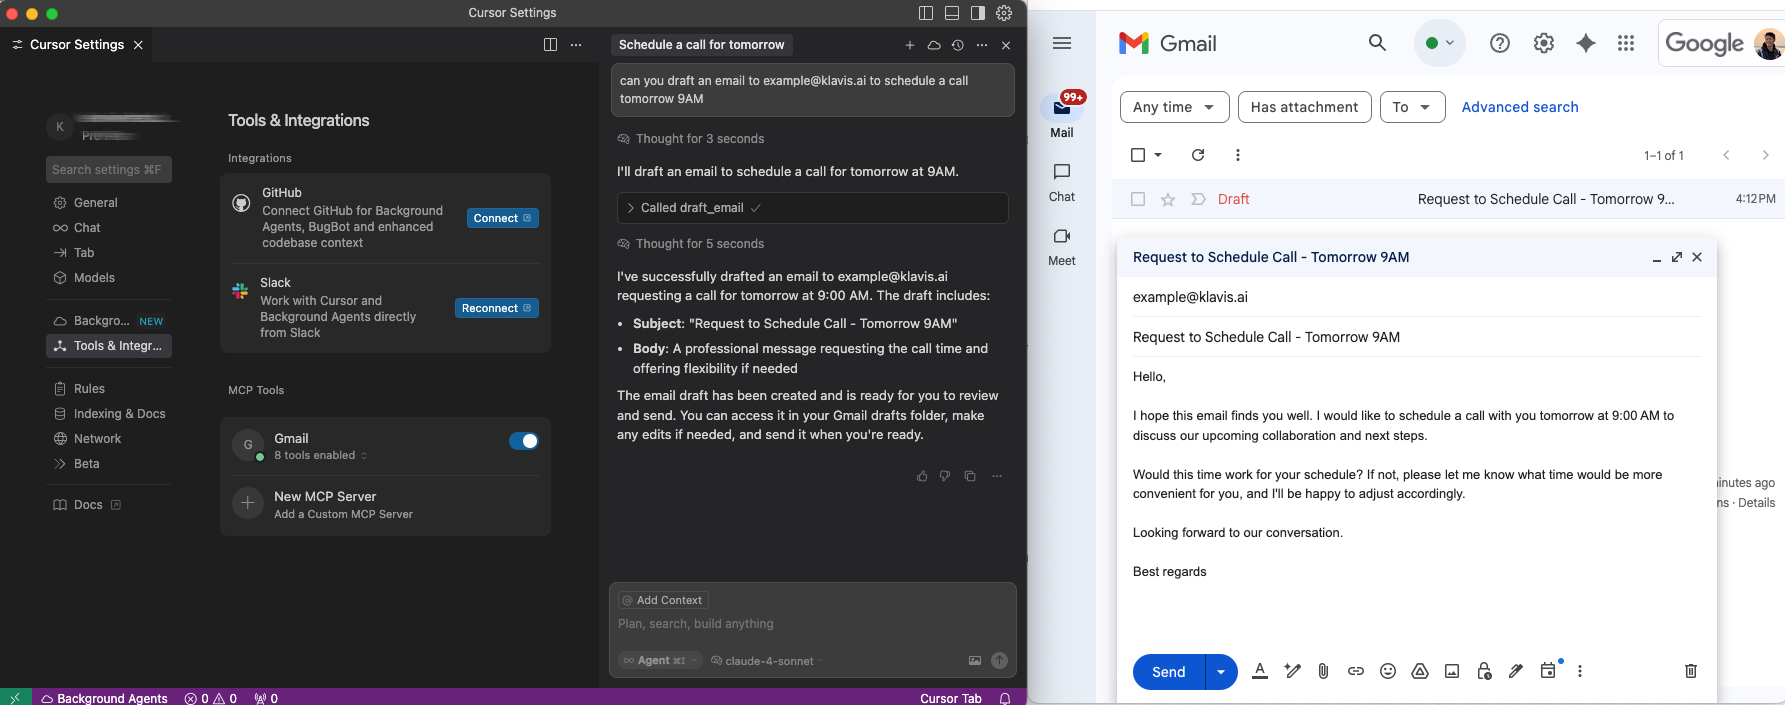 Open Cursor Chat (`Cmd/Ctrl + L`) and start using natural language:

 Click the **"Create"** button next to your chosen server.
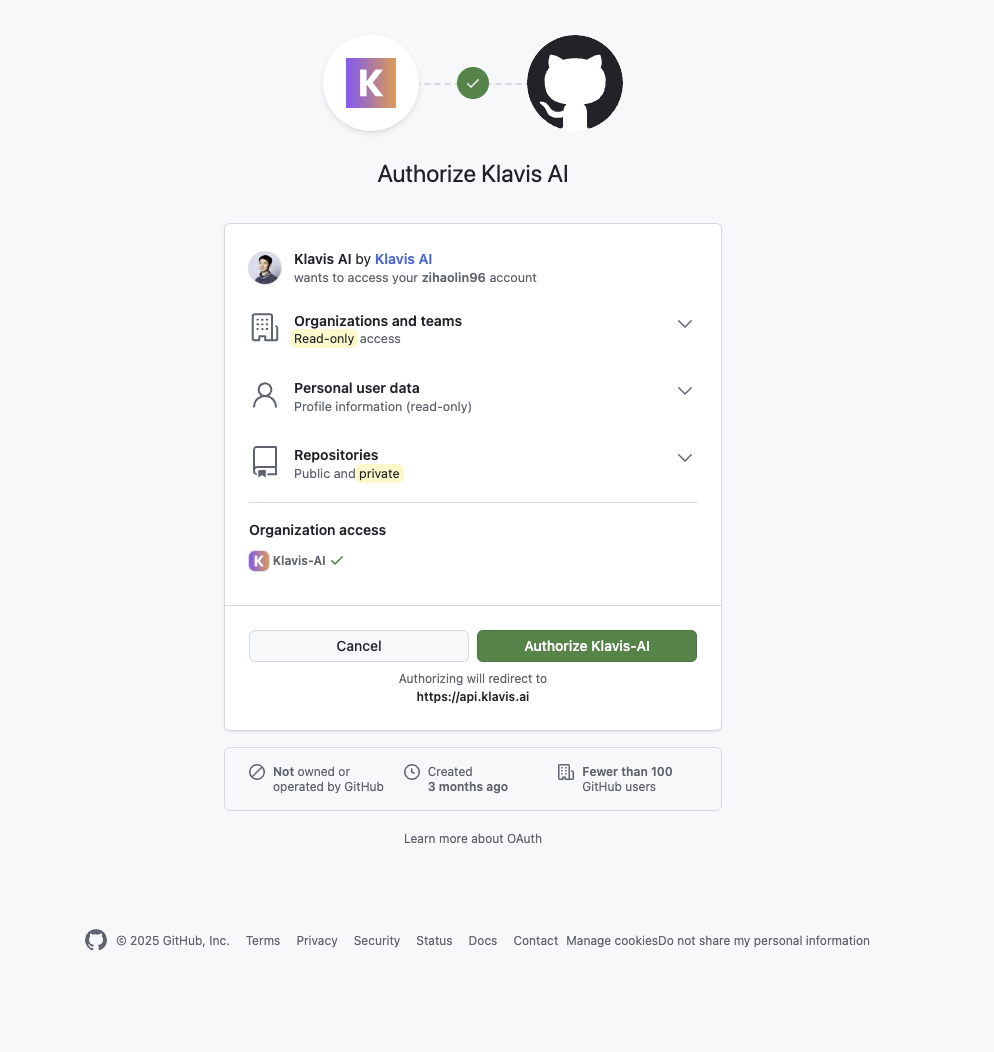

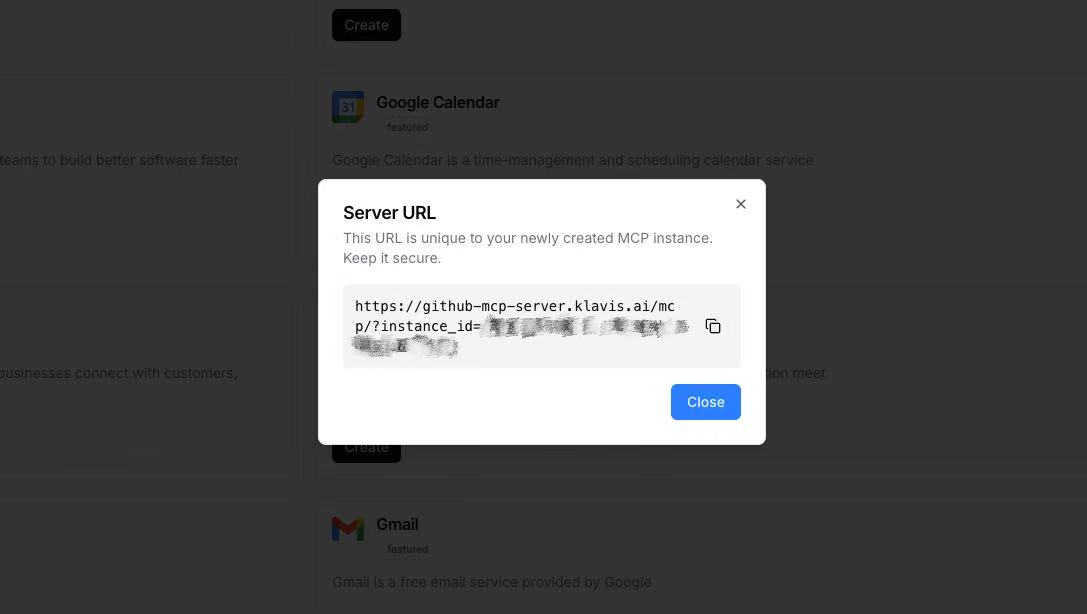
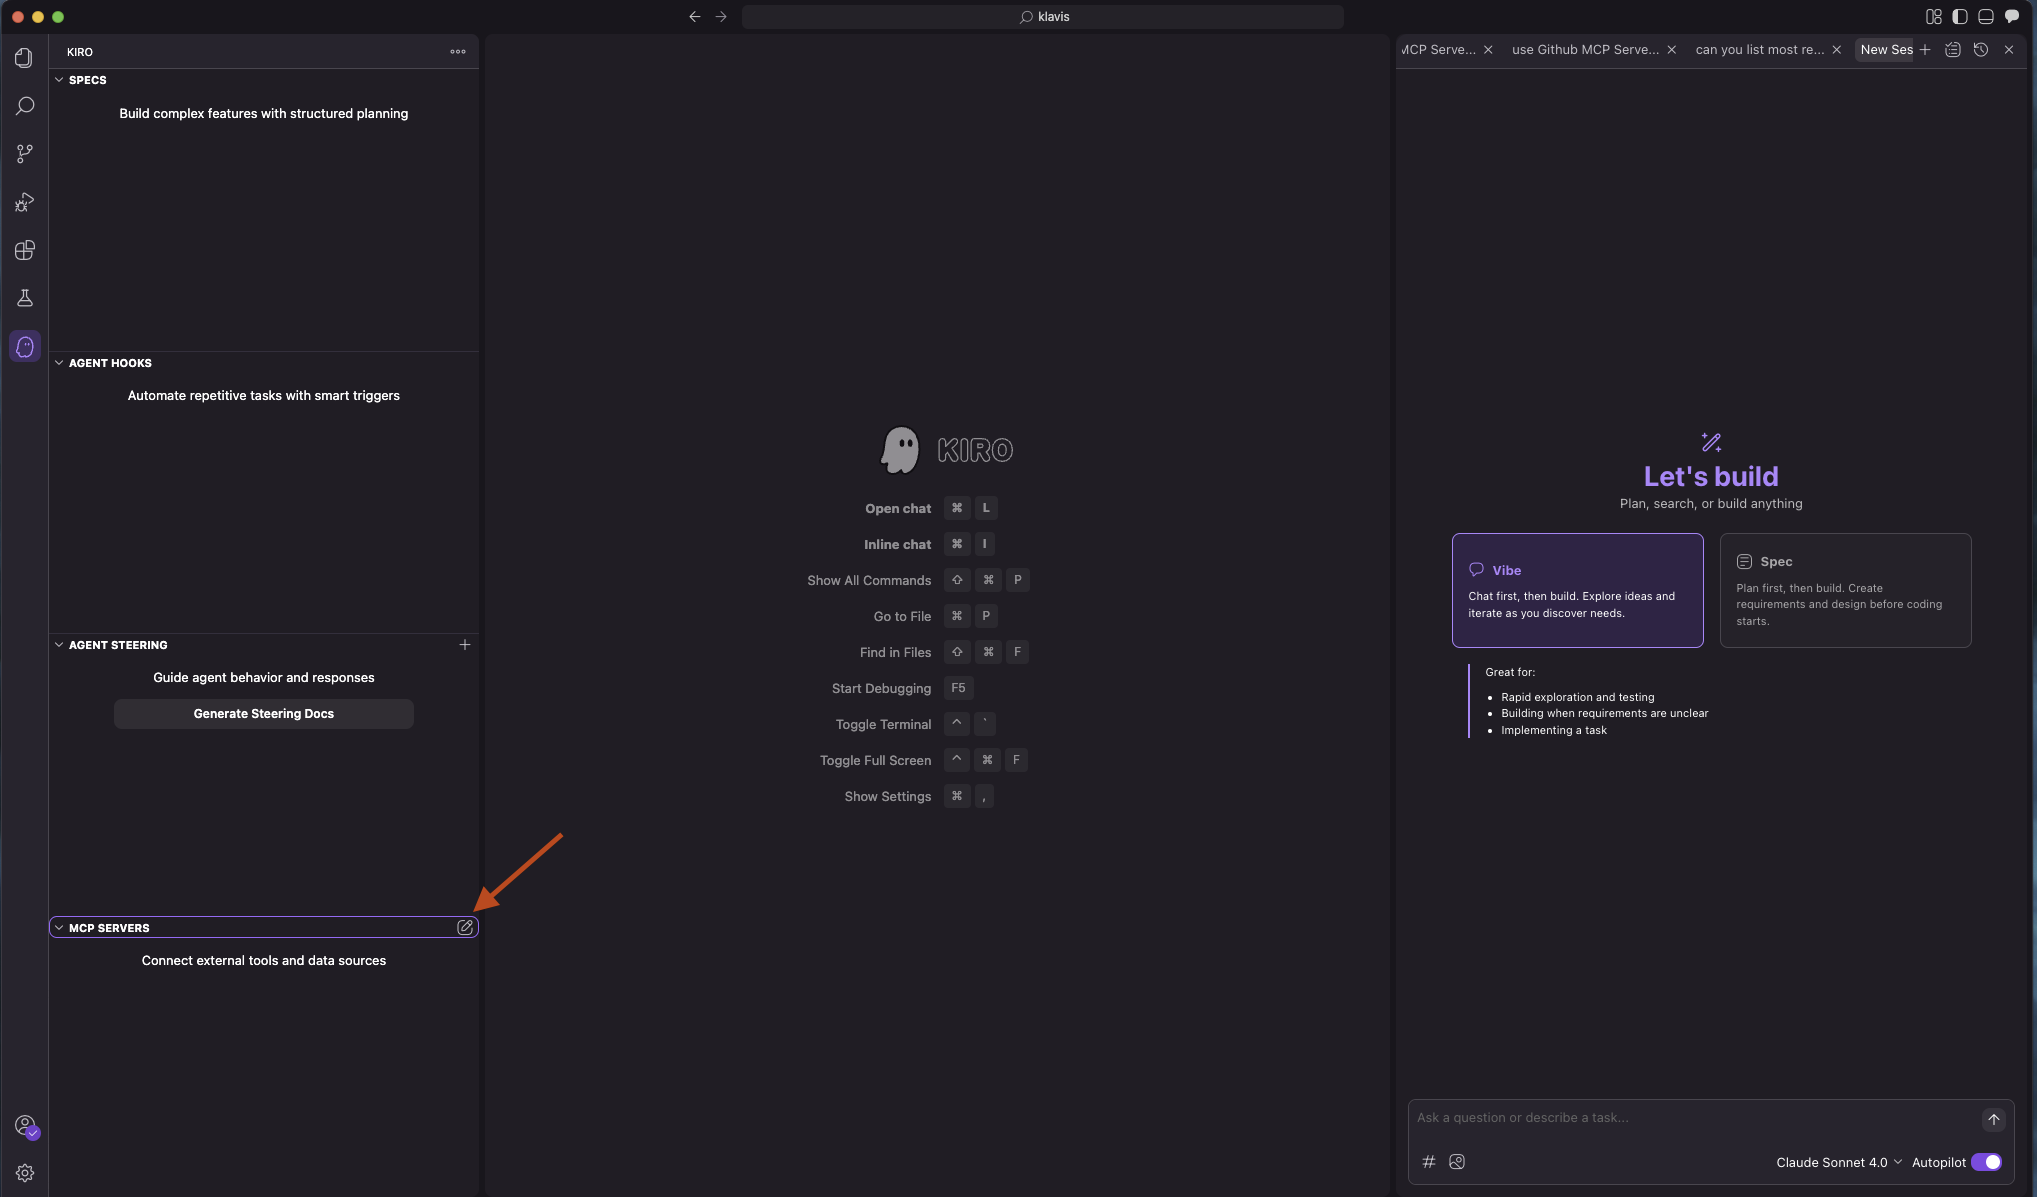
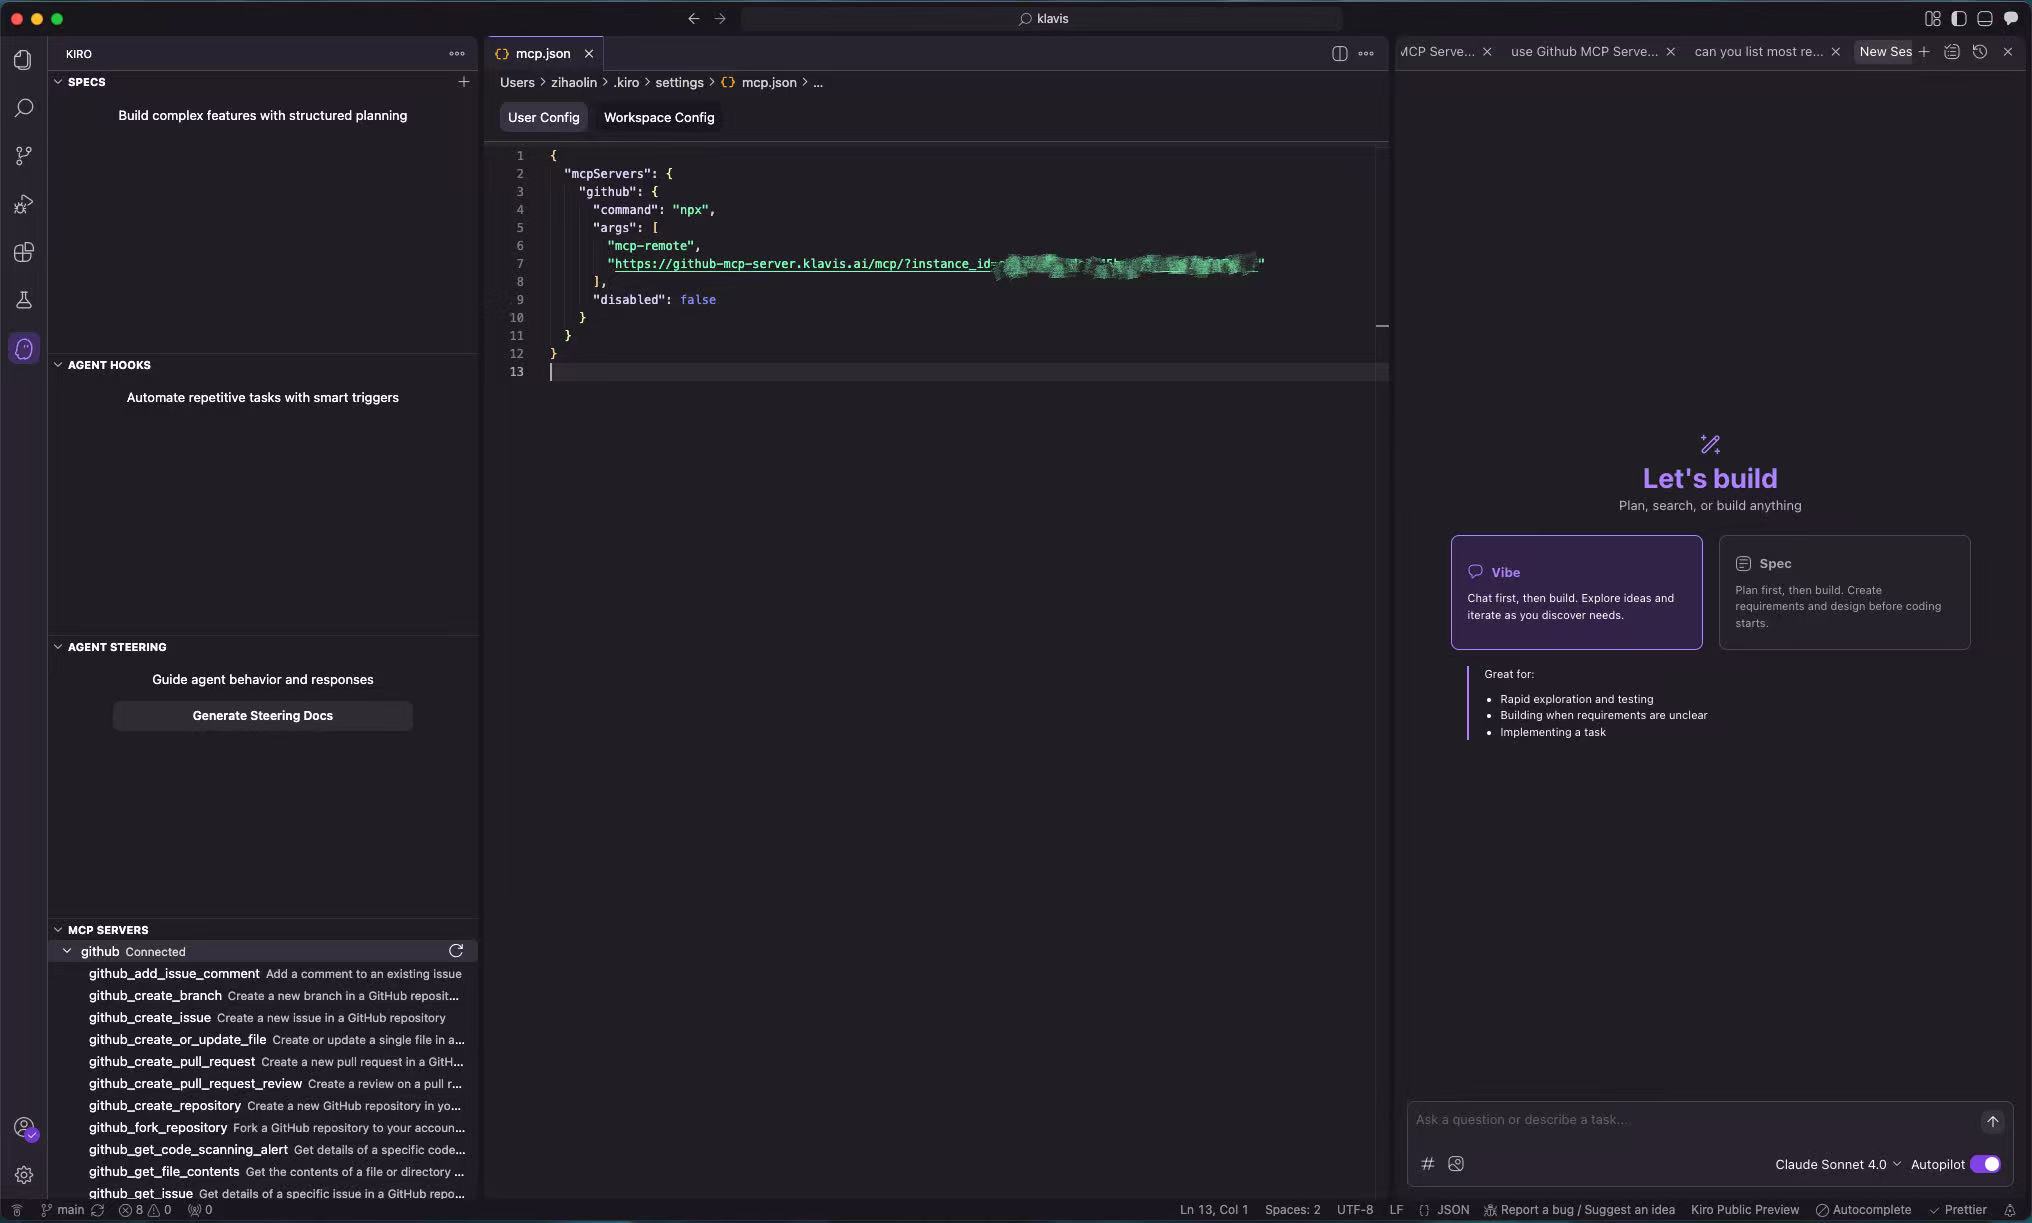
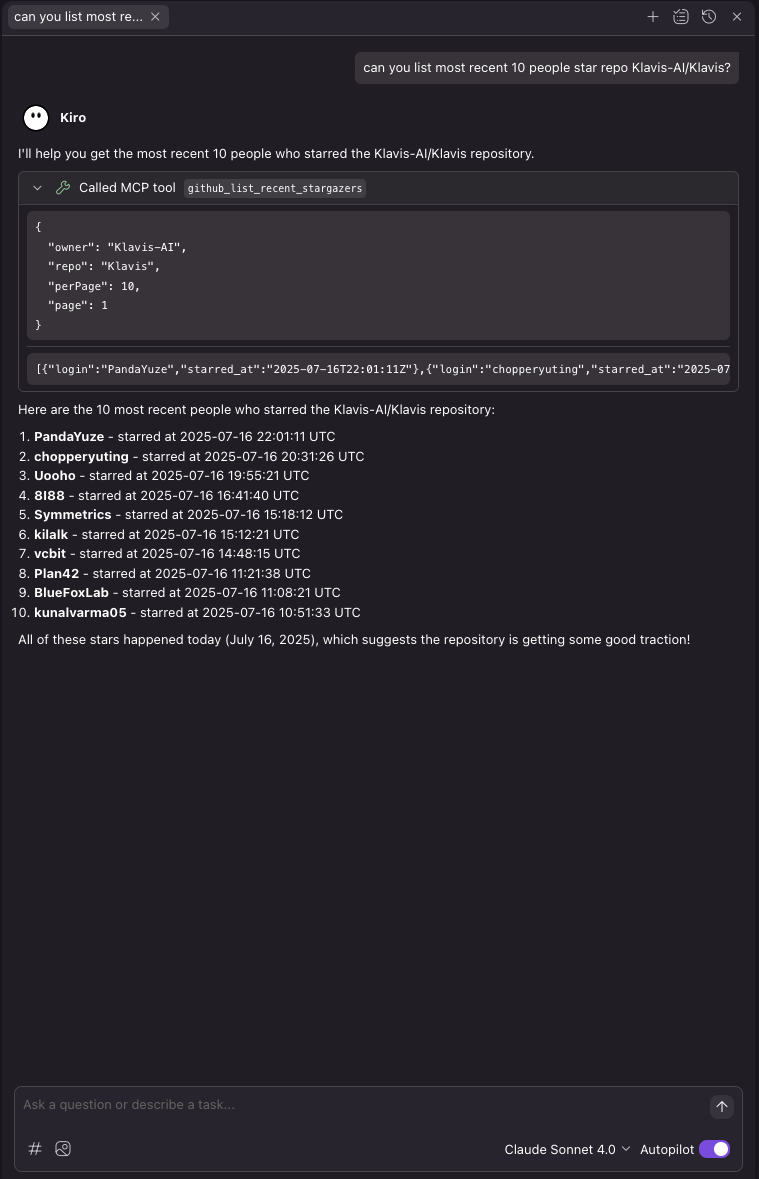
 **With password configured (showing MFA option):**
 ## Step 1: Create Canva Developer Account & Integration
1. Visit [https://developer.canva.com/](https://developer.canva.com/) and sign in with your Canva credentials
2. Navigate to **"Your integrations"** page
3. Click **"Create an integration"** and fill out the form:
* **Integration type**: Choose between "Public" (available to all users after review) or "Private" (team only)
* **Integration name**: Choose a descriptive name
* Accept Canva's Developer Terms
## Step 2: Configure Integration Settings
1. Under **"Configuration"** → **"Configure your integration"**, set the following:
* **Integration name**: Add your application name
* **Client ID**: Make note of this value for later use
* **Generate secret**: Click to generate and securely save your Client Secret
## Step 1: Create Canva Developer Account & Integration
1. Visit [https://developer.canva.com/](https://developer.canva.com/) and sign in with your Canva credentials
2. Navigate to **"Your integrations"** page
3. Click **"Create an integration"** and fill out the form:
* **Integration type**: Choose between "Public" (available to all users after review) or "Private" (team only)
* **Integration name**: Choose a descriptive name
* Accept Canva's Developer Terms
## Step 2: Configure Integration Settings
1. Under **"Configuration"** → **"Configure your integration"**, set the following:
* **Integration name**: Add your application name
* **Client ID**: Make note of this value for later use
* **Generate secret**: Click to generate and securely save your Client Secret
 ## Step 3: Set Required Scopes
 ## Step 4: Configure Authentication & Redirect URLs
1. Under **"Authentication"** → **"Add Authentication"**, add redirect URL:
* `https://api.klavis.ai/oauth/canva/callback`
## Step 4: Configure Authentication & Redirect URLs
1. Under **"Authentication"** → **"Add Authentication"**, add redirect URL:
* `https://api.klavis.ai/oauth/canva/callback`
 ## Step 5: Submit for Review (Public Integrations Only)
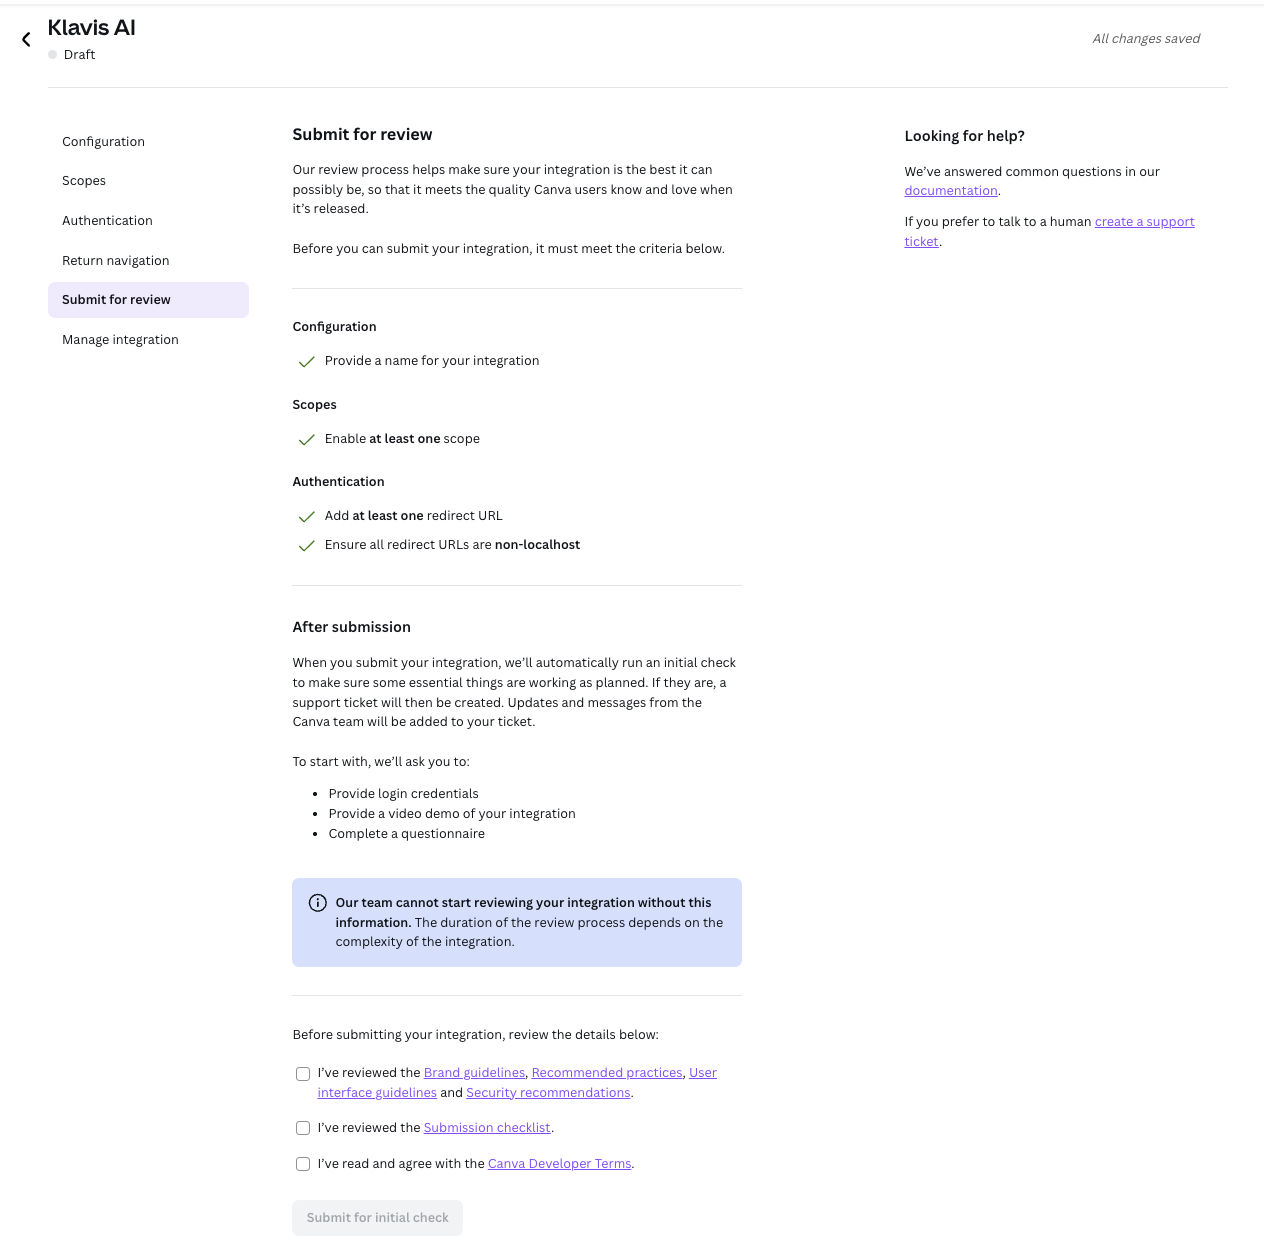 ## Step 6: Integration Review Status
Once submitted, your integration will show "In Review" status. You'll receive email notifications about the review progress, and you will be asked to complete a questionnaire in the Jira ticket from the email.
## Step 6: Integration Review Status
Once submitted, your integration will show "In Review" status. You'll receive email notifications about the review progress, and you will be asked to complete a questionnaire in the Jira ticket from the email.
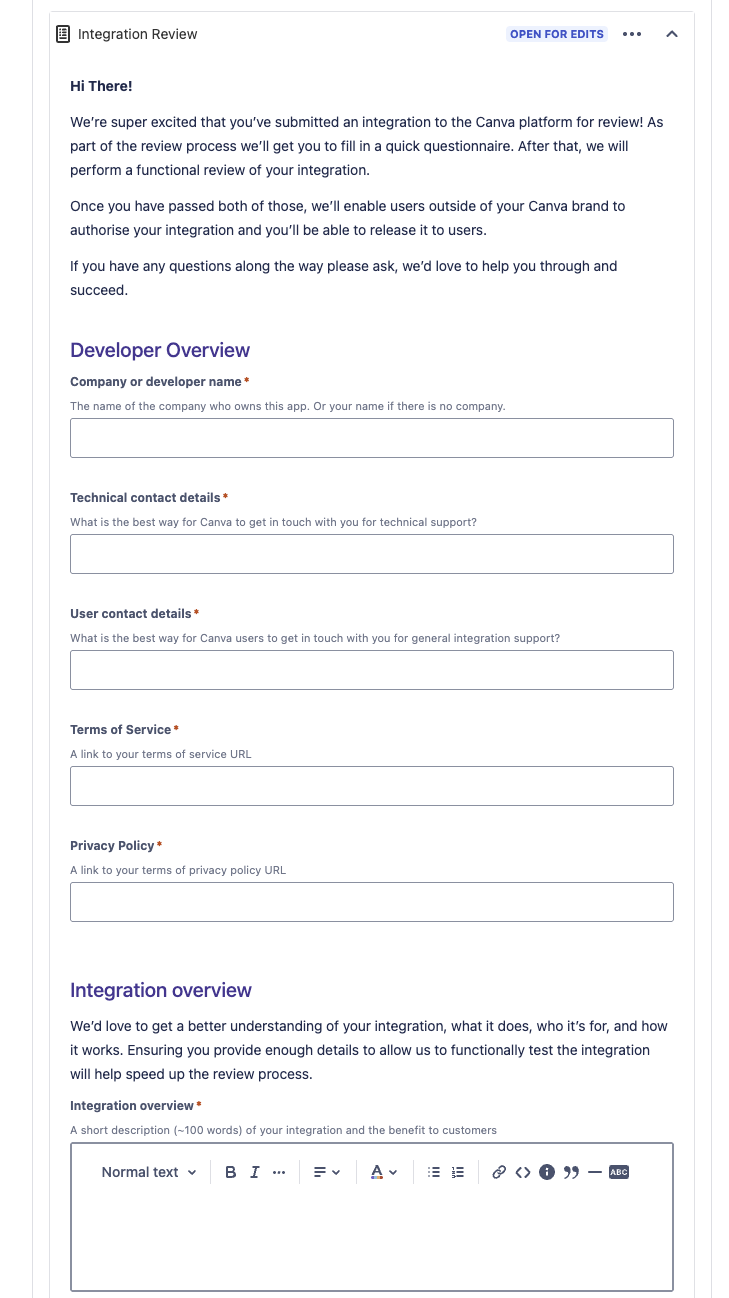
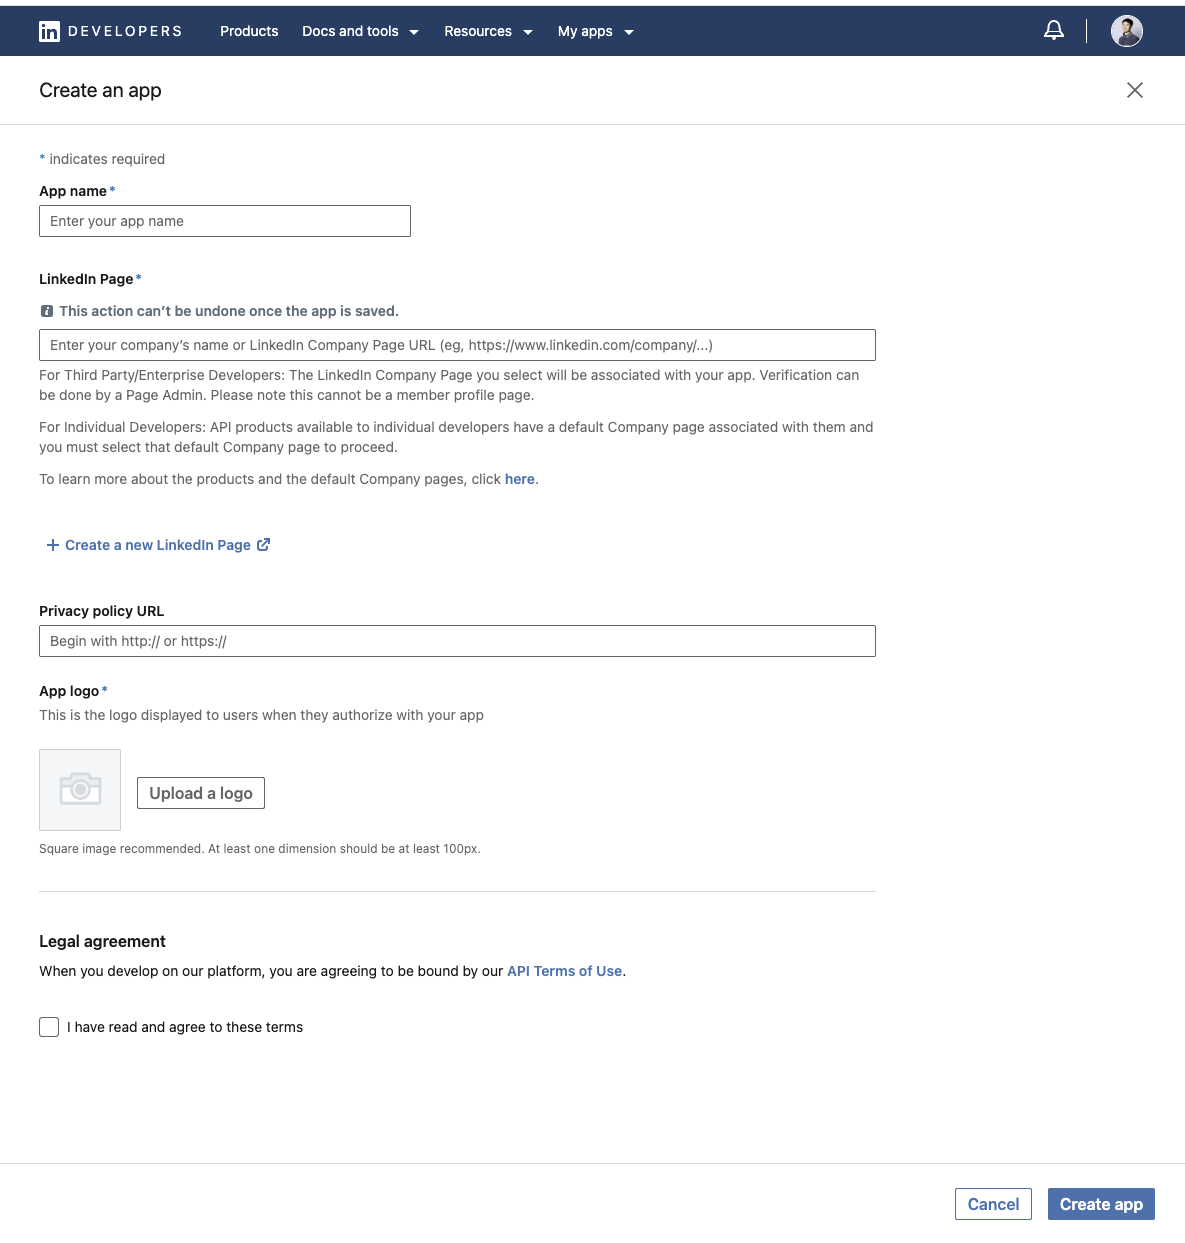 ## Step 2: Configure OAuth Settings
1. Go to the **"Auth"** tab in your application dashboard
2. Add redirect URLs: `https://api.klavis.ai/oauth/linkedin/callback`
Here is an example of Klavis AI OAuth app configuration:
## Step 2: Configure OAuth Settings
1. Go to the **"Auth"** tab in your application dashboard
2. Add redirect URLs: `https://api.klavis.ai/oauth/linkedin/callback`
Here is an example of Klavis AI OAuth app configuration:
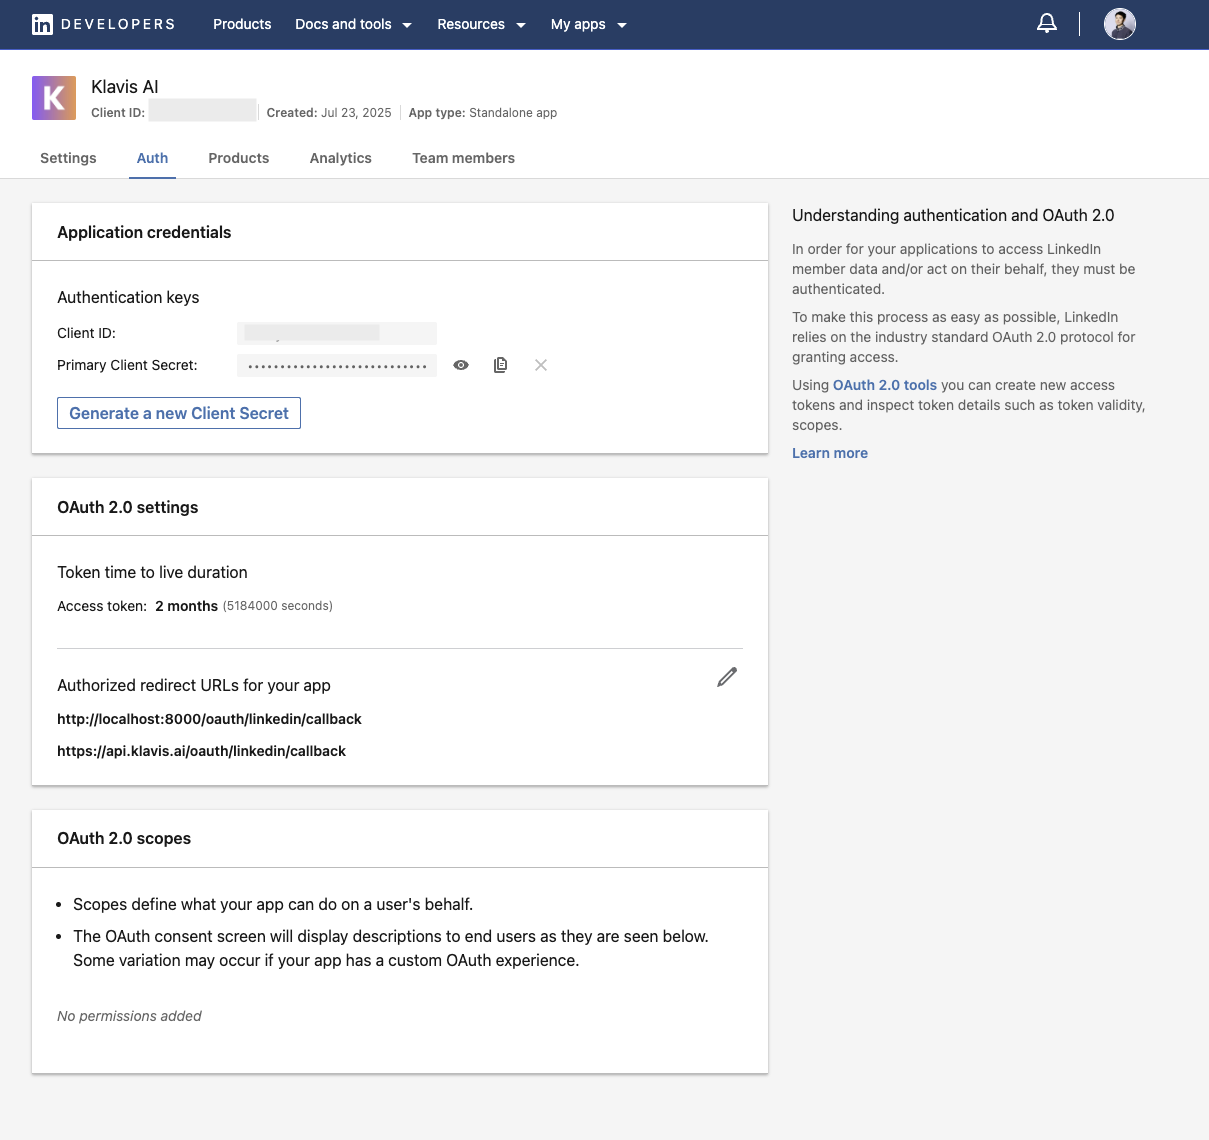 ## Step 3: Request Scopes
 ## Step 2: Create a New App
1. Once logged in, go to your developer dashboard
2. Click **"New app"** or **"Create an app"**
3. Choose **"Web App"** as the integration type
4. Fill in the app details:
* **App name**: Your application name (e.g., your brand name)
* **Company or application URL**: Your company website
* **Privacy policy URL**: Your privacy policy URL
* **Terms of service URL**: Your terms of service URL
## Step 2: Create a New App
1. Once logged in, go to your developer dashboard
2. Click **"New app"** or **"Create an app"**
3. Choose **"Web App"** as the integration type
4. Fill in the app details:
* **App name**: Your application name (e.g., your brand name)
* **Company or application URL**: Your company website
* **Privacy policy URL**: Your privacy policy URL
* **Terms of service URL**: Your terms of service URL